Most seals are built to be “set and forget,” but floors are rarely so cooperative. Whether you’ve got a Raven, Pemko, or Schlegel-branded automatic door bottom, adjusting it to fit your kitchen tile or bedroom carpet just right means less frustration down the line. Don’t worry if you’ve never touched one before—this process is way less intimidating than it sounds, and you won’t need a PhD in door hardware.
What Is an Automatic Door Bottom Seal—and Why Does It Matter?
An automatic door bottom seal is a clever little gadget that attaches to the bottom edge of your door. The magic happens when you close the door: a spring-loaded mechanism drops a flexible seal down to make contact with your floor or threshold, then lifts it out of the way the moment you open the door. Basically, it’s like having an invisible bouncer that only shows up when you need it to block out the elements.
You might be wondering—why not just use a standard door sweep or weatherstrip? Here’s the thing: those solutions can drag along the floor every time you open and close the door, eventually wearing out or scratching your floors. Automatic door bottoms solve that issue by only engaging when the door is shut. The result is a smoother door operation, longer-lasting seals, and often a tighter seal against the floor.
But this system works best when it’s dialed in for your unique floor. A poorly adjusted seal might leave a gap, making it useless for keeping drafts or noise out. On the flip side, a seal that’s set too tight could scrape your floor or make the door hard to open. Getting that “just right” fit is what makes your door feel solid and your space feel well-put-together.
Types of Automatic Door Bottoms and How They Attach
Automatic door bottom seals come in a few main styles. Most commonly, you’ll run into surface-mounted models, which screw directly onto the face of your door, and mortised versions, which slide into a slot cut along the bottom edge of the door. There’s also semi-mortised types that blend both approaches.
- Surface-mounted: Easiest to install. Usually, you’ll see a slim metal or plastic housing on the inside face of the door near the bottom. Great for retrofitting old doors or avoiding any major woodworking.
- Mortise-mounted: These sit flush inside the bottom edge of the door—nothing visible except the slim seal itself. They’re neat, but require careful cutting, usually at the time of door installation or replacement.
- Semi-mortised: A hybrid setup—partially recessed, partially visible. Sometimes used for specialty doors or to balance looks and function.
Regardless of the style, the brand you’ve got (Raven, Pemko, Schlegel, etc.) won’t usually change the adjustment process much. The important thing is knowing how your particular model attaches to the door, since you’ll need access to the adjustment screw or mechanism to make changes.
Knowing When to Adjust Your Door Bottom Seal
Let me explain why you might need to tweak that seal in the first place. Maybe you’ve just replaced old carpet with hardwood, so there’s now a bigger gap under the door. Or maybe the house has settled and the floor is no longer even—one side of the door hits tile, the other floats over a gap. Even temperature and humidity changes can affect how a door sits in its frame.
Signs you need to adjust:
- You can feel a draft or see light under the closed door.
- The seal drags or makes the door hard to open.
- The door bottom doesn’t sit flush along the whole width—one end touches, the other hovers.
- The seal isn’t making a good contact over a new threshold or uneven flooring.
It’s tempting to ignore small drafts or a faint scraping sound, but over time, these annoyances can mean higher energy bills or damaged floors. Plus, a well-adjusted seal just feels nicer—nobody wants their door acting stubborn every time they go in or out.
How Automatic Door Bottom Seals Work: The Basics
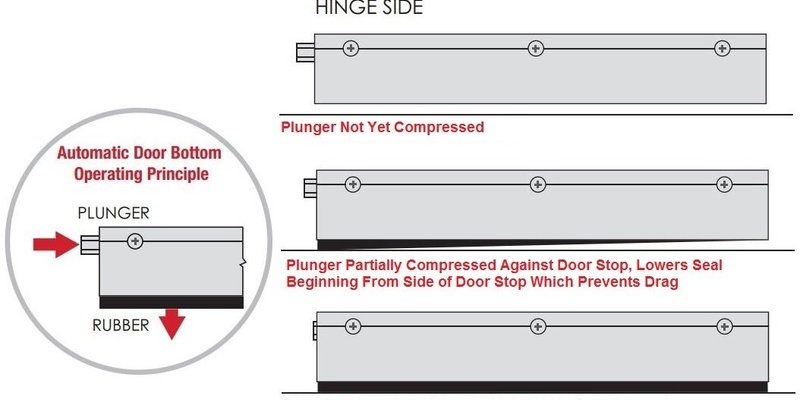
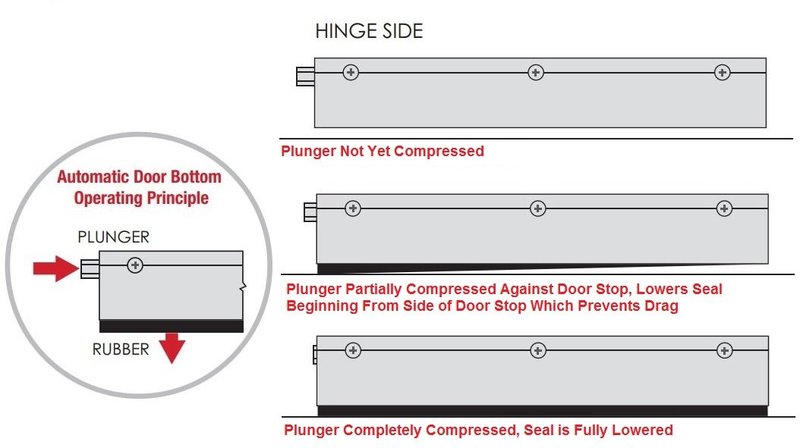
Understanding the mechanism helps take away any intimidation. Most automatic door bottom seals use a simple “actuator button” on one end of the seal—usually the hinge side. When the door closes, this button gets pressed against the door frame or stop, triggering an internal spring to push the flexible seal (often a silicone or neoprene strip) straight down toward the floor.
Here’s what usually happens, step by step:
- Open door: Actuator is not pressed. Seal is lifted up inside its housing, completely out of the way.
- Close door: Actuator button hits frame, triggering the mechanism.
- Seal drops evenly, making contact with the floor or threshold—creating a tight seal against air, dust, and noise.
- Open door again: Spring retracts the seal, so nothing scrapes the floor as the door moves.
The key to a good seal is even contact along the length of the door. Too much force, and your door feels stiff. Too little, and you might as well not have a seal at all. When floors are uneven or flooring types change (say, from tile to carpet), the adjustment screw lets you “tune” the drop so you get just enough pressure—no more, no less.
Step-by-Step: Adjusting an Automatic Door Bottom Seal for Your Flooring
So, you’re ready to actually make the adjustment. Grab a Phillips screwdriver and maybe a flashlight—it’ll make your life easier. Whether you’re working with a Raven, Pemko, or another leading brand, the process is similar.
- Locate the adjustment screw: Usually found on the edge or end of the seal. Some models have the screw hidden behind a small cap or cover. You want the door open for this step.
- Test the seal: Close the door and watch from the inside. Is the seal touching the floor evenly? Try sliding a sheet of paper under different sections to see if it’s snug.
- Adjust the drop: Turn the screw clockwise to lower the seal (making it drop further) or counterclockwise to raise it (less drop). Go slowly—a quarter turn at a time.
- Check again: Close the door, check the fit, and repeat as needed. You want a snug fit with no drag. If your flooring changes height across the door, aim for the best compromise—firm contact where it matters most.
- Troubleshooting: If the seal is crooked or drops unevenly, check for debris caught in the housing, or make sure the entire seal is properly seated. In rare cases, you may need to remove and reposition the whole assembly if the floor slope is extreme.
Honestly, it’s a little bit trial and error the first time, but you’ll get the hang of it after a couple of tweaks. Once set, most seals stay put for years—unless you redo your floors or notice a new draft.
Special Scenarios: Carpet, Tile, and Uneven Surfaces
Not all floors are created equal—and some call for extra patience. Thick carpet can compress a lot, which means you don’t want to set the seal too tight or it’ll feel like dragging your door through mud every time. Start with a minimal drop, test, and only increase pressure if light or air is still getting through.
For tile, hardwood, or vinyl, the seal usually needs to rest lightly on the surface. A little “kiss” of pressure is just right—you shouldn’t need to force the door shut or hear a scraping noise. If your floor slopes, try adjusting the seal so the low side is just touching, and let the high side flex a bit. Sometimes, you might have to pick your battles and aim for the best average fit.
Some homes have thresholds or transition strips that complicate things. Make sure the seal meets the highest point cleanly, without leaving a gap. If one end of the seal won’t reach, check if your model has an “end drop” adjustment—some premium brands offer this. Otherwise, you might need to upgrade to a more flexible seal or consult the manufacturer’s troubleshooting guide.
If your door opens over two different types of flooring—say, tile in the kitchen and carpet in the hall—it’s okay if the seal doesn’t make perfect contact across every inch. Focus on covering the biggest gaps, then fine-tune for comfort and ease of use.
Common Problems and How to Fix Them
Sometimes, things don’t go as planned. The seal might stick, squeak, or just refuse to adjust the way you want. Here are a few common headaches and their fixes:
- Seal won’t drop or retract: Check for dirt or debris inside the housing. Remove the seal (if possible) and clean it with a dry cloth. Lightly lubricate the moving parts with silicone spray if the manufacturer recommends it.
- Seal drops unevenly: The actuator screw might be too tight on one end. Try loosening or tightening it in small amounts. If the problem persists, the internal mechanism could be jammed—a replacement may be needed.
- Seal drags on floor: Turn the adjustment screw counterclockwise to reduce the drop. Make small changes and test the door after each adjustment.
- Drafts or gaps remain: Double-check your adjustment. If you see light, the seal isn’t making full contact. You might need a wider seal, or to add a threshold for the seal to press against.
If you’ve just installed a brand-new automatic door bottom and nothing seems to work, it’s worth checking you’ve chosen the right model for your door thickness and floor type. Some universal seals have a wider adjustment range, while brand-specific models are tailored for their own doors.
Alternative Solutions: When an Automatic Door Bottom Isn’t Enough
Here’s the honest truth—not every situation is fixable with a single seal adjustment. If your door is warped, your floors have a serious slope, or the gap is bigger than the seal can handle, you might need to use additional solutions.
- Add a threshold: Installing a raised threshold under the door can help the seal make better contact, especially on uneven floors.
- Use a double-seal approach: Add weatherstripping along the door frame, or use a traditional door sweep alongside the automatic seal for extra protection.
- Replace the door or seal: If you’re fighting an uphill battle with a badly fitted door, sometimes a new, properly sized door or a longer-drop seal is the right fix.
You might be tempted by universal weatherproofing kits, but automatic door bottoms do a much cleaner job for most homes. The key is finding the right combination for your unique doorway and floor setup.
Final Thoughts: Getting the Best Fit for Your Door and Floor
Adjusting an automatic door bottom seal isn’t rocket science, but it does pay to be a little patient and detail-oriented. Honestly, a few careful tweaks can mean the difference between a quiet, cozy room and a door that just feels “off.” Whether you’re dealing with thick carpet, shiny tile, or a funky old floor, taking the time to set your Raven, Pemko, or other brand seal just right is worth it.
Whenever you’re tackling changes to your home—big or small—it’s nice to know you’re not alone in puzzling through the details. Sealing up those tiny gaps is one of those projects that looks invisible, but feels like a huge upgrade. A well-adjusted automatic door bottom keeps the outside out, the inside in, and makes your space just a little more comfortable. And in the end, isn’t that what home is all about?