Here’s the thing: your door latch is supposed to hold the door tightly closed, so it doesn’t jiggle against the frame. But over time, houses settle, hardware loosens, and suddenly you’ve got that rattle. Adjusting a handleset latch isn’t rocket science, but a lot of folks aren’t sure where to start. Let me walk you through the process, slow and steady, so you can get back to enjoying peace and quiet—no more mystery noises every time someone walks by.
Why Does Your Door Handleset Rattle in the First Place?
Before reaching for your tools, it helps to understand what’s going on. Most handleset latches—whether you’re dealing with a fancy Kwikset, Schlage, or any other popular brand—work the same way. There’s a spring-loaded latch that pops in and out of the door edge. When the door closes, the latch fits into a metal plate (the strike plate) on the door frame. If there’s too much space between the latch and the strike plate, you get that annoying rattle.
You might be wondering how that space appears in the first place. Honestly, it could be a few different things:
- The screws are loose: Over time, repeated use can loosen up the screws in your handleset or strike plate. This gives the latch more wiggle room.
- The door or frame has shifted: Wood swells and shrinks with the seasons. Sometimes, it’s just enough to throw your latch alignment off.
- Normal wear and tear: Springs inside the latch can wear out, or the latch itself gets chipped or bent. It happens to everyone eventually.
Once you know the root cause, adjusting the handleset latch suddenly feels a lot less mysterious and a lot more like tightening up a loose bike seat.
Gathering Your Tools and Materials
No need to make this complicated. Here’s what you should have before you start messing with your handleset latch:
- Screwdriver (usually Phillips, but sometimes flathead, depending on your hardware brand)
- Small hammer (if you need to nudge the strike plate)
- Wooden toothpicks or matchsticks (for filling out screw holes, if needed)
- Pencil (so you can mark where things need to move)
- Optional: Wood filler (for bigger adjustments)
Let me explain why these basic tools matter. Handleset brands like Schlage and Kwikset don’t require fancy stuff. The screwdriver does 90% of the work—tightening screws, moving plates, even opening up the latch in some cases. Toothpicks sound silly, but they’re perfect for filling out worn screw holes if the plate won’t grab tightly. If you run into serious trouble, wood filler can help, but honestly, most beginners won’t need it.
Checking the Handleset Latch and Strike Plate Alignment
Here’s where you slow down and play detective. Before adjusting anything, check how your handleset latch actually fits when the door is closed. Close the door slowly, watching how the latch slides into the strike plate on the frame. Does it land in the middle? Is there a gap? Does the latch feel loose or tight?
A quick test: gently push and pull on the door with the latch engaged. If it rattles, you’ll probably notice some “give” between the latch and the strike plate. Sometimes you can even see daylight around the latch, which isn’t ideal.
If the latch is totally missing the strike plate, or only barely catching the edge, that’s your problem right there. You’ll need to move the strike plate slightly. If everything lines up but there’s still play, you might just need to tighten things up. Either way, this slow check is what guides your next move. It’s like troubleshooting a remote that won’t sync—you have to see what’s actually not working before you can reset or adjust it.
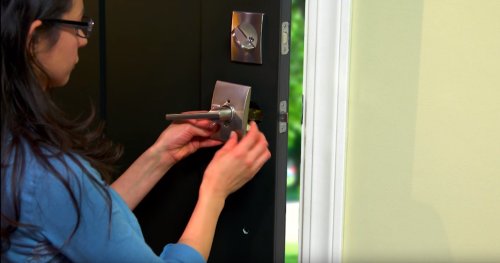
Tightening and Adjusting the Handleset Screws
Most rattles come from hardware that’s just a touch loose. Get your screwdriver and go over every screw you see on both the handleset and the strike plate. If you find any that spin easily, snug them down—but don’t overtighten. If a screw won’t tighten up, the hole might be stripped out. Here’s where those toothpicks come in:
- Take a toothpick (or two) and break it to the length of the screw hole.
- Stuff it in the hole along with a dab of wood glue if you want extra hold.
- Put the screw back in—the toothpick gives it new “bite.”
Let me say this: it’s a small trick, but it works wonders. Even high-end handleset brands can loosen up over time, especially with heavy use. By tightening the screws and backing up weak holes with toothpicks, you make sure your latch and strike plate aren’t floating around. If your latch still rattles after this, you’ll need to move on to repositioning the strike plate.
Adjusting the Strike Plate Position
Strike plates look pretty permanent, but they’re surprisingly adjustable. Most are held on by just two screws. If you’ve confirmed your latch is lining up but the door still rattles, you’ll want to move the strike plate in a bit—toward the doorstop—so it holds the latch tighter.
Here’s how you do it:
- Use your pencil to mark the outline of the strike plate as it is now.
- Remove the screws and strike plate.
- Shift the plate slightly inward (toward the doorstop).
- Mark new screw holes if you need to.
- Drill tiny pilot holes for the new position.
- Reattach the strike plate and test the door.
The idea is to close the gap so your latch can’t bounce around inside the strike plate opening. If you move the plate too far, the latch may get stuck—so nudge it a little at a time. Think of it like tuning a remote to sync perfectly with its device: you may have to try it once or twice for the best fit.
Fine-Tuning the Latch and Other Quick Fixes
Sometimes, even after adjusting the strike plate, you still get a bit of rattle—especially in older homes or with cheaper hardware. Thankfully, there are a couple more quick fixes you can try.
Bending the strike plate tab: Most strike plates have a little metal “tab” inside. If your latch is a bit loose, use a flathead screwdriver to very gently bend this tab inward. This creates a tighter fit for the latch, so it can’t rattle. Just don’t bend it too far, or the latch may not close smoothly.
Add foam weatherstripping: If your door fits pretty well but there’s still a tiny bit of movement, you can stick a thin, self-adhesive foam strip along the edge of the door or frame—right where it meets the stop. It’s a quick troubleshooting step that can make the door feel snug without major adjustments.
If you’re working with a smart or electronic handleset (like a Schlage Encode or Yale Assure), remember to check your battery, power, and code settings if the lock mechanism itself feels weak or isn’t engaging fully. Physical latch adjustment is the same, but always check digital remotes and keypads for proper sync, reset, or firmware updates, too.
When To Replace Your Handleset Latch
Honestly, sometimes you reach the end of the adjustment road. If your handleset latch has worn out—that means the internal spring is broken, the latch itself is bent, or the hardware is rusted through—it might be time for a replacement.
Here’s how you can tell it’s time:
- The latch jiggles even when screwed in tightly.
- The plate or latch is visibly damaged or warped.
- The door never quite feels secure, even after moving the strike plate.
The good news: most replacement latches from brands like Schlage and Kwikset are designed to fit standard holes, so swapping them out is almost always a plug-and-play job. If you’re upgrading to a smart handleset, make sure the new hardware matches your door’s thickness and existing cutouts. That way, you won’t run into extra pairing, code, or battery issues down the line.
Comparing Professional Adjustment vs. DIY Fixes
You might be wondering if it’s worth calling in a pro for a simple handleset latch adjustment. In most cases, DIY is totally doable and much cheaper. But if you run into any of the following, it might be time to get some help:
- Your door or frame is severely warped or split.
- The handleset latch is part of a high-security smart system with wired sync/code features.
- You’ve tried all the adjustments and the rattle still won’t go away.
Usually, a professional will have extra tools—like a wood chisel for deeper adjustments or specialized remotes to pair and troubleshoot smart locks. They can also spot hidden issues, like a door that’s sagging on its hinges or a frame that needs shimming. For most folks, though, a screwdriver and the steps above will do the trick.
Wrapping Up: Enjoy Your Quiet, Rattle-Free Door
Adjusting a handleset latch to prevent door rattle really is one of those small home fixes that makes a big difference. With the right tools, a careful eye, and a little patience, you can transform a wobbly, noisy door into one that feels solid every time you close it. No more rattling, no more guessing if your door is really shut—just smooth, dependable function.
Whether you’re dealing with a classic Schlage, a modern Kwikset, or even a smart lock with a remote or keypad, the fundamentals are the same: make sure the latch and strike plate are secure, properly lined up, and free from wear. Most of the time, you can troubleshoot and reset things yourself without calling in help.
Next time your door rattles, don’t just live with it—grab that screwdriver, tighten things up, and enjoy the quiet confidence of a door that does its job right.