Imagine that roller is like a car tire that blew out. You can’t drive on it, but getting it back in shape isn’t too hard with the right approach. In this guide, we’ll walk through how to access that roller and get your pocket door working smoothly again. We’ll touch on why things break, what tools you’ll need, and the steps to follow. So, grab a cup of coffee, and let’s dive into this DIY adventure!
Understanding Pocket Door Rollers
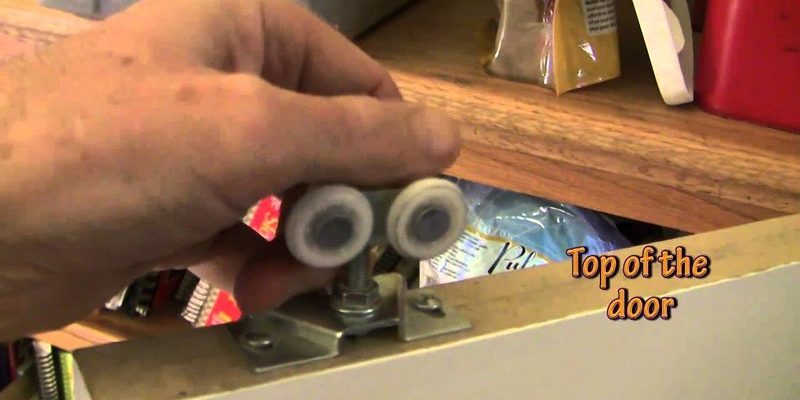
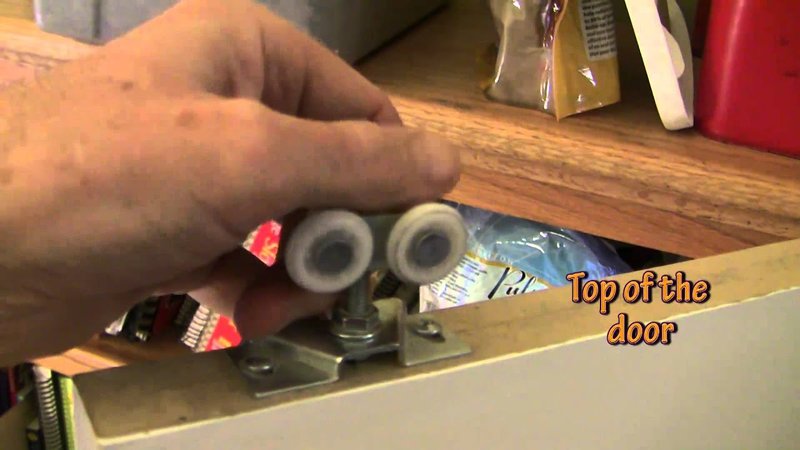
Before we get into fixing your pocket door roller, it’s essential to understand how these little mechanisms work. Pocket doors slide on a track, much like a train gliding along tracks. At the top of the door, you’ll usually find rollers that help it move smoothly in and out of its hidden space.
These rollers can wear out over time—think of them as the wheels on your car. They experience a lot of friction and can eventually break. When this happens, the door may become difficult or even impossible to open. Being familiar with the components will make troubleshooting and repairs easier.
Commonly, pocket door rollers can be plastic or metal, and each type has its strengths and weaknesses. Plastic rollers can wear out faster, while metal ones are more durable but can still become rusty over time. Knowing what type you have might help you figure out why it’s broken and how to fix it.
Tools You’ll Need
Having the right tools is crucial to efficiently fix a broken pocket door roller. Here’s a handy list of what you might need:
- Screwdriver set: You’ll want both Phillips and flat-head screwdrivers.
- Pliers: Useful for gripping and twisting any stubborn parts.
- Tape measure: To ensure you get the right size replacement rollers.
- Utility knife: If you need to cut out any drywall around the door frame.
- Replacement rollers: Make sure to have these on hand; your pocket door’s specific brand may require specific sizes.
Once you have these tools gathered, you’ll be ready to tackle the repair. Honestly, having everything in one spot will save you from running around the house looking for that pesky screwdriver.
Accessing the Pocket Door Roller
Getting to the roller inside the wall is likely the trickiest part of this whole process. You might be wondering how to do this without tearing your wall apart. Here’s a straightforward way to access it:
1. Remove the Door: If your door has a top plate (a horizontal piece at the top of the door frame), you might need to unscrew it. Once you remove it, gently slide the door out of the track and set it aside.
2. Inspect the Track: Look at the roller mechanism and track while you have the door out. If you see debris or dirt, that could be causing the issue. Clean it out gently.
3. Access the Roller: If the roller is broken or needs replacement, you may need to cut a small access hole in the drywall above the door frame. Use your utility knife carefully, and try to keep the hole as small as possible.
4. Remove the Broken Roller: Use your pliers to grab hold of the roller or what’s left of it and pull it out.
This part can feel daunting, but taking it step by step will make it manageable.
Replacing the Roller
Now that you have access to the broken roller, it’s time to put in a new one. Here’s how to make this process as easy as pie:
1. Choose the Right Roller: This is where knowing your door’s brand comes in handy. Most hardware stores have replacement rollers available, or you can check online. Be sure to measure the old roller so you get the correct size.
2. Install the New Roller: Slide the new roller into the track. Ensure it fits snugly and aligns properly with the door.
3. Reattach the Door: Once the new roller is in place, carefully slide your pocket door back into its track. Make sure it glides smoothly along the track. You may need to adjust the height using screws if the door doesn’t sit flush against the wall.
4. Close Up the Access Hole: If you made an access hole, patch it up with some drywall compound. It might require a little sanding and painting, but it’ll be good as new!
You might be wondering if you need to do anything else. It’s a good idea to check the alignment and make adjustments over the next few days as the door settles back into place.
Preventing Future Problems
Once you’ve fixed the issue, it’s worth taking some time to prevent future problems. Just as you’d maintain your car to avoid breakdowns, these doors require some care too. Here are a few tips to keep your pocket door functioning well:
– Regular Cleaning: Make it a habit to clean the track periodically. Dust and debris can build up, causing the rollers to malfunction over time.
– Lubrication: Applying a silicone-based lubricant can help keep the rollers moving smoothly. Avoid using oil-based lubricants as they can attract more dirt.
– Check for Damage: Every few months, inspect the door and rollers for any signs of wear and tear. Catching issues early can save you a lot of hassle.
Honestly, a little maintenance goes a long way in keeping your pocket door in great working condition.
Fixing a broken pocket door roller might seem overwhelming at first, but with the right tools and a bit of patience, you can tackle it like a pro. From understanding how rollers work to accessing and replacing them, each step is manageable.
Remember, a little care and preventive maintenance can keep your door sliding smoothly for years to come. So next time your pocket door acts up, just think of it as an opportunity to flex those DIY muscles. You’ve got this!