Honestly, it’s like trying to seal up a box that wasn’t cut straight in the first place. Standard weatherstripping just won’t sit flush, letting air, dust, and even bugs slip right through the cracks. If you’re dealing with a door that came with “unique reveals” (that’s the fancy way of saying *uneven spaces*), you need to think outside the usual stick-on foam strip box. There are some clever options out there, and some tried-and-true brands, that can help you finally get a tight, cozy seal—no matter how wonky your door gap might be.
Let me explain what actually works for doors with uneven reveals, why traditional solutions usually disappoint, and how to pick (and install) the best weatherstripping for your situation. Whether you’re sealing a drafty old front door or a quirky back entry that never quite shut right, you’ve got options.
What Makes a Door Reveal “Unique” or Uneven?
You might be wondering what exactly counts as a “unique reveal.” In the world of doors, the *reveal* is just the gap between the edge of your door and the frame. Ideally, that gap would be the same all the way around—a neat, even sliver where the weatherstripping can work its magic. But real life isn’t always so tidy.
Uneven door reveals can happen for a bunch of reasons. Maybe your house settled, or maybe the door warped a bit with age. Sometimes, an installer just did the best they could with an opening that was a bit crooked to begin with. Whatever the cause, you end up with a gap that’s, say, 1/8″ on top and almost 3/8″ at the bottom. Or maybe the gap is fine on one side and huge on the other. These odd sizes make it tough for regular weatherstripping to form a consistent, tight seal.
Here’s the thing: If you use the same thickness of weatherstripping all the way around, it’ll either crush too much in the narrow spots (making the door hard to close) or barely touch at all in the wide ones (leaving a draft). To truly fix this, you need weatherstripping that can adapt or “fill” those uneven areas without making your door impossible to operate.
Why Standard Weatherstripping Usually Falls Short
Standard weatherstripping—the type you see in most stores—works best when things are, well, standard. Peel-and-stick foam, simple rubber tubes, or those classic felt strips are all designed for doors with *even* reveals. They assume you’ll have the same little gap everywhere, so you can apply them in one go and call it a day.
But let’s get real: If you try to use thick foam to fill your biggest gap, you’ll end up fighting with the door every time you close it. If you use thinner material, you’ll still feel drafts where the gap widens. I’ve seen people double or triple up material in certain spots—honestly, it looks messy, and it rarely holds up over time.
Some brands like Frost King or MD Building Products do make heavier-duty weatherstripping, but even the best stick-on foam can compress or peel off under pressure. And if the gap changes from top to bottom, you’ll still be left with awkward spots. The *code* of proper sealing (if you can call it that) says you want an even, gentle squeeze—just enough to block air and moisture, not enough to ruin your door’s swing.
So, what does work? That’s where specialty weatherstripping comes in, offering smarter solutions for unusual reveals.
The Best Types of Weatherstripping for Uneven Door Gaps
When you’re dealing with a door that has unique reveals, you need weatherstripping that’s flexible—literally and figuratively. Here are the best options I’ve found, with some honest thoughts about each:
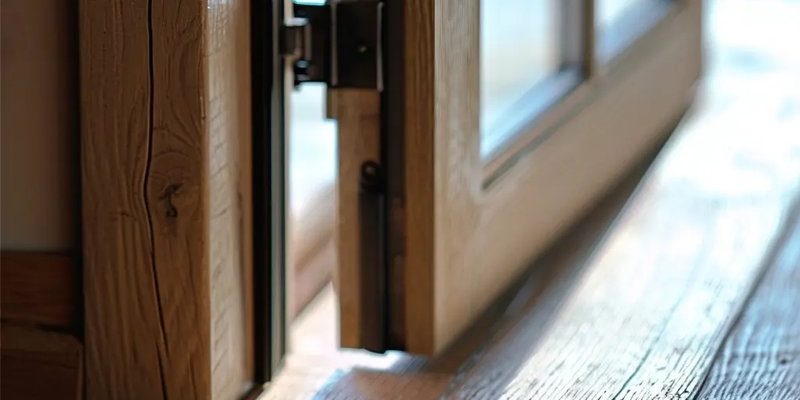
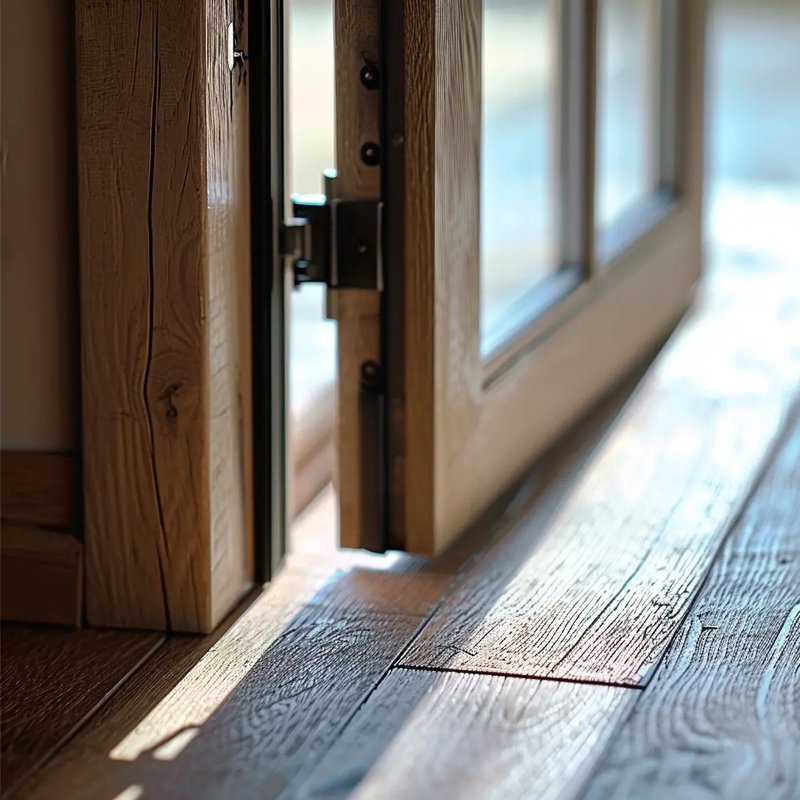
1. Adjustable (Spring Metal or Vinyl Bulb) Weatherstripping
This type uses a metal or vinyl strip that you attach along the door frame with screws. A flexible bulb or fin presses against the door when it closes. The magic is in those screws: you can fine-tune how close the strip sits to the door at each spot, fixing the seal where the gap is widest, and backing off where things get tight.
- Pro: Customizable fit for every part of the frame.
- Con: Takes more time and tools to install. You’ll have to tweak as you go.
2. Silicone or Rubber Door Gaskets
Some high-quality gaskets are made to compress and spring back, sealing even when the reveal changes size in different spots. You cut them to fit, and they form a soft, forgiving seal. Brands like Pemko or Zero International offer these—not cheap, but super effective.
- Pro: Durable, weather-resistant, and suitable for odd gaps.
- Con: Installation can feel finicky, especially if the door isn’t perfectly square.
3. Combination Solutions (Stacking or Layering)
This is a bit of a DIY approach. For really big gaps or odd reveals, some people use a combination of thin foam plus a sweep or double layer certain areas. For example, you might use a door sweep at the bottom and compressible silicone up the sides.
- Pro: Total customization for strange doors.
- Con: It’s easy to overdo it and create closure problems.
If you’re getting frustrated, remember: it’s totally normal to “mix and match” solutions until you find the perfect fit for your weird door gap. Brands like Pemko, M-D, and Frost King all offer parts you can piece together.
How to Measure and Diagnose Your Odd Door Gaps
Before you buy anything, you’ll want to figure out exactly what you’re dealing with. Here’s a simple step-by-step process:
1. Close the Door and Look for Light
During the day, stand inside and look around the edges of your closed door. Any visible light is a spot where air (and maybe critters) can get through. Take note of where the gap is widest and where it’s tightest.
2. Use a Thickness Gauge or Coins
If you want to get precise, slide a stack of coins (or a feeler gauge) into the gap at a few points—top, middle, bottom, both sides. Jot down your measurements.
3. Mark Problem Zones
It can be helpful to use blue painter’s tape to flag the spots where the gap is extra large or small. That way you’ll remember to adjust your weatherstripping as you install it.
This little bit of troubleshooting makes a huge difference. You’ll avoid buying the wrong size, and you’ll know exactly where to focus your attention. Don’t worry if your measurements aren’t perfect. Just aim to get a sense of where things are “off”—and how much you’ll need to compensate.
Tips for Installing Weatherstripping on Doors With Uneven Reveals
Once you’ve picked your materials, installation becomes a little puzzle—especially if you want a professional-looking result. Here are some key tips:
Work Top to Bottom, Adjusting as You Go
Start at the top of the frame. If you’re using adjustable metal or vinyl stripping, only drive one or two screws at first, so you can tweak the alignment. Move down the frame, testing the door as you go. This lets you spot spots that are too tight or too loose and adjust before fully committing.
Use Sharp Scissors or Utility Knives
For foam or silicone, make sure your cuts are clean. Ragged edges just make things look sloppy and can keep the door from sealing right. Take your time here—it’s worth it.
Check the Door’s Operation After Each Section
Open and close the door after every section you install. If it suddenly feels hard to close or latch, you’ve probably gone too thick at that spot. Back out a screw or trim the stripping as needed.
Patience Pays Off
Honestly, it can take an hour or two to dial in the perfect fit—especially on old or quirky doors. But that first draft-free “whoosh” when you shut the door? *Totally* worth the effort.
Weatherstripping Brands and Products That Stand Out
You might be wondering if there’s a “best” brand for this kind of work. While there’s no absolute winner, some brands have built a solid reputation for durability and flexibility—especially for doors with unique reveals.
- Pemko: Known for industrial-grade silicone gaskets and adjustable weatherstripping that can handle seriously uneven gaps. You’ll find them in commercial settings, but they work just as well at home.
- M-D Building Products: Offers a wide range of screw-on, adjustable metal weatherstripping that can be fine-tuned for tricky doors. Their products are often available at big-box stores.
- Frost King: Popular for DIY foam and vinyl weatherstripping. While not as customizable as Pemko or M-D, their products are budget-friendly and good for moderate unevenness.
- Zero International: More of a high-end option, but their seals are top-notch for really challenging doors. If you want a long-term fix, these are worth a look.
If you’re searching online or asking at your local hardware store, just remember to mention “adjustable” or “compression” weatherstripping. That’ll help steer you toward products made for doors that don’t play by the rules.
Alternative Solutions If Nothing Else Works
Every now and then, you’ll run into a door gap that stubbornly refuses to be sealed with weatherstripping alone. Maybe the frame is warped, the door is really twisted, or the reveal is just too wild for any strip or gasket.
In those cases, here are a couple of outside-the-box fixes:
- Use a Door Sweep or Automatic Door Bottom: These attach to the bottom edge of your door and drop down to seal as the door closes. Great for big gaps at the threshold.
- Install a New Door Shoe: This is a metal or vinyl strip that goes under the door. If your threshold is uneven, a new shoe or threshold may be easier than fighting with side weatherstripping.
- Consider Rehanging or Shimming the Door: Sometimes, a minor adjustment with shims or new hinges can help even out a stubborn gap. It’s more work, but can pay off if you’re already planning some repairs.
No single solution works for every unique reveal. It’s like pairing socks—sometimes you have to try a few before you find what fits just right.
Keeping Your Weatherstripping in Good Shape
Installing weatherstripping isn’t a “set it and forget it” project—especially on doors with quirky gaps. Over time, even the best products can compress, peel, or shift, especially with frequent door use. A quick bit of ongoing troubleshooting can keep things working perfectly.
Check Your Seals Every Season
Give your weatherstripping a quick once-over every few months. Look for flattening, cracking, or places where the seal isn’t touching the door anymore.
Clean the Edges
Dust, dirt, and moisture can all mess with how well your seal sticks or compresses. Wipe down the frame and the stripping as part of your regular cleaning.
Replace or Reset as Needed
If you start to feel drafts or notice daylight peeking through, don’t wait—swap out damaged sections or snug up screws as needed. Sometimes, just a minor reset can get things sealing tight again.
If you’re using a remote garage door or high-tech entry system, checking for proper “code” sync and battery health is a smart idea while you’re doing maintenance. Doors with tech can be even more sensitive to changes in the seal.
Final Thoughts: Getting the Perfect Seal, No Matter Your Door
Sealing up a door with unique reveals isn’t always quick—or easy—but it’s definitely possible with the right weatherstripping and a little patience. Take the time to measure, pick the right products, and don’t be afraid to adjust as you go. The perfect tight seal is out there, even for doors that aren’t so perfect themselves.
Honestly, a well-sealed door makes your whole home feel warmer, quieter, and a little more put-together—even if the house is old or the frame is less than straight. With so many weatherstripping options available now, you’re bound to find something that works. And when you finally shut out those drafts for good? That’s a fix worth feeling proud of.