Most people assume their deadbolt is doing all the heavy lifting, but honestly, even the best lock won’t save you if that little metal plate is only held in by short screws into soft wood. Brands like Schlage, Kwikset, or Yale can make the toughest deadbolts around, but their security doesn’t mean much if the *strike plate* isn’t properly secured to that solid framing stud behind the jamb. So, let’s roll up our sleeves and talk through the best—and safest—ways to anchor your deadbolt strike plate, so your entry door actually lives up to its promise.
Why Securing The Strike Plate To The Stud Really Matters
Here’s the thing: a deadbolt is only as good as what it’s connected to. Most door frames are made from soft pine, and often the only thing holding your strike plate are two small screws biting into a thin, decorative jamb. That’s not enough. One good kick, and those screws will rip right out, like tearing buttons off a shirt.
When you sync your strike plate directly to the frame’s stud, you create a true anchor point. The structural stud is the thick, solid board that forms the door opening—think of it as the skeleton holding up the whole wall. Short screws in the jamb won’t cut it, but long, heavy-duty screws connecting to the stud will absorb and distribute force from kicks, crowbars, or even someone trying to wrench the door open with a lot of muscle.
Without this, you’re basically trusting your home’s security to little more than a layer of paint and some finish nails. I’ve seen DIYers skip this step, only to regret it later when a break-in attempt shows them just how little was protecting them. So, let’s look at how to get it right.
The Tools And Materials You’ll Need
Don’t worry, this isn’t a job that requires pro-level tools or a workshop in your garage. Everything you need can be found at a hardware store, and you probably already have half of it lying in a drawer. Here’s what you’ll want at your side:
- Strike plate (choose a heavy-duty one if possible)
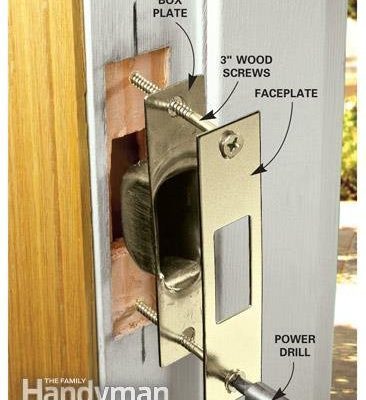
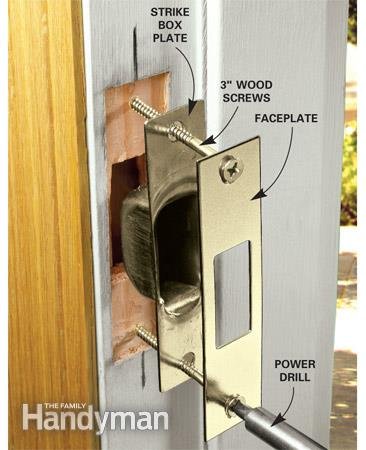
- 3-inch wood screws (preferably hardened steel)
- Drill with a screwdriver bit
- Pilot drill bit (around 1/8″ for pre-drilling)
- Pencil for marking
- Phillips-head screwdriver (for a final snug fit)
- Chisel and hammer (if adjustments to the mortise are needed)
Here’s a quick tip: Don’t use drywall screws or anything flimsy. Only use wood screws, and go for quality. Your security is worth it.
Step-By-Step: Securing A Deadbolt Strike Plate To The Stud
Let me walk you through the process—slow and steady, so there’s no confusion. Getting this right is all about taking your time and not skipping any prep work.
- Remove the existing strike plate. Unscrew it and pull it away from the jamb. You might see tiny screws and, sometimes, a shallow mortise (the little pocket in the wood). That’s normal.
- Check the strike plate mortise. If your heavy-duty plate is larger than the one you removed, grab your chisel and carefully expand the mortise until the new plate sits flush. You want it to be snug, but don’t force it—otherwise, the plate will sit crooked and the door may not close properly.
- Mark screw holes for the new plate. Hold the strike plate in place, aligned with the latch hole, and use your pencil to mark through the screw holes. Make sure it sits flat and lines up perfectly with the bolt when the door is closed.
- Drill pilot holes. Using your 1/8″ bit, drill slowly through the jamb until you feel the bit hit solid wood. That’s the stud you want to anchor to. The pilot holes prevent the wood from splitting and help the long screws go in straight.
- Secure the strike plate. Drive the 3-inch screws through the strike plate holes and deep into the stud. Use your drill for most of the way, but switch to a screwdriver to finish—this lets you feel when the screw is snug without overtightening and stripping the wood.
When you’re done, your strike plate should feel absolutely solid. Give it a tug. If the plate moves or the screws spin, pull them out, adjust the holes, and try again. This step really pays off in the long run.
Choosing The Right Screws For Maximum Holding Power
You might be tempted to just use whatever screws came in the packet, but honestly, most manufacturers include cheap, short screws—sometimes less than an inch long. You need screws at least 3 inches in length, preferably
Here’s why the length matters: the decorative jamb is rarely more than 3/4″ thick, and the real stud sits another inch or so behind that. Short screws only bite into the weak jamb, but long screws cross both layers and anchor firmly into the stud.
Material matters, too. Use hardened steel or construction-grade screws for the best results. Brass or soft metal screws can bend or shear off if the door takes a serious impact. I always keep a box of 3-inch wood screws handy; they’re good for almost any DIY security upgrade, whether you’re swapping out strike plates or beefing up door hinges.
How To Check If You’ve Hit The Stud (And What To Do If You Missed)
After you drill your pilot holes and drive in the screws, you want to double-check you’ve actually hit the stud (not just air or dead space behind the jamb). Sometimes, if your door frame is slightly crooked or was installed with shims, you might miss the mark.
One way to check: try pulling on the plate. If the screws feel loose or just spin, chances are you’ve missed solid wood. In that case, take the strike plate off and peer into the pilot holes. You can use a thin nail or even a toothpick to poke and feel if you hit something dense. If it slides in easily for more than an inch, you’re only in the trim.
If you missed, shift your strike plate a tiny bit—left or right by a hair—re-mark your holes, and try again. Sometimes, it takes a second attempt to hit true stud, especially in older houses where the framing might be a little wonky.
Tip: If you’re really stuck, consider using a stud finder to help locate exactly where the framing runs behind the jamb. It’s a cheap gadget that makes a big difference.
Are Reinforcement Plates Or Longer Screws Better?
You might be wondering if you really need special hardware to get a secure fit—or if just using longer screws is enough. Both methods help, but combining them gets you the most security.
- Reinforcement plates (often called “strike boxes” or “security plates”) wrap around the frame inside the jamb and offer extra area for the deadbolt to resist force. They’re paired with long screws, so force from the bolt is spread out across more wood.
- Standard strike plates with 3-inch screws are a major step up from the tiny, included screws, and will work for most homes. If you’re on a budget or time crunch, this is your best starting point.
If break-ins are common in your area, or if you want serious peace of mind, go for both—a tough strike plate and long screws. This setup is almost always compatible with all the big-name lock brands, and it keeps things simple during troubleshooting if you ever need to swap out the lock or plate later.
Maintaining Your Deadbolt Strike Plate Over Time
Just like any other part of your home, the screws and strike plate can work loose over time from door slams or seasonal shifting in the wood. Once or twice a year, check the strike plate by wiggling it—if anything feels loose, tighten the screws. If the screw holes feel stripped, back the screws out and fill the holes with wood glue and toothpicks or dowels, then re-drive the screws into the solid material. This will help reset the grip and keep things tight.
If you notice your deadbolt isn’t lining up perfectly or feels tough to lock, it could be a sign that your frame has warped, or the plate has shifted a bit. In that case, a quick realignment and a re-sync with the stud will keep your lock working smoothly and safely.
Keeping an eye on these simple details means you won’t be caught off guard if you ever need your door’s security the most.
When To Consider Professional Help (And What To Ask For)
Sometimes, a DIY fix just isn’t enough—especially if your door frame is cracked, rotten, or has seen several failed repairs in the past. In those cases, calling a locksmith or a carpenter is the safest bet. Explain that you want the strike plate anchored directly to the stud, and ask about reinforcement options. Good pros will bring their own heavy-duty hardware and know exactly how to reinforce even tricky or old frames.
If you’re installing a new smart lock or upgrading to an electronic deadbolt from a brand like Schlage or Yale, a professional can also help you reset and pair the lock correctly, while troubleshooting fit issues on the spot. Plus, they’ll make sure your strike plate installation doesn’t void any lock warranty—always good to double-check for peace of mind.
Wrapping It Up: Your Door’s First Line Of Defense
Securing your deadbolt strike plate to the door frame stud is one of those “small jobs, big payoff” fixes that anyone can do. Once you understand how much force a simple screw swap can resist, and how brands like Schlage and Kwikset design their locks to work best with a strong anchor, you’ll never want to trust short screws again.
It’s all about making sure the lock, plate, and stud are in sync—no gaps, no shortcuts, just solid home security. Whether you’re fixing a loose strike plate, upgrading to a smart deadbolt remote, or troubleshooting a tricky door, these steps will keep your entry secure. Take a few minutes, grab those 3-inch screws, and give yourself some peace of mind. Your door (and what’s behind it) will thank you.