Let me explain: most cars, windows, and even some fancy appliances use weatherstripping to keep the elements where they belong—outside. On vehicles like Ford, Toyota, or Honda, and around old home windows and doors, that flexible rubber (the “weatherstrip”) is held by adhesive. Over time, heat, cold, or just plain bad luck will make that glue give up. But here’s the thing—if the weatherstrip itself isn’t torn or crumbling, you can almost always reattach it and skip the hassle of swapping the whole strip.
So if you’ve noticed your door, trunk, or window weatherstrip coming loose, but the rubber looks fine otherwise, let’s walk through the best ways to reattach it—no full replacement needed.
Why Weatherstrip Matters More Than You Think
A good weatherstrip is like the unsung hero of your home or vehicle. Sure, you may not notice it when it’s working, but you’ll definitely feel its absence—especially on a cold morning or during a thunderstorm. Honestly, it’s surprising how much that simple strip of rubber or foam does for comfort and efficiency.
When weatherstrip gets loose around a car door, you might start hearing whistling wind noise or notice puddles on your seat. On a window, you’ll feel drafts or even spot ants squeezing through. That’s because the weatherstrip isn’t just decoration—it’s a vital seal. If it’s not making proper contact, it can’t do its job.
Beyond comfort, it also keeps out dust, pollen, and, in a worst-case scenario, can even help with security. Gaps around doors and windows aren’t just energy leaks—they’re invitations for pests and sometimes even intruders. That’s why fixing a loose weatherstrip isn’t just a cosmetic thing; it’s genuinely important for keeping your space safe, quiet, and energy-efficient.
How to Check If Your Weatherstrip Can Be Reattached
You might be wondering, can every loose weatherstrip be reattached, or are some just too far gone? The answer depends on two things: the condition of the rubber (or foam) and how much of it is peeling away.
Start by gently pulling on the loose section. Is the material cracked, brittle, or torn? If so, reattaching might not do you much good—you’ll need a full replacement. But if the weatherstrip is still flexible and intact, and the adhesive has simply failed, you’re in luck. That’s the best-case scenario for a quick repair.
Look at how much of the strip has come loose. If it’s just a few inches, you’ll likely have an easy fix on your hands. If the whole length is flapping in the wind, you’ll need to spend a bit more time, but the method is basically the same. Always check both the weatherstrip and the surface it attaches to—cleanliness matters, as leftover glue, dirt, or old foam can keep any new adhesive from working properly.
Cleaning and Prepping the Surface for Reattachment
Here’s where most people slip up: trying to stick the weatherstrip back on without cleaning. Adhesive—whether it’s the original stuff, super glue, or specialized weatherstrip adhesive—won’t bond to dirt, grease, or old glue. Take a few extra minutes to do this right, and your repair will last much longer.
First, peel back the loose section just enough to work underneath. If there’s old glue or foam stuck to the door or window, gently scrape it away with a plastic scraper or your fingernail. Avoid metal tools; they can scratch paint or glass. For stubborn spots, a little rubbing alcohol on a rag will loosen gunk without damaging surfaces.
Wipe down the whole area (both the rubber strip and where it attaches) with rubbing alcohol or a cleaner that won’t leave residue. Let it dry completely. If you find sticky old glue that just won’t budge, there are commercial adhesive removers made for cars and window frames—just be sure to test on a hidden spot first to avoid discoloration.
Once everything’s clean and dry, the weatherstrip is ready to be reattached. Honestly, the prep is more than half the battle. Don’t rush it.
Choosing the Right Adhesive for Weatherstrip Repairs
You have a few options when it comes to gluing weatherstrip back in place, and what you pick matters. Not all glues are created equal, especially when you need something that can handle temperature swings, rain, and repeated opening and closing.
The gold standard is weatherstrip adhesive, sometimes called *trim adhesive* or *gasket glue*. Brands like 3M or Permatex are commonly used on car doors, trunks, and windows. These adhesives dry flexible (so the rubber can move) but stay strong enough to keep the strip stuck down for years.
You might be tempted to grab super glue or construction adhesive, but honestly, those are rarely a good fit. Super glue dries hard and brittle—it’ll just crack off the first time you close the door. Construction adhesive can swell or make a mess, and isn’t always safe on painted surfaces or rubber.
If you’re in a pinch, a strong double-sided automotive tape can work for small sections—think: a short fix, not a permanent solution. But for most repairs, a dedicated weatherstrip adhesive is the way to go. Make sure you check the label for compatibility with rubber and the surface you’re fixing (paint, metal, glass, etc.).
Step-by-Step: How to Reattach Loose Weatherstrip Without Replacement
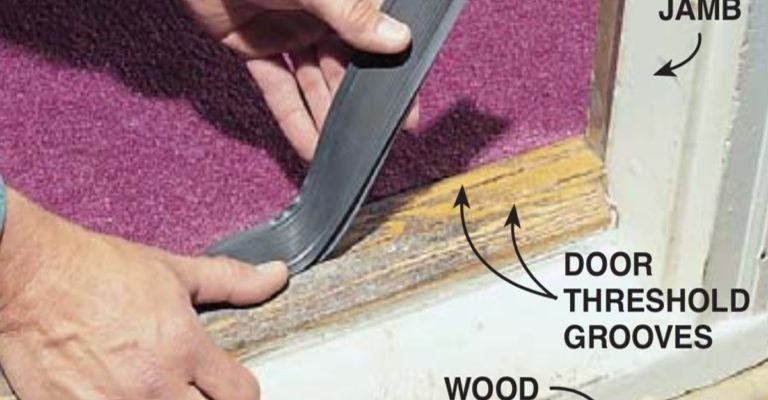
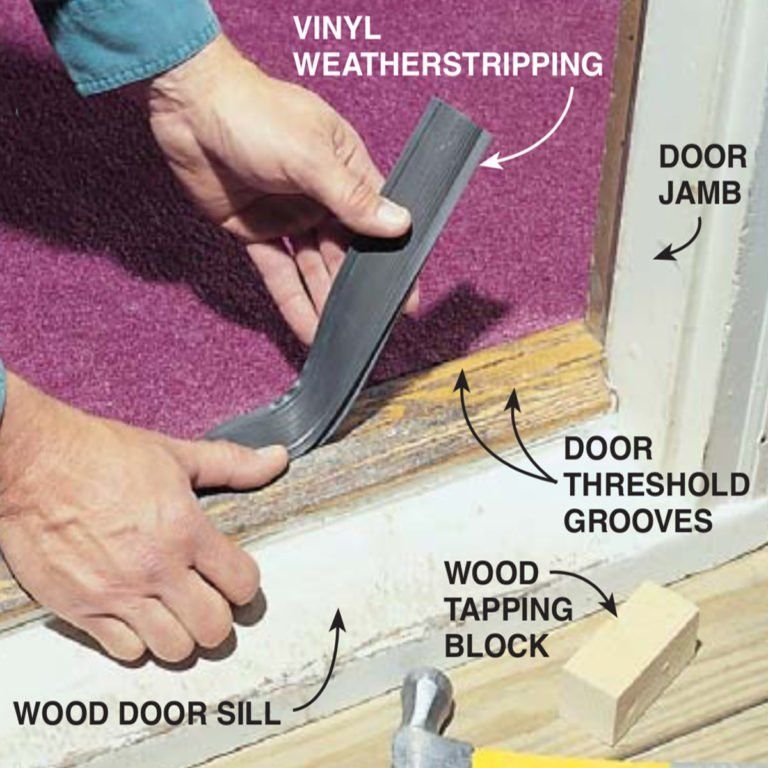
Let’s walk through this like you’re fixing a car door or a drafty window frame. Here’s how to do it right, whether you’re working with a Ford door, an old wooden window, or a vinyl slider:
- Clean everything thoroughly. See the earlier section—get all old residue off and let surfaces dry.
- Test fit the weatherstrip. Line it up dry, without glue, to make sure it’ll return to its original shape without stretching or puckering.
- Apply adhesive. Squeeze a thin, even bead of weatherstrip adhesive onto either the back of the strip or the surface you’re bonding to. Don’t overdo it; too much glue makes for a slippery, messy fix.
- Wait for tack time. Most weatherstrip glues will tell you to wait a minute or two (usually until slightly tacky) before pressing the surfaces together. Follow the instructions on the tube—seriously, it makes a difference.
- Press and hold. Carefully align the weatherstrip and press it into place. Use steady, even pressure for a few minutes. On vertical surfaces, you might need a strip of painter’s tape to hold it in place while the glue sets.
- Let it cure. Don’t slam the door or window right away. Give it a few hours (or overnight, if possible) for the adhesive to fully cure for the best bond.
If you’re fixing a long section, work in small increments—don’t try to glue down ten feet of rubber all at once. It’s okay to take your time and get a neat, lasting result rather than rushing and having to start over.
Troubleshooting Common Weatherstrip Gluing Problems
You might run into a few headaches along the way—let’s talk through them so you’re not stuck with a flappy, leaky repair job.
The strip keeps peeling up: This usually means the surface wasn’t completely clean, or the adhesive didn’t have enough time to set. Peel it back, clean again, and try applying slightly more glue. If it’s cold outside, warming the area gently with a hair dryer before glueing can help the adhesive bond.
The weatherstrip won’t line up: Older strips can shrink or stretch a little. If it seems too short, try warming it gently—it may become more pliable. If it’s too long, trim the end with sharp scissors for a clean fit.
Glue is oozing out everywhere: Too much adhesive is just messy and can prevent a tight seal. Next time, use a thinner bead and wipe away any squeezed-out glue with a rag before it dries.
Still getting drafts or leaks: Double-check the seal all the way along the strip. Press down any gaps, and consider adding a second layer of adhesive to stubborn spots. If the strip is truly warped or falling apart, it may finally be time for a replacement.
When to Replace Instead of Reattach
Not every loose weatherstrip is a good candidate for repair. If the rubber is cracked, hard, or missing big chunks, no amount of adhesive will get a decent seal. Same goes for foam weatherstrips that have flattened or crumbled from years of use.
So how do you know when to give up on re-gluing? Here are the signs:
- The weatherstrip is falling apart, splitting, or feels sticky or oily
- Chunks are missing, especially at corners or bends
- No matter how many times you reattach, it comes loose again
- The seal still leaks even after careful repair
In those cases, it’s best to invest in a new, model-specific weatherstrip (for cars) or a new roll (for windows and doors). It may take a bit more work up front, but you’ll save yourself a lot of hassle in the long run.
Maintenance Tips to Prevent Weatherstrip Problems
After you’ve reattached your weatherstrip, a little ongoing care will help it stay put and work like it should. Most people set it and forget it, but honestly, a minute or two every season can add years to its life.
- Clean the strip regularly. Use a damp cloth to wipe away dust, sand, and debris that can wear down the adhesive or the rubber itself.
- Use a rubber protectant spray. Silicone-based sprays are great for car doors and windows—they keep the strip supple and help resist cracking.
- Check after bad weather or temperature swings. Heat, cold, and moisture can loosen adhesive. After a big storm or heatwave, give your weatherstrips a quick once-over.
- Don’t slam doors or windows. It sounds silly, but repetitive, hard impacts can pop weatherstrips loose—especially if they’re old or have already been repaired.
A little prevention here goes a long way—think of it as syncing up your comfort and energy efficiency, with hardly any effort.
Alternative Options: Temporary Fixes and Hacks
Maybe you’re in a hurry, waiting for the right adhesive to ship, or just need a short-term solution before you can do a full repair. There are a couple of ways to MacGyver your loose weatherstrip until you can fix it properly (but don’t treat these as permanent fixes):
- Painter’s tape or duct tape. It’s not pretty, but it’ll hold a strip in place for a few days, especially on a window frame or trunk edge.
- Double-sided foam tape. For door weatherstrips, a thin strip of double-sided tape can hold things together in a pinch, but remember, it won’t last through rain or repeated use.
- Weatherstrip caulk. For gaps that can’t be glued, a bead of weather-resistant caulk will fill holes and block drafts—just don’t use it on moving parts.
These tricks are more for emergencies—say, if you’re heading out on a road trip and spot a peeling Ford door seal the night before. As soon as you can, go back and do a proper fix with the right adhesive for the long haul.
Quick insight: Spending an extra ten minutes choosing the right adhesive and prepping the surface is the difference between a fix that lasts a week and one that lasts for years.
Closing Thoughts: Keep Your Weatherstrip, and Peace of Mind, Intact
Dealing with a loose weatherstrip can be frustrating, but it doesn’t have to mean a full replacement—or a trip to the mechanic or hardware store for something you can handle yourself. With a bit of patience, the right adhesive, and careful prep, it’s totally possible to reattach most weatherstrips and restore that tight, weatherproof seal.
Remember: cleaning and prepping are half the battle, and using a dedicated weatherstrip adhesive is key to a lasting repair. Take your time, troubleshoot carefully, and don’t be afraid to replace the strip if it’s truly worn out. Your comfort, energy bills, and even your sanity will thank you for it.