Keeping your exterior door hinges clean and well-lubricated is one of those small home tasks that makes everything feel a little smoother—literally. It doesn’t matter whether you’ve got a sturdy Schlage brand remote entry door, a classic wood panel door, or a newer steel security setup; they all use the same basic hinge hardware, and they all need some TLC from time to time.
If you’re new to this kind of maintenance, don’t worry. The process is easier than you might think. I’ll walk you through what you need to know, from how to properly clean the hinges to what kind of lubricant to use, how often to check them, and even a bit of troubleshooting for those times when you hit a snag.
Why Exterior Door Hinges Get Dirty (And Why It’s a Problem)
Let me explain why exterior door hinges seem to collect grime and rust like magnets. First off, these hinges are constantly exposed to the elements—rain, dust, wind, road salt, pollen, and even little bits of plant debris. Over time, all this gunk works its way into the tiny spaces between the hinge leaves and the pin. Imagine how a pair of sneakers left outside would look after a few rainy days and you’ll get the idea.
When dirt settles in, it does more than just look messy. That buildup traps moisture, leading to rust if your hinges are steel or iron. Rust eats away at the metal, causing those telltale squeaks, making the hinge stiff, or, in really bad cases, making the door tough to open at all. If you use a remote entry system (like a Schlage Smart Door with battery backup), sluggish hinges can even throw off the auto-lock or make the door misalign, which can lead to tricky troubleshooting later.
Basically, a little cleaning now keeps you from bigger problems down the road. Think of it as the hinge code for “keep things moving.”
Gathering Supplies: What You’ll Need to Clean and Maintain Door Hinges
You don’t need a fancy toolkit or specialized code to get the job done. For most exterior door hinges, you can handle regular cleaning with a few basic items you probably already have at home:
- A screwdriver: To remove and replace hinge pins if needed.
- Old toothbrush or small brush: For scrubbing inside crevices.
- Rag or microfiber cloth: To wipe off grime (and keep your hands clean).
- Mild soap and water: For cleaning off dirt and sticky residue.
- White vinegar (optional): Helps dissolve light rust.
- Lubricant: Silicone spray, lithium grease, or even a dab of petroleum jelly. Avoid WD-40 for long-term lubrication, since it can actually attract more dirt over time.
- Rubber gloves: Helpful if you’re sensitive to cleaning products or just want to keep your hands tidy.
Some folks swear by a bit of baking soda paste for stubborn stains, but honestly, soap and elbow grease usually do the trick for routine maintenance.
Step-by-Step: How To Clean Exterior Door Hinges
Here’s the thing—cleaning door hinges isn’t rocket science, but there are a few steps you’ll want to follow for the best results. Let’s break it down slowly:
- Open the Door Wide:
Start by swinging the door open so you have room to work. It’s easier to see what you’re doing, and you’ll have better access to the hinge. - Remove the Hinge Pin (If Needed):
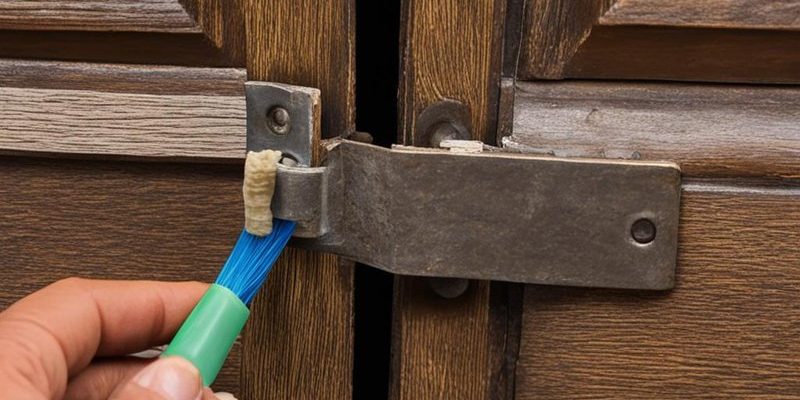
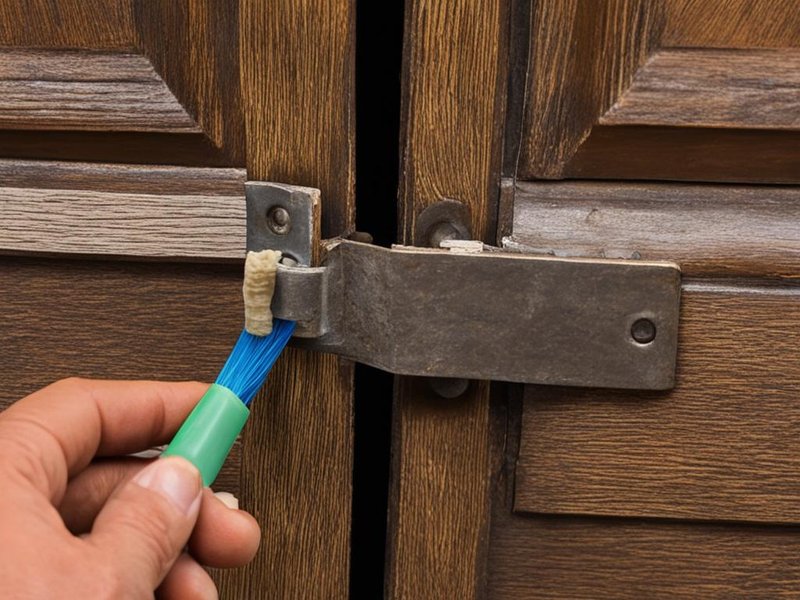
For a deep clean, you might want to pop out the hinge pin. Use a screwdriver and a little upward tap from a hammer if it’s stuck. Just be careful—sometimes the pins are tight, especially on older or painted-over hinges. - Clean Off Dirt and Grime:
Dip your brush in warm soapy water, then scrub all the visible parts of the hinge. If there’s a lot of buildup in the pin hole or along the edges, use the brush to dig it out. For rust spots, drizzle a bit of vinegar on a cloth and rub gently. Dry everything thoroughly before moving on. - Lubricate the Hinge:
Spray or dab your lubricant along the pin and inside the hinge barrel. Do not overdo it—a little goes a long way. Wipe away any excess so you don’t attract more dirt. - Replace the Pin and Test:
Slide the pin back in place, then swing the door open and shut a few times. Listen for squeaks and feel for smooth movement. If it’s still stiff, repeat the cleaning and add a touch more lubrication.
You might be wondering if you can skip removing the pin. For light cleaning, that’s totally fine—just do your best to get into the nooks and crannies with the door open.
How Often Should You Clean and Maintain Hinges?
The best maintenance is regular maintenance—but what does “regular” even mean when it comes to door hinges? Here’s a simple rule of thumb: give your exterior door hinges a deep clean and lubrication every six months. If you live near the coast or in a place with a lot of dust and rain, check them every three months.
If you use a remote entry system, like a Schlage or similar smart lock, put hinge upkeep on your battery replacement calendar. That way, you solve two problems in one: you keep the door swinging smoothly and reduce the chance of alignment issues that can mess with your remote’s sync.
It’s always easier (and cheaper) to prevent hinge problems than to fix them once they’ve gotten out of hand.
Of course, if you start hearing squeaks or feel the door sticking, that’s a sign to break out the cleaning supplies sooner.
Signs Your Hinges Need Immediate Attention
Let’s say you’re not a calendar person and you forget about door hinge maintenance (honestly, most of us do). What should you watch for? Here are a few signals your hinges need help, pronto:
- Loud squeaking or creaking every time you open or close the door—this usually means dry or dirty hinges.
- Visible rust on the hinge leaves or pin—rust is a sign moisture is trapped and the metal’s starting to corrode.
- Difficulty closing the door without pushing or pulling hard—this can mean swollen wood, but often it’s just a sticky hinge.
- Loose or wobbly hinges—if the screws keep working themselves loose, they might be stripped or the hinge is too dirty to seat properly.
It’s easy to ignore these for a while, but if you keep waiting, you might find your door slips out of alignment, causing even more headaches with smart locks, remotes, or battery-powered entry systems.
Choosing the Right Lubricant for Exterior Hinges
Okay, let’s talk lube. Not all lubricants are created equal, and the “best” choice depends a bit on your door and climate.
- Silicone spray: Great for most doors—it won’t gum up or attract much dirt, and it handles outdoor weather well.
- White lithium grease: Perfect for heavy-duty, high-use doors—forms a thicker protective layer that resists rain and grime.
- Petroleum jelly: Works in a pinch, especially if you just need a dab to stop a squeak (but it can attract dust over time).
Steer clear of WD-40 as your primary hinge lubricant. It’s handy for freeing up stuck hardware, but it’s not designed as a long-term lube and can make things look or feel sticky. If you’re using a remote-controlled system and want to avoid troubleshooting lock misalignment, stick with silicone spray for the cleanest results.
Common Problems and Quick Fixes
Even with the best cleaning routine, sometimes things go sideways. Here are a couple of real-life scenarios (and what to do about them):
- Remote lock won’t engage after hinge cleaning: If your Schlage remote entry system starts acting up, check to make sure the hinge and door are perfectly aligned. Sometimes, removing the hinge pin or deep cleaning can shift things slightly—just tighten or adjust the hinge screws as needed.
- Persistent squeak after lubrication: This usually means there’s still dirt or leftover old lubricant in the hinge barrel. Try removing the pin again, wiping everything down a second time, and use a fresh shot of silicone spray.
- Black streaks around the hinge: That’s often a sign of old grease mixing with outdoor dust. Clean off the residue thoroughly and stick with a lighter, non-staining lubricant.
If you ever run into stripped screws or discover your hinge is actually cracked or bent, it might be time to replace it. Universal hinges are easy to find at hardware stores and are usually a simple swap for most standard doors.
Do’s and Don’ts for Long-Term Hinge Care
Here’s where a little common sense goes a long way. Let me lay out some best practices so you don’t end up with more problems than you started with:
- Do clean and lube hinges when you notice squeaks—even if it’s not on your maintenance schedule.
- Don’t use abrasive scouring pads, which can scratch hinge finishes and expose them to more rust.
- Do check for loose screws during each cleanup—they can work themselves out over time, especially in climates with big temperature swings.
- Don’t overspray lubricants onto your door frame, especially if it’s painted or has a wood finish (it can stain or damage the surface).
- Do consider swapping out old hinges for rust-resistant or stainless steel versions if you live near the ocean or in very damp climates.
If you ever feel like your door is “off” or your remote entry system is acting weird after a cleaning, double-check the hinge screws and door alignment before jumping into a deep sync or reset process with your lock. Sometimes, the solution is mechanical, not electronic.
Wrapping Up: Keep It Simple and Consistent
Here’s what it all comes down to: taking care of your exterior door hinges is one of those unglamorous jobs that pays off in quiet, reliable ways. Every time your door swings open smoothly and your Schlage remote entry clicks perfectly into place, you’ll know your effort was worth it. Regular cleaning and proper lubrication only take a few minutes, but they save you from annoying squeaks, sticky doors, and time-consuming troubleshooting later.
So, if you’ve got a few squeaky hinges or just want your doors to feel “right,” grab your supplies, follow these steps, and treat your hinges to a little attention. Your doors—and your patience—will thank you.