Let me put it this way: imagine trying to use a phone case for the wrong model. Sure, it might sort of fit, but you’ll have gaps, wobbles, or worse, something that just won’t snap in place. That’s how it goes with doors and their hardware—there’s no room for “close enough.” So, before you fire up an installation video or start daydreaming about fancy keypad remotes and seamless codes, let’s look at the best tools for measuring exterior door thickness to make hardware compatibility a breeze.
It doesn’t matter if you’re working with a classic solid wood door, a modern composite, or something vintage with an odd profile. Picking the right measuring tool means you’re ready to match up your door, your hardware (from Schlage to Yale to generic “universal” remotes), and any troubleshooting you’ll need to do if the fit isn’t perfect.
Why Door Thickness Matters for Hardware Installation
You might be wondering, “Does a tiny measurement really change that much?” Honestly, yes—it’s the make-or-break detail for exterior door hardware. Most locks, deadbolts, smart remotes, and handle sets are engineered for a specific door thickness range, usually between 1 3/8″ and 1 3/4″. Step outside that window, and you’re in for some serious installation headaches.
Here’s what can happen when you get this wrong:
- The lock won’t mount correctly. Too thin, and you’ll leave gaps or an insecure fit; too thick, and the hardware might not bolt together at all.
- Electronic or smart locks may not pair or sync up—the battery compartments or wiring simply won’t reach through the door.
- Weatherstripping or security plates might sit awkwardly, making you vulnerable to drafts or break-ins.
That’s why every instruction manual, from universal remotes to premium Schlage codes, lists a compatible thickness right up front. Getting your measurement right saves you from returning hardware, hunting for adapters, or worse, compromising your home’s security.
Traditional Tape Measures: The Everyday Go-To
Let’s start simple: the humble tape measure. If you already have one in your kitchen junk drawer or toolbox, you’re off to a good start. A tape measure can give you the basic thickness, but there are a few tricks to getting a truly accurate read.
Here’s how it works:
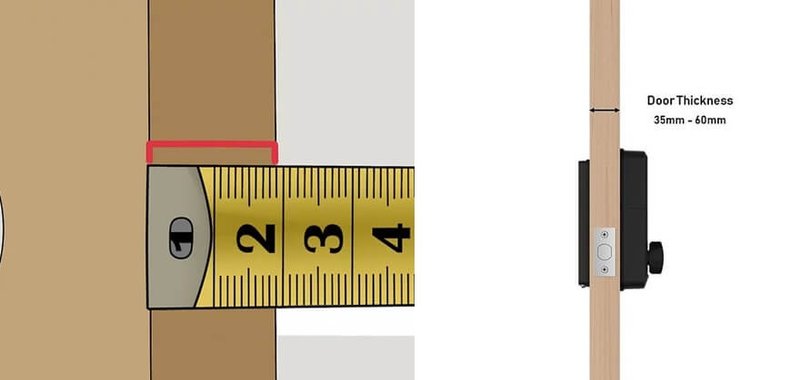
- Open the door so you have access to the edge—this is where you’ll measure.
- Hold the tape measure squarely against one face of the door and extend it straight across to the other face.
- Be careful not to bend the tape or angle it; even a little slant can throw off your measurement.
With a standard tape, you’ll likely see the measurement land somewhere between 1 3/8″ and 2″. Just remember: doors aren’t always perfectly uniform, especially older ones. If yours feels warped or has a thick paint job, measure at a few points for good measure (pun intended).
A tape measure is great for quick checks, but it can be less precise—especially if you’re dealing with odd profiles, heavy weatherstripping, or doors that aren’t perfectly flush. If you want “zero guesswork” accuracy, it’s time to step up your tool game.
Calipers: Precision for Perfect Hardware Fit
When you hear “calipers,” you might picture a high-school science lab or a mechanic’s workbench. But let me explain—calipers are the gold standard when you want absolute precision. These tools let you measure the exact distance between two surfaces, down to a fraction of a millimeter.
Here’s how you use them:
- Open the caliper jaws and place one on each side of your door edge.
- Close the jaws until they’re snug, but not tight enough to compress the door’s material.
- Read the measurement on the digital or dial display—no squinting at tiny lines required.
Digital calipers are especially beginner-friendly. They give you a clear readout, and many can switch between inches and millimeters with a button press. You don’t need to worry about zeroing the scale or second-guessing your eyesight.
If you want to install high-end electronic hardware—think keypads, smart remotes, or anything requiring a tight code sync—you’ll want this kind of accuracy. Even a small difference can throw off installation or battery placement, so calipers help you dial it in with confidence.
Door Thickness Gauges: Quick and Foolproof
Here’s a tool you might not have heard of: a dedicated door thickness gauge. These are made specifically for measuring doors and other panels, so they take a lot of the guesswork out of the process.
Most gauges look like simple cards or “U”-shaped clamps with clearly marked increments (usually in both inch and millimeter units). Some even label the sweet spot for most residential hardware, so you know right away if you’re in the safe zone.
Why use a gauge?
- They’re quick—just slide it onto the door edge and read the result.
- No math or conversions needed, unlike some digital tools.
- Perfect for checking multiple doors fast, like if you’re upgrading hardware throughout the house.
I’ve seen locksmiths and pro installers use these for one reason: they eliminate human error. You don’t need a steady hand or a second pair of eyes, and there’s no risk of damaging the door’s finish. If you’re doing a bunch of installations or troubleshooting a tricky fit, a gauge is honestly worth adding to your toolkit.
Combination Squares: A Multipurpose Classic
Combination squares aren’t just for carpenters—they’re surprisingly handy for anyone with a door project. These tools combine a ruler with a sliding head that sits flush against the door edge, making it easy to get a consistent measurement.
Using a combination square goes like this:
- Slide the head so it’s snug against one face of the door.
- Read the measurement where the ruler crosses the opposite face.
- This tool doubles for layout work—marking cut lines, measuring backset, or checking squareness (which comes in handy if the door is old or settled).
Combination squares shine when you’re installing mortise locks or retrofitting older doors that might not be perfectly flat. Plus, if you’re someone who likes tools that do more than one job, it’s a worthwhile pick. They won’t be as hyper-precise as a digital caliper, but for most hardware compatible with standard thicknesses, you’ll be just fine.
Laser Distance Measurers: High-Tech but Situational
Now, if you’re into gadgets or dealing with especially thick doors—think double-entry setups or commercial buildings—a laser distance measurer can be surprisingly useful. These digital devices shoot a laser across the surface and instantly tell you the distance between points.
Here’s why they’re appealing:
- Super fast readings, especially for oversized or awkward door profiles.
- Many models sync up with your phone or smart home system for easy logging and troubleshooting.
- Some even connect to remote-controlled hardware systems, letting you track compatibility and battery status as you go.
The catch? They tend to be overkill for standard home doors, and they’re only as accurate as your aim. If you’re the kind of person who loves pairing tools with apps or needs data for bigger projects, go for it—but for most folks, simpler tools get the job done faster and with less fuss.
How to Read Door Thickness for Hardware Specs
So, you’ve picked your tool—now what? You need to know how to read and use that measurement to guarantee hardware compatibility. Start by locating the hardware’s packaging or product page; you’ll see a section that lists “compatible door thickness” or “fits doors from X to Y inches thick.”
Here’s the step-by-step:
- Check your exact door thickness—write it down to the nearest sixteenth of an inch if you’re using calipers or a gauge.
- Compare this number to the hardware’s specified range. For example, Schlage or Kwikset remotes commonly fit 1 3/8″ to 1 3/4″. Higher-end electronic hardware may require even tighter tolerances.
- If your measurement doesn’t fit the listed range, stop and look for extension kits or different models. Forcing a mismatch can cause battery modules to lose power, screw threads to strip, or remotes to stop pairing altogether.
If your door is outside standard ranges, don’t panic—many brands offer special order hardware or universal adapters to help bridge the gap, just like switching from a brand-specific remote to a universal one.
Other Factors to Double-Check Before Installation
While thickness is the main act, there are a few supporting players you shouldn’t ignore. For starters, door material—solid wood, composite, or metal—can affect hardware compatibility, especially when it comes to drilling or battery placement for smart systems.
Also, don’t forget to:
- Measure at multiple spots. Some doors swell or warp over time, especially near the bottom or at the latch plate.
- Look for storm doors or secondary screens. These can interfere with handle or lock installation, even if thickness is perfect.
- Consider your hardware’s features. Some remotes or smart codes require more space for batteries or internal mechanisms—always check the product’s troubleshooting or install guide.
If you’re upgrading from an old lock to a fancy smart system, make sure your wiring and battery packs will actually fit inside the door. Syncing up a new remote or code is only possible if all parts slot together with room to spare.
Making the Right Tool Choice for Your Project
Let’s be real—no two door projects are exactly the same. If you’re measuring just one door for a basic lock, a tape measure or combination square does the trick. If you’re installing multiple smart locks, troubleshooting remotes, or want to future-proof your home, a digital caliper or door thickness gauge is totally worth it.
To recap, here’s a quick look at how these tools stack up:
| Tool Type | Best For | Accuracy Level | Ease of Use |
| Tape Measure | General, quick checks | Medium | Very easy |
| Calipers | Smart/electronic hardware, tight fits | High | Easy (digital) |
| Door Thickness Gauge | Multiple doors, pro installs | High | Very easy |
| Combination Square | Older/warped doors, carpentry | Medium-High | Easy |
| Laser Measurer | Oversized/commercial doors, gadget lovers | Medium-High | Moderate |
The right tool is the one that fits *your* skills, the hardware you’re using, and how much precision you need. Double-check that spec sheet, keep your measurements honest, and you’ll save yourself a world of troubleshooting—no matter if you’re syncing a smart lock, swapping a remote, or just want a deadbolt that feels solid every time you close the door.
In the end, measuring door thickness isn’t about showing off your handyman skills—it’s about making sure the hardware you choose works smoothly, securely, and for years to come. Once you’ve got that number locked in, you can code, pair, and reset your way to a front door that’s every bit as functional as it is welcoming.