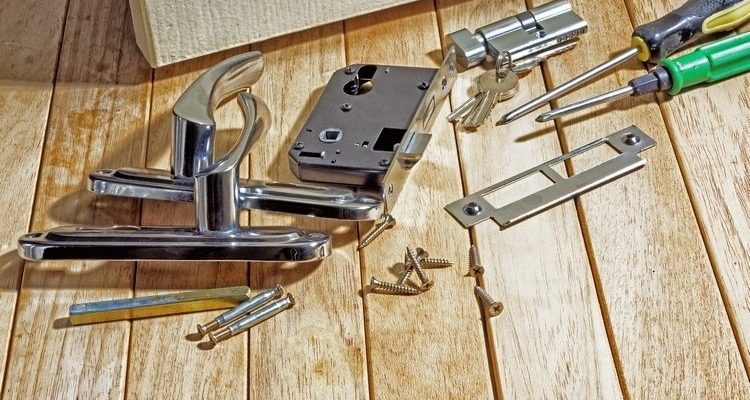
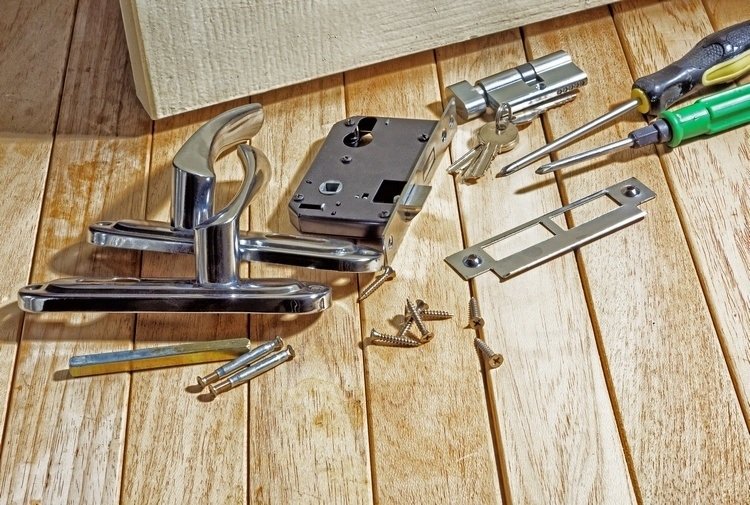
But here’s the catch: installing these screws isn’t like putting together Ikea furniture. Security screws are designed to keep out the bad guys *and* pretty much anyone who doesn’t have the right tools or know-how. If you’ve ever tried turning one with a regular drill or screwdriver, you know the feeling—stripped heads, slipped bits, and frustration. That’s why picking the right tools, whether you’re using a DeWalt driver or Milwaukee security bit set, makes all the difference between a secure door and a door that (honestly) you might as well leave unlocked.
Why Security Screws Matter On Exterior Doors
Let me explain why you even need to bother with security screws in the first place. Regular screws are easy to install, but anyone with a flathead or Philips screwdriver can take them out just as quickly. That’s not much of a challenge for someone looking to break in or cause trouble. Security screws, on the other hand, are basically the “no entry” signs of your door hardware setup. They come in unusual shapes—like Torx, spanner, or one-way—so standard tools just won’t cut it when it comes to removing them.
If you’ve got deadbolts, smart locks, or even a simple door handle set on your front door, those are the first lines of defense. Using standard screws here invites unwanted attention. Once you switch to security screws, you’re making it a headache for anyone trying to mess with the setup from the outside. Manufacturers like Schlage, Kwikset, and Yale often use specialty screws specifically for this reason.
Here’s the thing: the peace of mind is almost instant. You screw these in once, and you don’t have to worry about someone unscrewing your hard work unless they have very specific tools and a lot of patience. That’s a simple upgrade with a huge return. Plus, if you ever need to reset, swap, or troubleshoot your door hardware, knowing how these screws work (and how to install or remove them yourself) will save you a call to the locksmith.
Types Of Security Screws You’ll Run Into
You might be wondering, “Aren’t all screws more or less the same?” Not with security screws. There are a handful of designs, and the type your exterior door hardware uses will determine which tools you need.
- One-way screws: As the name suggests, you can drive these in, but taking them out is another story. They’re often found on public building doors or in areas that need serious tamper-resistance.
- Torx (star) security screws: These have a six-pointed star shape, usually with a pin in the middle. You’ll need a matching Torx security bit, which isn’t the same as a regular Torx bit—don’t get caught out.
- Spanner (snake-eye) screws: They have two tiny holes in the head. The spanner tool fits right in, and nothing else will work.
- Hex-pin screws: Similar to a regular hex/Allen screw, but with a stubborn little pin in the center.
Different brands use different styles. For example, Schlage might go with Torx, while some Kwikset models use spanners. It’s important to check what’s included with your lockset before you start so you can pick the right installation tools.
Must-Have Tools For Installing Security Screws
Honestly, trying to use the wrong tool here isn’t just annoying—it can wreck your screws and your hardware. The best tools for installing security screws on exterior door hardware are:
- Security Bit Set: These sets include a wide variety of bit types—Torx security, spanner, tri-wing, and hex-pin, among others. Brands like Wiha, Milwaukee, and DeWalt offer reliable, well-made sets that fit most drill/drivers.
- Magnetic Screwdriver or Drill: If you’re not going manual, a cordless drill with a variable speed setting (like the ones from Makita or DeWalt) makes the job faster and your hand less sore. Just don’t overtighten and strip the screw head.
- Manual Precision Screwdriver: Sometimes, especially with smaller or more delicate hardware, you’ll want more control than a power tool can give. Precision screwdriver sets with interchangeable security bits are super handy.
- Headlamp or Adjustable Work Light: Trust me, there’s nothing more frustrating than trying to line up a tiny Torx screw in a shadowy corner by feel. A headlamp gives you back both hands.
One word of advice? Double-check your security bit sizes before starting—security screws are stubborn, and using the wrong size or type can leave you searching “how to remove stripped security screws” before you even finish the install.
Step-by-Step Guide: Installing Security Screws On Your Door
You’ve got your tools, you’ve confirmed the screw type—now it’s time to actually get those things installed. Here’s how you do it without losing your mind:
- 1. Prep Your Door Hardware: Make sure all the pieces fit together properly before dealing with security screws. Some brands, like Schlage or Yale, recommend a quick “dry fit” to check everything lines up.
- 2. Pick The Right Bit: Match your security screw head (Torx, spanner, etc.) with the right bit from your set. If there’s a center pin, make sure your bit has the hollow end to fit over it.
- 3. Use Steady, Even Pressure: Whether you’re using a manual screwdriver or a drill, go slow and steady. Security screws can be soft, and their unique heads are easy to strip if you rush or slip.
- 4. Don’t Overtighten: Once the screw is flush, stop. Trying to force it further can damage the screw or your hardware. If your drill has a clutch, use a light setting.
- 5. Double-Check Alignment: Before you call it done, operate your lock or handle a few times to make sure everything’s smooth and secure.
If you run into trouble—like a screw refusing to go in straight or a bit that keeps camming out—back up, check your alignment, and try again. Sometimes it really is just a matter of slowing down and resetting.
Common Problems And How To Dodge Them
Security screws are meant to be a pain to remove, but that pain can hit you, too, during installation. Here are a few headaches people run into—and how to fix or avoid them:
If your bit keeps slipping, it probably doesn’t fit the screw perfectly. Forcing it usually just strips the head or splits the bit. Always try the bit in the screw head before starting to make sure it’s a snug fit.
- Stripped Screw Heads: Stop as soon as you feel the bit start slipping or skipping. Reset the bit, try a manual driver for better control, and stay straight-on—no wiggling. If it’s already stripped, sometimes rubber bands or specialty extraction tools can help, but prevention is easier.
- Bit Breakage: Security bits are often more brittle than regular ones. If you’re using a drill, avoid high torque settings. Manual drivers are safest where you need finesse.
- Misalignment: If your hardware isn’t flush or your holes don’t line up, don’t try to force the screws. Loosen everything and realign, or you’ll end up cross-threading and making things worse.
Some brands even include a “universal” security bit in the box, but honestly, they’re usually cheap and wear out fast. Investing in a good-quality set saves you frustration in the long run.
Power Tools vs. Hand Tools: Which Is Better?
You might be tempted to reach for your cordless drill and power through installation, but is faster always better? Well, not exactly. Power tools like a DeWalt or Milwaukee drill can make short work of driving in security screws, especially for longer screws or heavy-duty hardware. They save a lot of wrist strain, but you have to keep the speed and torque low to avoid damaging your screws or hardware.
Manual screwdrivers, on the other hand, give you better control and a “feel” for how much force you’re applying. This is handy with smaller screws, soft metals, or when working in awkward corners where a power tool just doesn’t fit. Honestly, for most people, it’s smart to have both ready—use the drill for most of the work, then switch to a hand tool for the last few turns or any tight spots.
If you’re dealing with tricky security screws, don’t shy away from mixing and matching tools. The right combo keeps things moving smoothly and helps you avoid unplanned “troubleshooting” down the line.
Alternative Solutions If You Don’t Have The Exact Tool
Say you’re halfway through installation and realize your bit set doesn’t include that weird spanner or Torx security bit. First: don’t panic, and definitely don’t try to force it with a flathead. That’s how screws (and tempers) get ruined. Instead, here are some practical workarounds:
- Visit Your Local Hardware Store: Most will carry individual security bits or a small set. It’s worth picking up the right one, even if it means pausing your project for an hour.
- Order a Universal Security Bit Set: Brands like Wiha, Milwaukee, and DeWalt make sets that cover nearly every security screw style. You’ll thank yourself the next time you run into a weird screw, whether it’s on a door, electronic device, or car part.
- Borrow Or Swap With Neighbors: Sometimes, someone nearby has exactly what you need. Ask around before buying a whole set you might use once.
If you’re really stuck, you can try using a precision pliers or specialty extraction tool to remove a screw, but that’s more of a last resort. It’s always better to sync up with the correct bit and take your time.
Final Thoughts: Getting Security Screw Installation Right
Here’s the thing: installing security screws on exterior door hardware isn’t rocket science, but it does take the right approach and the right tools. Whether you’re using a good security bit set from DeWalt or Milwaukee, a reliable manual screwdriver, or even a trusty headlamp for those late-night projects, having what you need on hand makes the whole process less of a headache.
Take your time, match your tools to your screws, and don’t be afraid to troubleshoot or reset if things aren’t lining up perfectly. At the end of the day, those little screws are doing a big job—keeping your home secure and your hardware safe from tampering. It’s worth a few extra minutes and the right tools to get it done right.