Imagine you’re at home, trying to fix a squeaky door. You unscrew the handle only to discover that the screw is broken off right at the surface. You might feel a little panic, but there’s no need! Many tools are designed specifically for situations like this. Think of them as your trusty sidekicks, ready to swoop in and save the day. In this guide, we’ll explore the best tools available to extract those pesky broken screws and get your door hardware back in working condition.
Understanding Broken Screws in Door Hardware
Broken screws happen to the best of us. Maybe it’s a result of rust, wear, or a simple mishap while you’re trying to unscrew it. What really matters is how you handle it. First, understand the type of screw you’re dealing with. Some screws are embedded deep within materials, while others might be partially exposed. Identifying the situation can help you choose the right extraction tool.
You might be wondering why it’s crucial to remove a broken screw. Well, leaving it in can lead to uneven hardware, difficulties in reattachment, or worse—damage to the surrounding area. Plus, removing it can prevent further issues down the line, like squeaky hinges or malfunctioning locks. So, let’s get into the tools that can help you do just that.
Common Tools for Extracting Broken Screws
There are several tools you can use to extract broken screws. Each has its unique benefits and methods. Here’s a brief overview of the most common ones:
- Screw Extractors: These are specialized tools that grip the broken screw, allowing you to twist and pull it out. They come in various sizes, so you can find the right one for your situation.
- Drill Bits: Sometimes, using a drill bit just slightly larger than the screw shaft can help. You’ll drill into the screw, which may loosen it enough to pull out.
- Pliers: If there’s enough of the screw sticking out, a good pair of locking pliers can grab the screw, letting you twist it right out.
- Heat Tools: In some cases, applying heat can help. Tools like soldering irons can soften glue or rust that might be holding the screw in place.
- Rubber Bands: This is a neat trick! Placing a rubber band over the screw can give you extra grip when you’re trying to turn it out with a screwdriver.
Each tool is designed for different scenarios, so consider your specific situation when choosing. Let’s dive deeper into these tools.
Screw Extractors: Your Best Friend
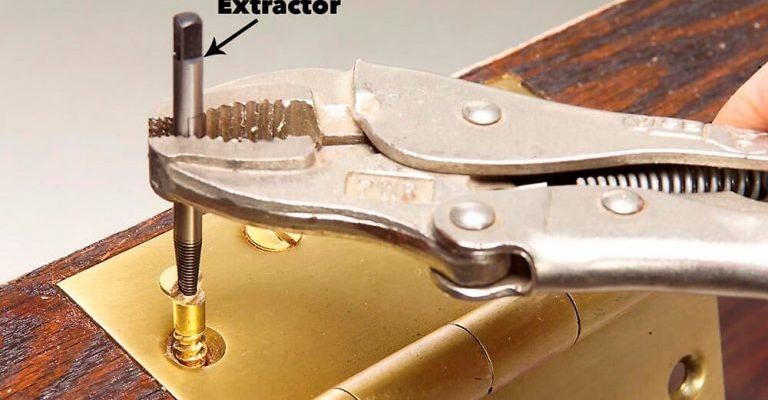
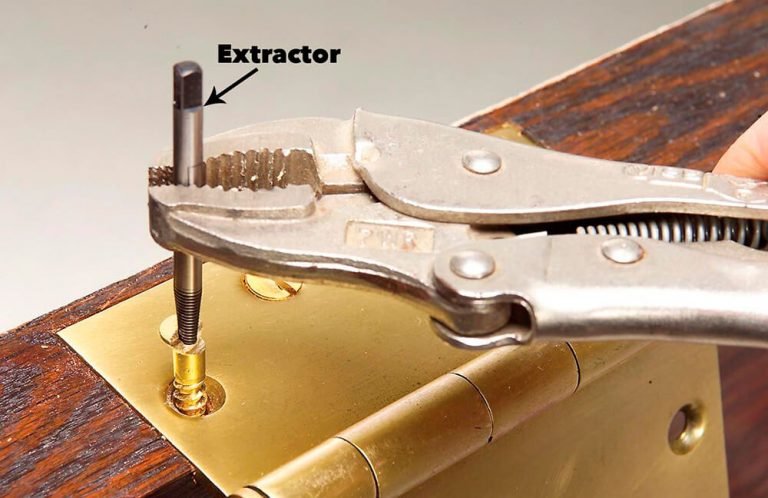
When it comes to extracting broken screws, screw extractors are often the go-to tool. They come in sets, usually containing various sizes. Their design features sharp threads that grip the screw as you turn it counterclockwise. Think of them as little drills that help you get a hold on that stubborn screw.
Here’s the thing: using screw extractors requires a bit of patience. You’ll need to drill a small hole into the center of the broken screw before inserting the extractor. It’s a step that can feel a bit daunting, but with the right guidance, you’ll nail it. Make sure to drill slowly and carefully to avoid damaging the surrounding material.
If the extractor doesn’t work on the first try, don’t give up! Sometimes, the extractor needs a little coaxing, or you might need to try a larger size.
Drill Bits: A Simple Solution
Using drill bits is another effective way to extract broken screws. The idea is straightforward: you’ll drill into the screw, creating enough space to remove it. This method works best if the screw head is broken off and there’s nothing sticking out to grab onto.
To use this method, select a drill bit that’s slightly larger than the screw itself. Start by marking the center of the screw as best you can and then drill carefully. You want to avoid going too deep and damaging the material around the screw. Once you’ve drilled deep enough, the screw may loosen or break free entirely. If not, you can always follow up with a screw extractor.
Pliers: For Sticking Out Screws
Sometimes, you might be lucky enough to have a bit of the screw sticking out. This is when a good pair of locking pliers comes in handy. Here’s how you can make it work:
1. Grip the Screw: Position the pliers around the exposed part of the screw, making sure you get a firm hold.
2. Twist and Pull: Slowly twist the pliers while pulling gently. With enough patience, the screw can come out.
This method is straightforward, but if you find you’re not getting anywhere, it might be time to switch to a different tool. Don’t force it; you don’t want to damage the hardware further.
Heat Tools: An Alternative Approach
In some cases, heat tools can help loosen screws that are stuck due to rust or adhesive. A soldering iron can be particularly useful here. The heat softens the material surrounding the screw, making it easier to extract.
To do this safely, follow these steps:
1. Heat the Tool: Turn on the soldering iron and let it heat up.
2. Apply Heat: Carefully touch the tip of the soldering iron to the broken screw. Be careful not to burn yourself or damage the surrounding area.
3. Try Extracting Again: After a minute or so, use your extractor or pliers to see if the screw has loosened.
This method can work wonders, especially in tight spots where other tools can’t reach. Just remember to keep safety in mind!
Rubber Bands: A Handy Trick
Finally, let’s talk about an underappreciated tool: the rubber band. If you’ve got a screw that’s not completely broken but just won’t budge, this trick can be a lifesaver.
To use this method:
1. Place the Rubber Band: Lay a rubber band over the screw head.
2. Apply Steady Pressure: Use a screwdriver to try turning the screw again. The rubber band will grip the screw, providing extra traction.
This simple method can be a game changer when all else fails, proving that sometimes the best solutions are the most unexpected.
Extracting tiny broken screws from door hardware doesn’t have to be a headache. With the right tools, you can tackle this small challenge like a pro. Whether you opt for screw extractors, drill bits, pliers, heat tools, or even rubber bands, the key is patience and a steady hand.
Remember, it’s about understanding your specific situation and choosing the best tool for the job. Every door or cabinet is different, and sometimes it takes a bit of trial and error to find what works for you. Soon enough, you’ll have your hardware back in shape, and you’ll be able to take on future repairs with confidence. Happy fixing!