
Painting hinges properly can make all the difference when it comes to function and aesthetics. You want your door to open easily while also looking sharp, right? Many people worry that painting hinges will cause them to stick, but with the right techniques, you can achieve both a polished look and smooth operation. So, let’s dive in and explore the best practices for painting hinges to avoid sticking without having to take them off.
Understanding Your Hinges and Their Function
Before we get into the nitty-gritty of painting, it helps to know a bit about what you’re working with. Hinges are mechanical devices that connect two objects, allowing them to pivot relative to one another. Think of them as the silent workhorses of your doors, providing the ability to swing open and closed smoothly.
Most common hinges are made of metal and come in various types, including butt hinges, continuous hinges, and strap hinges. Each type serves a specific function, but they all share the common goal of facilitating movement. When you paint them, you’re not just changing their color; you’re affecting their entire operation. That’s why choosing the right method and materials is crucial—even if it feels like a small detail.
You might be wondering why it’s so important to avoid sticking. Sticking hinges can lead to frustration, and over time, they might even cause damage to your door frame. Let’s get into how to paint your hinges carefully so you can avoid these issues.
Choosing the Right Paint and Supplies
When you’re planning to paint hinges, starting with the right materials is vital. Not all paints are created equal, and choosing the wrong one can lead to sticking or peeling over time. For hinges, you want a paint that offers durability and flexibility.
Look for a paint specifically designed for metal surfaces. Oil-based paints are often the best choice because they adhere well and dry hard, giving a smooth finish. However, they can take longer to dry compared to water-based options. Alternatively, spray paint for metal can offer an easy application and a nice finish without the hassle of brushes.
Don’t forget your supplies! You’ll need the following:
- Painter’s tape
- Drop cloths or newspapers
- A small paintbrush or a spray can
- Sandpaper (fine grit)
- Primer (optional, but recommended for better adhesion)
Having everything ready before you start will make the process smoother and more enjoyable.
Preparation is Key: Cleaning and Taping
Now that you’ve got your materials, it’s time to prepare. Think of this step as getting ready for a big game—you want everything in top shape before you dive in. Begin by cleaning the hinges thoroughly. Use soap and water or a degreaser to eliminate any dirt or grease. A clean surface allows the paint to adhere better, minimizing the chances of it chipping later.
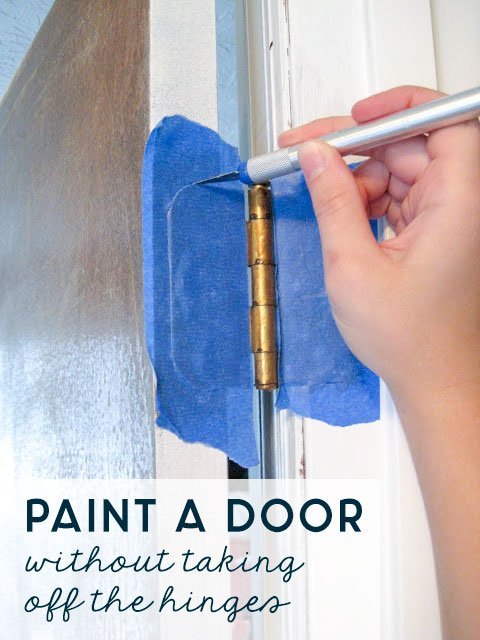
Next, dry the hinges completely. Now’s the time to use painter’s tape. Apply it around the hinges carefully to protect the surrounding areas from any paint splatters. You might think you can skip this step, but trust me; it saves a lot of time and trouble down the line.
If your hinges have any old paint or rust spots, gently sand them down with fine-grit sandpaper. This step not only smooths out the surface but also helps the new paint stick better.
Applying Primer: Is It Necessary?
Here’s the thing—while primer isn’t strictly necessary, it can be a game changer. If your hinges are rusty or if you’re switching to a lighter color from a darker one, applying a primer will make your final coat look richer and more even.
Choose a metal primer that suits your paint type. If you’re using oil-based paint, stick with an oil-based primer. For spray paints, many brands offer a primer combined in the product, which simplifies the process.
Apply a thin layer of primer and let it dry completely. It usually takes about an hour, but you should always check the product instructions. Once the primer is set, lightly sand it again if necessary. This will help achieve that sleek finish you’re looking for.
Painting Your Hinges: Techniques for Success
With everything prepped, it’s finally time to paint! If you’re using a paintbrush, take your time, and apply a thin layer. Start with the edges and work your way in. You want to avoid overloading the brush with paint, which can cause drips and uneven layers.
If you’re using spray paint, hold the can about 8–12 inches away from the hinges and use smooth, steady strokes. A back-and-forth motion works best. Start outside the hinge, and move in for a clean application.
Here’s a tip: Apply several light coats instead of one heavy coat. This method minimizes the risk of creating sticky, clumpy surfaces. Allow each coat to dry before applying the next, and be patient—you’ll thank yourself later for taking this extra time.
Finishing Touches and Ensuring Smooth Operation
Once you’ve painted your hinges and allowed them to dry fully, it’s essential to check their operation. Gently open and close the door a few times to ensure that nothing is sticking. You may notice a bit of resistance at first, but that should ease as the paint settles.
If you find that they’re sticking even after proper drying, don’t fret—adding a lightweight lubricant like WD-40 can help loosen things up. Just apply a small amount to a cloth and wipe it on the hinges. Trust me; it works wonders and will keep everything working smoothly.
Finally, remove any painter’s tape carefully. If you notice any paint seepage, you can touch it up with a small brush. Just make sure to clean your brushes immediately after use, so they stay in good shape for next time.
Common Mistakes to Avoid
Everyone makes mistakes, but knowing them ahead of time can save you from future headaches. Here are a few pitfalls to watch out for:
- Rushing the drying time: Don’t be tempted to skip waiting for each coat to dry fully. Prematurely closing the door can make everything stick.
- Using the wrong type of paint: Stick to metal-specific paint to avoid chipping and peeling later.
- Skipping sanding: Neglecting to sand before painting can lead to uneven surfaces and poor adhesion.
Awareness of these common errors can smooth your painting process and lead to a professional-looking finish.
Enjoying Your Newly Painted Hinges
Once you’ve followed these best practices for painting hinges, you can sit back and admire your work. Enjoy the fresh look of your newly painted hinges that not only enhance your door’s appeal but also function smoothly.
Remember, keeping hinges painted and maintained is just like caring for anything else in your home. Regular checks can help catch any issues before they become problems. So, the next time you contemplate a quick home upgrade, consider the magic of freshly painted hinges. They’ll bring new life to your doors, and you won’t have to worry about sticking. Happy painting!