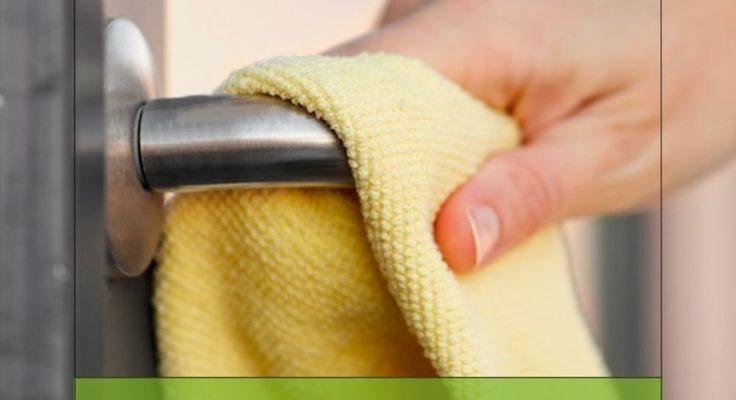
Deep cleaning exterior door hardware isn’t just about looks, either. When dirt and grime build up, it gets harder for things like deadbolts and levers to move smoothly. If you’ve ever jiggled your key, hoping the lock will finally turn, you know exactly what I mean. Maybe your hardware is Schlage, Kwikset, or Baldwin—it doesn’t matter. The right deep cleaning routine helps *any* door hardware work better and last longer.
If you’re not sure where to start (or what you should be scrubbing), don’t worry. Below, I’ll walk you through best practices for getting every last hinge, knob, plate, and lock as clean as possible—without causing damage or voiding your warranty.
Why Deep Cleaning Exterior Door Hardware Matters
Think of exterior door hardware as the handshake your home gives the world. Not only do these pieces—handles, deadbolts, keypads, and hinges—welcome guests, but they’re your first line of defense against break-ins and bad weather. If you let dirt, grime, and rust pile up, you’re making it easier for problems to sneak in—literally.
Corrosion and stiffness are the biggest threats. When moisture, salt, and dust get inside a lock or hinge, they can eat away at the metal or seize up moving parts. Over time, you might end up with a frozen deadbolt the night you lock yourself out. Even “maintenance-free” finishes, like those on some Yale or Kwikset locks, can lose their luster if neglected.
You might be wondering if quick surface wipes are enough. Honestly? That’s like rinsing only the outside of your car and never bothering with the wheels. A deep clean every few months keeps everything running smooth, helps prevent expensive repairs, and gives your entryway a boost in curb appeal.
Plus, with smart locks and digital keypads now common, keeping things spotless can help prevent sync and code errors from sticky keys or blocked sensors. So, there’s more at stake than you might think.
Gathering the Right Cleaning Tools and Supplies
Getting your door hardware spotless starts with the right gear. It’s tempting to just grab whatever spray is under the sink, but many household cleaners are harsh—especially for brass, nickel, or special coated finishes. Here’s the thing: Using the wrong product can leave scratches, discolor the metal, or even break delicate parts like electronic code pads.
- Soft cloths or microfiber towels: These are your go-to for wiping and buffing without leaving lint or scratches.
- Mild soap and warm water: For most brands and finishes, this combo is gentle but effective.
- Soft-bristled toothbrush: Great for getting into crevices around locks and hinges where dirt hides.
- Cotton swabs: Perfect for cleaning inside lock cylinders, keypad edges, or tight hinge corners.
- Non-abrasive sponge or pad: For stubborn grime, but make sure it won’t scratch the finish.
- Lubricant (like graphite powder for locks): Helps with sticky locks, but avoid oil-based sprays unless your lock’s manufacturer recommends them.
Double check your hardware’s care instructions (yes, it’s worth digging out the manual or googling your specific Kwikset or Schlage model) before using any chemical cleaners. Some finishes—like oil-rubbed bronze or matte black—need extra caution.
How to Remove and Prepare Door Hardware for Deep Cleaning
Before you scrub, it’s smart to remove hardware from the door—at least the parts you can. You might be tempted to clean everything in place, but trust me: popping handles and plates off lets you reach hidden grime, and keeps water from seeping into the door or frame.
Let me explain how to do this step-by-step, even if you’re not a DIY pro:
- Gather tools: Most hardware only needs a Phillips screwdriver. For some brands, you might need an Allen wrench (hex key).
- Remove the screws: Start with visible screws on the interior side. Hold the exterior handle or lock as you unscrew, so it doesn’t drop and chip your paint.
- Detach the hardware gently: Wiggle handles and plates free. For tight pieces, use a soft cloth to protect the finish as you pry them loose.
- Take out the latch or deadbolt: Most slide out once you remove the faceplate screws.
Keep screws and small parts in a cup or bag—you don’t want to be on hands and knees searching for a runaway spring later. If you have a smart lock or keypad, check the battery compartment and remove batteries before cleaning. This helps avoid sync issues or accidental resets.
If you can’t (or don’t want to) remove a part—like a heavy-duty hinge—just be extra careful to avoid drips and buildup around the door frame.
Step-by-Step Deep Cleaning Methods for Each Component
Now for the main event. Here’s how to deep clean every part of your exterior door hardware, whether it’s stainless steel, brass, bronze, or a painted finish.
Handles, Knobs, and Plates
- Wipe with soapy water: Dip a cloth in mild soap and water, wring it out well, and scrub every surface. Don’t forget the underside and any detailed grooves.
- Scrub crevices: Use your toothbrush to reach tight spots and edges.
- Rinse and dry: Wipe away all soapy residue with a clean, damp cloth. Dry thoroughly to prevent water spots.
Locks and Keypads
- Clean exterior: Use a barely damp cloth. Avoid letting water get inside the cylinder or keypad.
- Gently clean keyways and crevices: Use a cotton swab or dry toothbrush to dislodge dirt near the slot or code buttons.
- Lubricate: If the lock feels sticky, add a small puff of graphite powder into the keyhole. Avoid oil-based sprays, which can gum things up.
Hinges and Screws
- Brush away dirt: Use a dry toothbrush to loosen dust and debris.
- Clean surface: Wipe down with a damp cloth, then dry right away.
- Lubricate moving parts: Add a dab of silicone-based lubricant if the hinges squeak, but don’t overdo it.
If you spot rust, try scrubbing with a little baking soda paste, but be gentle—harsh scrubbing can scratch up most finishes. For persistent tarnish on brass (real, not coated), a bit of lemon juice and baking soda can work wonders, but test in a hidden spot first.
Dealing with Smart Locks and Keypads: Special Tips
If you’ve switched from a standard deadbolt to a smart lock or digital keypad, deep cleaning takes a little more care. Brands like August, Yale, or Schlage Encode are full of sensitive electronics that don’t play nicely with water or harsh chemicals.
Here’s the right way to keep things clean *without* causing trouble:
- Power down first: Always remove batteries or disable power before you start. It’s easy to accidentally press buttons and trigger a code reset or pair mode while cleaning.
- Use dry tools: Stick to slightly damp microfiber towels for the surface. Never spray cleaner directly on the unit.
- Clean in small sections: Focus on one area at a time, especially around screens or fingerprint sensors. Use a cotton swab for crevices around keys or the code pad.
- Check for error codes: After cleaning, reinsert batteries and make sure your lock syncs and resets properly. If you see a trouble code or can’t unlock via remote, double check batteries and connections.
If you ever notice persistent troubleshooting errors after cleaning—like the lock not syncing with your phone or the battery draining quickly—remove and reinstall batteries, and check the manufacturer’s website for reset instructions. Sometimes tiny amounts of moisture inside the device can cause problems, so keep things dry at all times.
A little patience goes a long way—treat smart locks the way you would your phone or tablet, not like a piece of plumbing!
How Often Should You Deep Clean Exterior Door Hardware?
Here’s the million dollar question: how often do you really need to do this? The answer depends on your climate and how much traffic your entryway sees, but a good rule of thumb is every three to six months for a full deep clean. That sounds like a lot, but if you quickly wipe down handles and keypads every week or so, you’ll stretch out the time between big scrubbing sessions.
- Humid or coastal areas: Salt and moisture speed up corrosion. Clean more often—every two or three months is smart.
- City or high-traffic homes: Pollution and fingerprints pile up fast. Monthly wipe-downs keep hardware looking sharp.
- Low-use or protected doors: Every six months is probably plenty. Just keep an eye out for sticky locks or dull finishes.
If you ever notice stiffness, odd noises, or see your keypad acting up (like entering the right code but not unlocking), don’t wait. Spot clean and re-lubricate as needed.
What to Avoid: Common Mistakes and Myths
It’s easy to overdo it—or do the wrong thing entirely—when cleaning exterior door hardware. You might be surprised at what can ruin a finish or make a lock harder to use. Let’s cover some classic “don’ts”:
- No harsh chemicals: Bleach, ammonia, or abrasive powders can scratch, corrode, or strip color from your hardware.
- Don’t soak or pressure wash: Drenching hardware lets water get inside locks or under plates. That’s asking for rust or sticky mechanisms.
- Skip the WD-40 in locks: While it’s great for squeaky hinges, oil-based sprays collect dust and can gum up modern lock cylinders. Use lock-specific lubricants instead.
- No steel wool: Even if you’re desperate to scrub off rust, don’t use heavy abrasives—they’ll scratch most finishes.
- Don’t reassemble before fully dry: Any moisture left inside a lock or under a plate can start corrosion from the inside out.
If you’re not sure about a cleaning method, always check the manual or the manufacturer’s website for brand-specific tips. Some universal remotes for smart locks even warn against using cleaners stronger than soap and water.
Extending the Life of Your Exterior Door Hardware
Deep cleaning is just one part of taking care of exterior door hardware. Want to keep everything working (and looking) its best for years to come? Take these extra steps:
- Wax or polish: A light coat of carnauba wax or finish-safe polish can protect against fingerprints and weather. Just make sure it’s safe for your finish.
- Routine checks: Every month or two, inspect screws, hinges, and lock movement. Tighten loose screws and spot-lubricate sticky spots.
- Cover in extreme weather: If you live somewhere with salty air or heavy storms, consider a storm door or small overhang to shield your hardware.
- Replace worn gaskets or seals: These help keep water out of smart locks and keypads. If you see cracks or gaps, replace them before moisture gets in.
Every time you unlock your door, you’ll know things are working right—and you’ll avoid the frustration of fighting with a sticky handle or a keypad that refuses to pair.
The best way to prevent expensive repairs? Stay ahead of the grime, and your hardware will thank you.
Wrapping Up: Why Deep Cleaning Makes a Difference
Giving your exterior door hardware a real deep clean is about more than just appearances. It’s a smart move for your wallet, your home’s security, and your peace of mind. Every handle, hinge, lock, and keypad gets exposed to the elements day in, day out. A simple, regular cleaning routine keeps everything shining, prevents stubborn problems, and lets you skip those frustrating moments when your key won’t turn or your code won’t sync.
Whether your entryway hardware is classic brass, modern matte black, or a high-tech smart lock, a little extra care goes a long way. With the right supplies, some simple steps, and a bit of patience, you’ll get professional-level results—no need for fancy tools or special skills. Next time you step through your front door, take a moment to appreciate that smooth, satisfying click. Clean hardware really does make your home feel fresher, safer, and more welcoming.