Honestly, most folks don’t even think about cleaning the internal components of a deadbolt until something starts to go wrong. Maybe your key feels stubborn or you notice the lock’s response is delayed. Whether you’re dealing with a Schlage, Kwikset, or Yale deadbolt, the basics are usually the same. And while you don’t need a full toolbox to get it right, a little knowledge and the right approach can make all the difference. Let me walk you through the best practices so your lock runs smoothly and keeps your home safe.
Why Cleaning Your Deadbolt Matters
Here’s the thing: a deadbolt is only as strong as its weakest point. If the inner workings are clogged or corroded, even the best brand or high-security model won’t live up to its promise. Dirt and grime inside the lock body can make turning the key feel stiff, or worse—lead to jams that leave you locked out or struggling at your own front door. For folks who rely on code or smart deadbolts, dust can even interfere with the electronic sync and sensor mechanisms inside.
Think about it: your deadbolt’s internal components are exposed to outdoor air through the keyway and bolt channel. Tiny debris, metal shavings from the key, and even pocket lint can work their way inside over time. A regular cleaning routine clears out these troublemakers and keeps the tumblers and springs moving like new.
Even if you use a remote or keypad-based deadbolt and rarely insert a key, the mechanical bits still need care. Deadbolts aren’t one-size-fits-all, but whether you have a classic Yale or a modern “smart” Kwikset, buildup inside can affect everything from smooth locking to battery life in electronic models. Bottom line: maintenance matters, even if your lock seems fine right now.
Signs Your Deadbolt Internal Components Need Cleaning
You might be wondering, “Do I really need to clean inside my deadbolt yet?” Good question. Most locks won’t wave a white flag, but they do send some subtle (and not so subtle) signals:
- Key sticks or feels gritty: If your key doesn’t slide in and out smoothly, or turning it feels like grinding coffee beans, there’s likely debris inside.
- Difficulty locking or unlocking: Maybe your deadbolt needs a little wiggle, or you have to push extra hard. Mechanical resistance is often due to gunk.
- Unusual noises: Squeaks, rattles, or faint metallic scraping are red flags.
- Electronic deadbolt lag: If you use a code or remote and find delays or syncing issues, internal dust could be the culprit, especially if sensors are affected.
Ignoring these signs isn’t just inconvenient—it can cause lasting damage. Letting dirt build up can wear out the lock or even mess with smart features and battery connections. If you notice these symptoms, don’t wait for a full breakdown.
Tools and Supplies You’ll Need
You don’t need to be a locksmith or invest in fancy gear to clean your deadbolt’s internal components. Most households already have the basics:
- Phillips and flathead screwdrivers: For removing the deadbolt from the door.
- Cotton swabs and a soft-bristled brush: Think old toothbrush or small paintbrush for loosening debris.
- Compressed air: A quick blast can clear out stubborn dust inside tiny crevices.
- Lubricant: Graphite powder or a silicone-based spray is ideal. (Never use WD-40 or oil, which can attract dust and gum up the works.)
- Clean rag or paper towels: For wiping components and drying after cleaning.
- Disposable gloves: Optional, but handy if you dislike mess or work with old, grimy locks.
If you’re dealing with a smart deadbolt, have the battery and code ready in case you need to reset or re-pair the lock after reassembly. Keep your phone or the remote handy as well—just in case syncing issues crop up post-cleaning.
Step-by-Step: How to Safely Clean Inside Your Deadbolt
Let’s break it down simply. Taking apart your deadbolt might sound intimidating, but if you work slowly and keep track of parts, it’s pretty straightforward.
1. Remove the Deadbolt from the Door
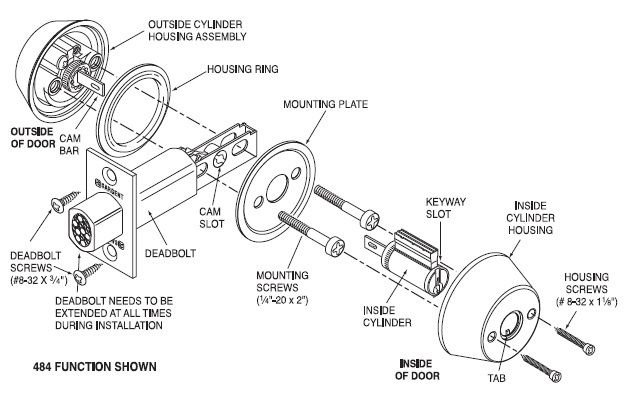
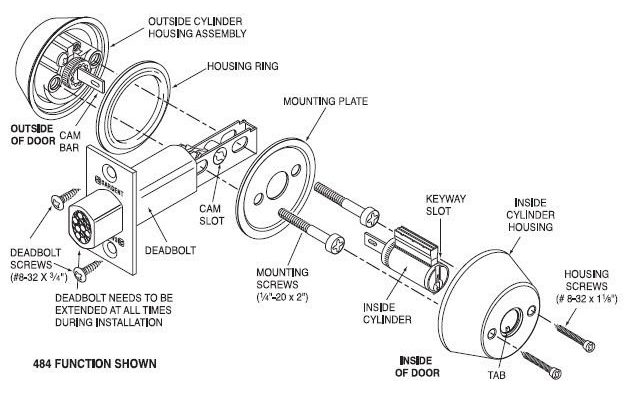
Start by unlocking the door and opening it wide for easy access. Use your screwdriver to take out the screws from the deadbolt’s faceplate (the part on the edge of the door) and the interior thumbturn plate. Gently pull both halves away, keeping all screws and parts together so nothing gets lost.
2. Disassemble the Interior Lock Parts
Next, you’ll see the lock body (the chunk containing the cylinder and bolt). If your model allows, unscrew and gently open the main housing. It’s normal to find small springs, pins, and tumblers inside—these are what you’ll be cleaning. Keep them organized on a clean towel.
3. Clean Out Dust and Debris
Time for the real cleaning. Use a brush or cotton swab to loosen dust and dirt on all surfaces. For tight spots, a blast of compressed air works wonders. Wipe each part gently so nothing gets scratched or bent.
4. Lubricate the Moving Parts
This is crucial. Sprinkle a tiny bit of graphite powder into the cylinder and moving joints, then work the mechanism back and forth a few times. If you use spray, apply very lightly—more is not better here. Wipe any excess lubricant so it doesn’t attract new dirt.
5. Reassemble and Test
Put all the internal components back in reverse order, making sure everything clicks into place smoothly. Reattach the deadbolt to your door. Test the action with the key, thumbturn, and—if you have one—the remote or keypad. If anything feels off, repeat the cleaning or double-check for missed dirt.
Never force a part back into place. If something resists, stop and see if there’s hidden debris or a piece out of alignment.
Extra Tips for Smart and Electronic Deadbolts
Modern deadbolts aren’t just about a metal key—they may use codes, wireless pairing, or battery power. Here’s what to keep in mind:
- Batteries out before cleaning: Always remove batteries before disassembling any electronic deadbolt.
- Check the code memory: Read your brand’s manual (Schlage, Kwikset, Yale, etc.) to see if unlocking or disconnecting the lock could reset codes or require re-syncing your remote.
- Sensor and contact care: Dust off battery contacts and electronic sensors using a clean, dry cloth. Don’t use liquids or sprays here.
- After cleaning, re-pair: Sometimes you’ll need to re-pair or sync the lock to your smart home system or remote after putting everything back together. Do a quick test run before locking yourself out, just in case.
If your lock uses a backup keyway, don’t forget to clean and lubricate it too. Sensors and moving parts both need attention, or else you’ll run into weird troubleshooting headaches later.
Choosing the Right Lubricant for Deadbolts
Let me explain why lubricant choice matters. It’s tempting to grab whatever’s in the garage, but not all sprays and powders play nice with lock internals. Some products—like WD-40 or oil-based lubricants—actually attract dust and turn sticky over time, which can lead to more problems down the road.
For most deadbolts, especially brands like Schlage and Kwikset, graphite powder is the gold standard. It’s dry, doesn’t gum up, and provides smooth action for the tiny parts inside the cylinder. If you prefer a wet option, go with a silicone-based spray—just use it sparingly and avoid flooding the lock. Never use grease or any thick pastes.
A well-lubricated deadbolt feels buttery smooth, requires less effort to turn, and holds up better against wear and tear. Don’t skip this step!
When To Call a Locksmith Instead
Here’s a little honesty: sometimes, cleaning isn’t enough. If your deadbolt refuses to work even after a thorough cleaning, you might be facing more than just dirt. Worn tumblers, bent springs, or hidden corrosion can make home fixes impossible. And if you try to force stuck parts, you might end up bending or snapping something essential.
If you hear clicking but nothing moves, or you notice damage you can’t easily fix, it’s time to bring in a pro. Locksmiths have special code tools to diagnose, reset, and repair fancy electronic locks, too—so don’t sweat if your remote or keypad goes totally unresponsive after cleaning.
You should also call for help if your deadbolt is a high-security model with tamper-resistant features. Some brands build their locks in a way that makes DIY disassembly tricky, not to mention risky for your warranty. In these cases, professional service keeps you safe and saves time.
How Often Should You Clean Your Deadbolt’s Internal Components?
Honestly, most people only clean their deadbolt if something goes wrong. That’s a bit like waiting for your car to break down before checking the oil. For best results, aim to clean out the internal components every 12–18 months—especially on doors you use daily. If you live somewhere sandy, humid, or with lots of pollen, bump it up to once a year.
Electronic and smart deadbolts sometimes need more frequent attention. All those little battery contacts and sensors are magnets for dust, and a quick cleaning can save you a lot of troubleshooting and code resets.
Here’s a simple schedule to keep in mind:
| Location | Cleaning Frequency |
| High-traffic entry doors | Every 12 months |
| Low-use or interior doors | Every 18–24 months |
| Humid, coastal, or dusty areas | Every 6–12 months |
| Smart/electronic models | Every battery change |
Make cleaning your deadbolt part of your regular home maintenance routine—right along with changing smoke detector batteries or syncing your remote control.
Wrapping Up: A Smooth, Secure Deadbolt Is Worth It
Taking care of your deadbolt’s internal components takes a little effort but pays off every time you unlock your door without a hitch. Whether you’re dealing with a classic key-based lock or the latest smart deadbolt with wireless syncing and code entry, clean internals mean reliable, safe performance. Don’t wait for your lock to get stubborn or stuck. A regular cleaning, the right tools, and a bit of patience keep life simple—and your home secure.
