If you’ve ever noticed your front door seal looking grimy or felt a breeze sneak past, you’re not alone. Whether you have a steel entry door, a sliding patio door, or a classic wooden front door, regular cleaning of the exterior door seals really makes a difference. Honestly, ignoring those squishy rubber or foam strips is kind of like leaving your car windows cracked in the rain—problems sneak up, and suddenly you’re left with bigger headaches. Let’s break down the best ways to keep that barrier in top shape, so your home stays snug, dry, and energy efficient.
Why Exterior Door Seals Matter More Than You Think
A well-maintained door seal isn’t just about keeping things tidy. It’s your home’s first line of defense against drafts, dust, bugs, pollen, and even noise. Ignoring the door seals can turn a simple entryway into a gateway for unwanted surprises. Here’s the thing—*even the best doors,* whether from Andersen, Pella, or a simple off-brand, lose their edge if the seals get dirty and start breaking down.
When grime, mud, or mold build up on the seals, a couple of things happen. First, the rubber or foam gets brittle and loses its flexibility. That means it can’t flex and seal out air as well as it should. Second, abrasive dirt can wear out the surface, causing cracks or gaps where water and bugs can slip through. Finally, all that gunk can make the seal stick to the door, which can pull it loose when you open and close it.
If you care about your heating and cooling bills—or just hate that whistling wind sound on a winter night—keeping your door seals clean is worth a few minutes of your time every month.
How to Tell When Exterior Door Seals Need Cleaning
You might be wondering, “How do I know it’s time to clean?” Thankfully, you don’t need a technician or any fancy code or troubleshooting app to figure it out. Here are the most obvious signs:
- Visible dirt or mold: Black streaks, fuzzy patches, or dusty outlines usually mean the seal is overdue for a wipe.
- Sticky or squeaky feeling: If the door sticks when you open or close it, or if the seal feels tacky or gritty, it’s gathering debris.
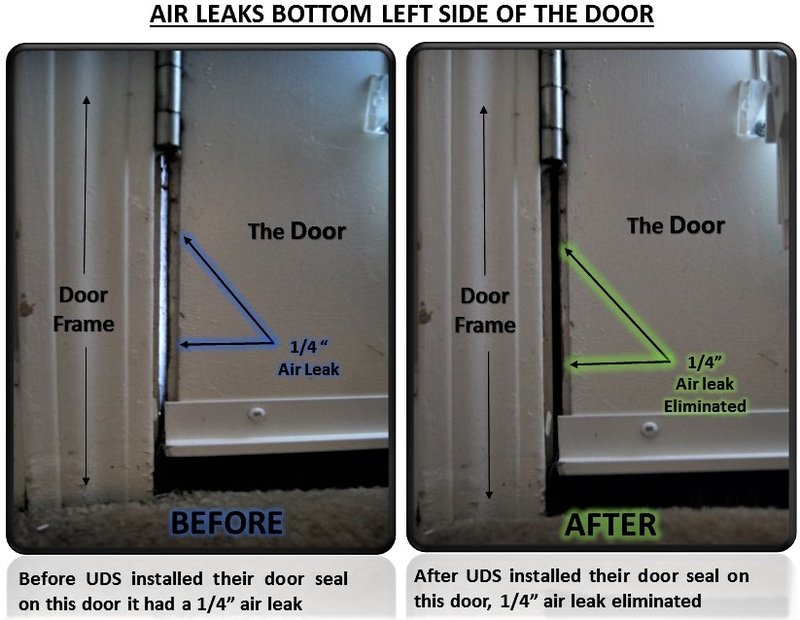
- Gaps or air leaks: Run your hand around the edges on a windy day. If you feel a breeze, cleaning (and maybe a reset or replacement) is in order.
- Unusual odors: Musty smells can signal mold or fungus—especially on older foam or rubber seals.
Honestly, a quick monthly check works wonders. I like to just run my finger along the seal when I’m doing other chores; if it comes up dirty or feels rough, it’s cleaning time.
Supplies You’ll Need to Clean Exterior Door Seals
Let me explain—you don’t need fancy gear or branded cleaning kits. Most people can use what’s already under the kitchen sink. Here’s a basic list of what actually works:
- Soft cloths or sponges: Old T-shirts, microfiber towels, or sponges all do the trick—just avoid anything scratchy.
- Mild dish soap: Nothing harsh. A small squeeze in a bowl of warm water cuts through most household grime.
- Bucket or spray bottle: Some people prefer dipping a cloth in soapy water, while others like spraying it on.
- Old toothbrush or cotton swabs: For those tight corners and the grooves in the seal, these help get gunk out without damaging the surface.
- Silicone-based lubricant: This keeps the rubber soft and flexible once it’s clean. Don’t use anything petroleum-based—it can break down rubber seals over time.
If you run into stubborn stains or mildew, a tiny splash of vinegar or a specialized rubber-safe cleaner can help. Just double-check the instructions for your specific door brand if you’re unsure—some high-end models (like Andersen or Pella) list what’s safe to use.
Step-by-Step: How to Clean Your Exterior Door Seals
Here’s how I’d walk you through the process, even if you’ve never done it before. Go slow, and don’t rush—you want to clean *without* damaging the seal.
- Start by opening the door fully. This gives you easy access to the entire seal, including top, sides, and bottom. For sliding patio doors, slide them all the way open.
- Dust off loose debris. Use a dry cloth or your hand to brush away loose dirt, leaves, or spider webs. For really gritty seals, a quick pass with a soft-bristled brush helps.
- Mix your cleaning solution. Add a few drops of mild soap to a bowl of warm water. Dip your cloth or sponge and wring it out so it’s damp, not dripping wet.
- Gently wipe the seal. Run your damp cloth along the length of the seal, getting both the side facing the outside and the side tucked against the door. Don’t forget the corners and the bottom edge.
- Scrub stubborn spots. For caked-on dirt or mildew, use an old toothbrush or cotton swab with a bit of soapy water. Work slowly to avoid tearing the seal.
- Rinse with a clean, damp cloth. Wipe again with just water to remove leftover soap.
- Dry thoroughly. Pat all surfaces dry with a towel. You don’t want moisture trapped against the door or seal—it can cause mold over time.
- Apply silicone lubricant. Rub a small amount along the cleaned rubber (following the product instructions). This keeps the seal flexible and helps prevent sticking.
If you spot major cracks, chunks missing, or notice that the seal won’t “reset” after cleaning, it might be time to replace it. Most seals are easy to pair or swap out—universal kits work for many doors, but double-check compatibility for your specific model.
Common Problems If You Neglect Cleaning Door Seals
You might be tempted to skip this chore, but here’s what happens if you don’t keep up:
- Stiff, brittle seals don’t flex and can’t make a good seal—let’s face it, that defeats their whole purpose.
- Cracks and rips lead to obvious gaps, which let in wind, bugs, and water. Over time, this can even damage your door frame or floorboards.
- Mold and mildew can spread, causing odors and even allergy problems—especially if the seal is foam and holds moisture.
- Sticking doors are a pain and can make the whole door hard to open, close, or lock. If your door remote (if you have a smart lock or sensor) keeps failing to sync or reset, dirty seals can even be the culprit by blocking sensors or triggers.
Honestly, it’s easier to keep things clean than deal with repairs or expensive replacements later.
How Often Should You Clean Exterior Door Seals?
You might be wondering what’s “enough”—is once a year plenty, or does it need to be more regular? Here’s my take:
- Every month or two: Quick dust or wipe-down, especially after storms, wind, or pollen-heavy days.
- Each season change: Do a more detailed clean and look for any signs of damage, mold, or wear. This is the best time to check all exterior doors before temperatures shift.
- After major weather: If you’ve had a big rainstorm, wind event, or lots of pollen, give the seals some extra attention.
If your door has a smart lock, remote opening, or security system, keeping the seals clean also helps avoid false codes or sync errors—less dirt means sensors read signals more reliably.
Can You Use Universal Seal Cleaners or Should You Stick With the Brand?
This is a common question, especially if you’re staring at a shelf full of “universal” cleaners or lubricant sprays at the hardware store. Let me explain:
Most exterior door seals are made from similar materials—rubber, silicone, or closed-cell foam. That means most mild soaps, water, and silicone lubricants are safe, regardless of the door brand. Universal products are usually fine for brands like Andersen, Pella, Marvin, or generic off-the-shelf doors.
But here’s the thing: if you have high-end, double-sealed, or specialty weatherstripping (or your door remote/manual specifically calls out a cleaning method), it’s worth reading the instructions before grabbing a cleaner. Using a harsh or incompatible product can *void the warranty* or wear out the seal faster.
For peace of mind, stick with soap and water for the regular clean, and only use dedicated cleaners or sprays if the manufacturer says it’s OK.
What To Do If Cleaning Doesn’t Fix the Problem
Sometimes even the best cleaning job can’t save a worn-out seal. If that’s your situation, don’t panic. Here’s what you can try next:
- Inspect for major damage: If parts of the seal are missing, peeling, or permanently crushed, it’s time to replace instead of clean.
- Check the seal’s fit: If it won’t pop back into shape or stay flush, it may need a reset or a new adhesive strip.
- Consider a universal replacement: For many doors, universal seal kits are available and easy to cut and pair to size.
- Brand-specific replacements: Some brands offer pre-cut replacement seals that are easy to install—great if you want a plug-and-play solution with no fuss.
If your door has a coded remote or sensor (common with smart locks or security doors), make sure dust or moisture isn’t blocking the signal. Sometimes a good cleaning around the battery compartment and sensors can help reset the connection and save you from unnecessary troubleshooting.
Wrapping It All Up: Keep Door Seals Clean for a Happier Home
Taking a few minutes every month to clean your exterior door seals really does pay off. You’ll keep your home more comfortable, protect your doors from early wear, and avoid those sneaky drafts or leaks that show up at the worst times. Don’t worry about being perfect—regular, gentle cleaning is better than a once-a-year deep scrub. And if you ever run into stubborn dirt, odd smells, or can’t get that seal to cooperate no matter how much you clean, replacement is easier (and more affordable) than you might think.
Next time you walk through your front door, give those seals a quick look. They might not get much attention, but with a little care, they’ll keep doing their job, quietly making your home safer, more efficient, and a whole lot comfier.
