Honestly, caring for your automatic door bottom isn’t as intimidating as it sounds. You don’t need fancy tools or an engineering degree—just a few minutes, the right products, and a little patience. In this article, I’ll walk you through everything you need to know: from safe cleaning steps to smart lubrication tricks that’ll keep your doors gliding shut and sealing tight. If you’ve ever wondered why your door doesn’t feel as solid as it used to, or if you just want to avoid expensive repairs, you’re in the right place.
What Is an Automatic Door Bottom, and Why Does It Need Care?
Automatic door bottoms are clever, spring-loaded strips that drop down to seal the gap under your door every time it closes. Picture a hidden gasket that pops into action, creating a tight barrier against drafts, sound, and even smoke. Brands like Pemko and National Guard have become go-to names for these gadgets in schools, hospitals, and even modern homes. But here’s the thing: even though these devices are tucked away, they face a non-stop battle with dirt, grit, and moisture.
Over time, the moving parts that allow the seal to drop and lift—think internal plungers, gears, and rubber—can start sticking or grinding. It’s a bit like how your bike chain builds up grime with use. If you ignore it, the automatic function won’t “sync” properly with the door closing, which leads to leaks and annoyance. Even worse, if the seal jams, you could end up with a remote door system that won’t code or reset as it should, since the bottom seal interferes with the movement.
Regular cleaning and lubrication do more than keep things tidy—they’re like troubleshooting for longevity and performance. Skipping this maintenance can mean higher energy bills, drafty rooms, and even broken hardware. If you’re still thinking, “Isn’t this just a basic part?” trust me: automatic door bottoms are small details that make a big difference.
Signs Your Automatic Door Bottom Needs Attention
You might be wondering how to tell when it’s time to clean or lubricate your automatic door bottom. There are a few telltale hints that almost everyone misses at first. If you notice a door that suddenly feels stiff, squeaks, or makes a grinding noise as it closes, that’s a red flag. Sometimes you’ll spot a little resistance when you try to close the door completely—like something is out of sync or caught halfway.
Another sign is visible dust, dirt, or sticky residue along the door bottom. Take a close look: does the seal look grimy? Are there dark streaks or even a buildup of pet hair and debris? If yes, the cleaning step is overdue. If you’ve got a remote-controlled automatic door, you might also experience issues where the seal doesn’t drop smoothly after you hit the button to pair or reset the remote. This isn’t always a battery or code problem—it’s often a mechanical issue down below.
If you notice air whistling through even when the door looks shut, or if you spot daylight under the door, the bottom seal isn’t doing its job. These simple clues are your door’s way of troubleshooting itself—just calling out for a little care before things get worse.
Step-by-Step: How To Clean an Automatic Door Bottom Safely
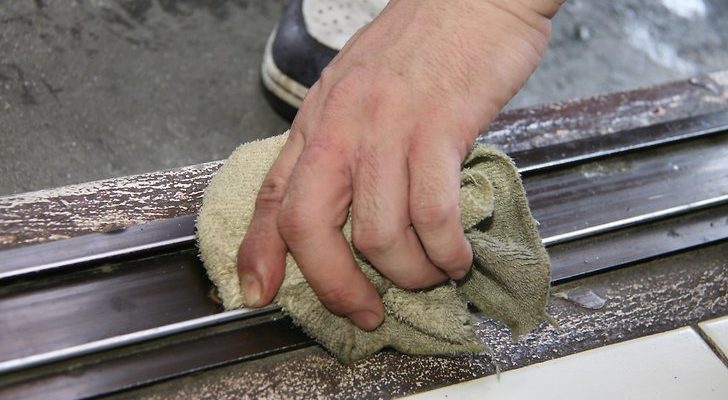
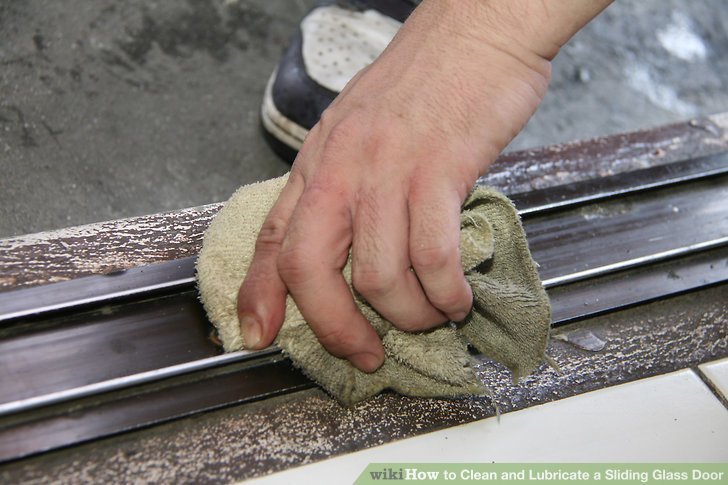
Cleaning an automatic door bottom is all about gentle, thorough work. Here’s how I recommend tackling it, even if you’re a total beginner:
- 1. Gather your supplies: Grab a soft cloth, a small brush (like an old toothbrush), mild detergent, and some warm water. For stubborn grime, keep a plastic scraper handy. Don’t use aggressive cleaners or metal scrapers—they’ll scratch and damage the hardware.
- 2. Open the door fully: This gives you good access to both sides of the seal and lets you spot any hidden mess. If your model has a removable seal, check your brand’s manual to see if you can take it out for deeper cleaning.
- 3. Wipe away loose debris: Use a dry cloth or soft brush to clear away dust, cobwebs, and loose dirt from the automatic door bottom. Pay attention to corners and edges where gunk likes to collect.
- 4. Wash the surface: Dip your cloth in a mild detergent solution and gently wipe the metal and rubber parts. For caked-on dirt, the toothbrush and a bit of patience do wonders. Avoid flooding the mechanism with water—just dampen the cloth.
- 5. Dry thoroughly: Moisture invites rust and can mess with the sync of moving parts. Use a dry cloth to get rid of all dampness before you move on to lubrication.
Let me explain why gentle cleaning matters: you’re dealing with precise parts that need to move freely. A little caution now means fewer resets, troubleshooting sessions, and avoidable door battery issues later on.
Best Lubricants For Automatic Door Bottoms (And What To Avoid)
Choosing the right lubricant for your automatic door bottom can make a world of difference. The wrong stuff—like thick grease or oil—can attract more dirt and eventually jam the mechanism. Here’s what to look for:
- Dry Silicone Spray: This is my go-to for most door bottoms. It goes on thin and dries quickly, leaving a smooth, non-sticky film that helps parts slide without collecting dust. Just make sure it’s a lubricant rated for both metal and rubber.
- PTFE-Based Lubricants: Sometimes called “dry Teflon,” these are great for internal gears or plungers. They bond to the surfaces and provide long-lasting slip, but won’t gunk up or drip.
- Graphite Powder: If you can reach the moving plunger or gear inside, a puff of graphite can be perfect. It’s dry, so it doesn’t attract dust, and it helps prevent sticking over the long haul.
Always avoid petroleum oil, WD-40, or general-purpose grease—these can actually make things worse in the long run by “gluing” fine dust and causing future jams.
If your automatic door bottom is part of a fancy access control remote system, the right lubricant also helps prevent the kind of mechanical drag that can confuse the system’s code or battery sensors. Think of good lube as a silent partner, keeping everything working in sync.
How To Lubricate Automatic Door Bottoms (Without Overdoing It)
Lubricating the moving parts of your automatic door bottom is where you bring back that “smooth as new” feeling. Here’s how to do it—carefully and methodically:
- Identify the key moving parts: Look for the drop-down seal, the actuator (usually a small plunger you’ll find on the hinge side), and any sliding rails or gears. Each brand might look a little different, but the basic layout is the same.
- Apply lubricant sparingly: Spray or dab a small amount of your chosen lubricant onto the metal-to-metal contact points—usually around the plunger and sliding mechanisms. If you’re using a spray, give it a quick shot and wipe off any excess.
- Move the door to spread the lubricant: Open and close the door slowly several times. This distributes the lubricant through all the internal parts and helps you spot any sticky sections that need a second touch.
- Wipe up drips: Use a dry cloth to clean up any overspray or drips, especially if lubricant gets on the floor or door face. This keeps things tidy and prevents accidental slips.
Here’s the trick: less is more. Over-lubricating won’t help and can even harm the device, attracting more dirt or making it hard to pair with universal or brand-specific remotes. If you’re ever troubleshooting weird noises or sticky movement after you lube, go back and see if excess gunk needs to be cleaned away.
How Often Should You Clean and Lubricate Automatic Door Bottoms?
You might be tempted to set a reminder for this task once a year, but frequency really depends on your location and door use. Here’s how I frame it for friends and clients:
- High-traffic or commercial doors: Clean and lubricate every 3–4 months. Lots of foot traffic means more dirt gets swept into the mechanism.
- Residential doors: Twice a year is fine for most homes, especially if the door faces the outdoors or is part of a remote-access system. Add a quick check after stormy weather or if you’ve been doing work nearby (like renovations that kick up dust).
- Whenever you spot issues: If you notice strange noises, sticky movement, or drafts, don’t wait. A quick cleaning and lubricant touch-up can prevent bigger issues and expensive repairs.
Honestly, this is one of those little “life hacks” that pays you back. Clean, smooth door bottoms mean a more comfortable, energy-efficient, and secure space—and way fewer headaches with troubleshooting or battery-draining jams in remote systems.
Troubleshooting Common Problems After Cleaning and Lubrication
Sometimes, even after a careful cleaning and lubrication, your automatic door bottom still acts up. Don’t panic—most issues are easy to diagnose. If your seal won’t drop smoothly or seems out of sync with the door’s closing, double-check that you haven’t accidentally missed a spot or applied too much lubricant. Sometimes, leftover cleaner or gunk can hide in crevices, making it hard for the plunger to retract fully.
If you have a remote-controlled door and notice the code won’t sync or responses are sluggish, try resetting the pairing process—sometimes sticky mechanical parts can confuse the electronic sensors. It’s a good idea to check the battery too, in case extra resistance is drawing more power than usual.
For brands like Pemko or National Guard, replacement seals are available if yours is torn or won’t reset after cleaning. Always match the model and size, and double-check that the mechanism isn’t bent or misaligned. If the gasket keeps catching, realign the mounting screws or consult a professional—forcing things can do more damage than good.
A quick tip: If cleaning and lubricating don’t solve the problem, don’t be afraid to ask for help. Sometimes a tiny internal part needs replacing, and catching it early is far cheaper than dealing with a broken or jammed door down the line.
Comparing Universal vs. Brand-Specific Automatic Door Bottoms
Not all automatic door bottoms are created equal. You might notice that some universal options claim to work on any door, while others—especially from brands like Pemko—insist on a custom fit. Here’s what I’ve learned after helping folks sort through the options:
- Brand-specific models: These are designed for perfect compatibility. The seals, actuators, and even the remote pairing steps all sync seamlessly. If you’re troubleshooting a high-end system, sticking with the original manufacturer is often the best bet for battery life, performance, and easy resets.
- Universal alternatives: These can be a solid choice if you’re on a budget or replacing only the seal, not the whole mechanism. However, fitting and adjustments might take longer. Sometimes they’re a bit trickier to code or pair with electronic remotes—but with patience and a close look at instructions, it’s doable.
Let me explain why this matters: a universal door bottom might need more frequent cleaning and lubing because the fit isn’t as precise. Brand-specific models, on the other hand, usually have tighter tolerances and better long-term reliability. If you’re not sure which one you have, a quick search for the brand logo on the mechanism can save you a lot of troubleshooting later.
Closing Thoughts: Keep Your Doors (And Life) Running Smoothly
Taking care of your automatic door bottom might not be glamorous, but it’s one of those small tasks that makes your daily life smoother—literally. With just a bit of regular cleaning and the right lubricant, you’ll avoid most common problems, save on repairs, and enjoy quieter, more energy-efficient rooms. Think of it as giving a little TLC to the unsung hero of your entryway. Whether you’re working with a universal fit or a brand-specific gadget, patience and attention to detail pay off. If you ever get stuck, don’t stress—help is out there, and most fixes are well within reach. So take a few minutes, grab that cloth and spray, and let your doors slide and seal like the day they were installed.