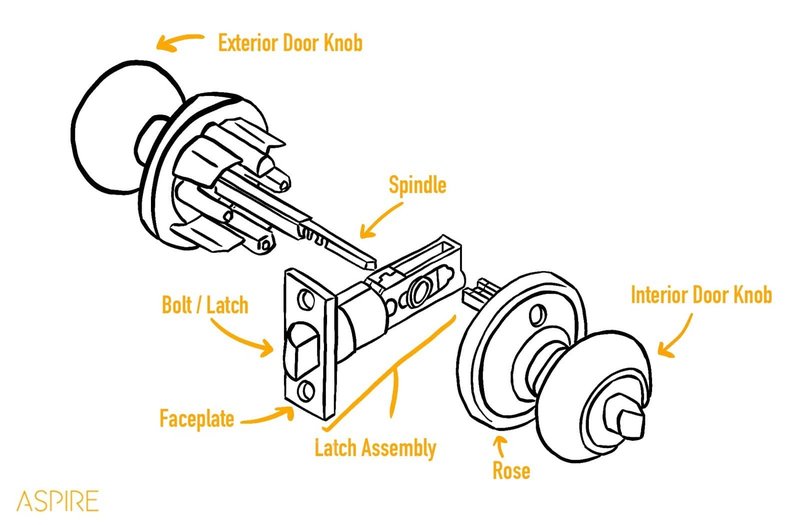
You might be wondering how to clean these components effectively. After all, door latch mechanisms come in different types—like deadbolts and standard latch locks—from a variety of brands. Whether you’re dealing with a quick fix on a bedroom door or tackling the main entry lock, the principles of cleaning largely remain the same. In this guide, we’ll break down everything you need to know, step by step, to keep those latches in top shape.
Why Cleaning a Door Latch Matters
Cleaning your door latch mechanism isn’t just about aesthetics; it’s about functionality too. A dirty latch can cause misalignment, leading to difficulties in locking or unlocking doors. When dirt, dust, or grime accumulates, it can prevent the latch from moving smoothly. Over time, this can lead to wear and tear that might necessitate a costly replacement.
You might think, “It’s just a latch; how much can dirt really affect it?” Oddly enough, a lot! Imagine trying to turn a rusty bolt; it’s not just annoying, but it can cause the whole mechanism to jam. By regularly cleaning your latch, you can avoid these small inconveniences that could escalate into larger problems.
One common issue people face is that their door doesn’t latch properly. This can be caused by a build-up of debris that prevents the mechanism from fully engaging. So, ensuring it’s clean can save you from future headaches.
Gathering the Right Materials
Before diving into the cleaning process, you’ll want to gather a few essential supplies. Here’s a quick list to get you started:
- Soft cloths or rags
- Warm water
- Mild soap or vinegar
- Lubricant (like WD-40 or silicone spray)
- Small brush (an old toothbrush works great)
- Cleaning cloth for the final wipe
Having the right tools ready can simplify the task significantly. You wouldn’t paint a room without brushes, right? Similarly, having your cleaning kit organized makes the entire process smoother.
Another great tip? If you live in a humid area, it’s wise to choose a lubricant that resists moisture. This can help keep your latch from rusting or corroding in the long run.
Step-by-Step Cleaning Process
Now, let’s dig into cleaning the latch mechanism. Here’s a straightforward approach that anyone can handle:
1. Remove the Latch from the Door
First, you’ll need to unscrew the latch from the door. Use a screwdriver to carefully remove the screws. Remember to keep these screws in a safe place so they don’t get lost. If you’re working with a deadbolt, follow the same principle but be gentle, as these can sometimes be a bit more complicated.
2. Cleaning the Latch
Once you have the latch free, it’s time to get to work. Take your small brush and dip it into warm, soapy water or a vinegar solution. Gently scrub all the components, paying extra attention to grooves and crevices where dirt tends to hide. Rinse with clean water, being careful not to soak any electrical components if applicable.
You might find it helpful to use a toothbrush here, as its bristles can reach those tight spots where grime accumulates. Just think of it as giving your latch a little spa day!
3. Drying and Lubricating
Next, it’s crucial to ensure everything is completely dry before reassembling. Use a soft cloth to wipe away any moisture. Once dry, apply a light coat of lubricant to the moving parts of the latch. This will keep it functioning smoothly and prevent rust from forming. Honestly, a little goes a long way here—too much lubricant can attract dirt, which defeats the purpose.
4. Reassemble and Test
After everything is cleaned and lubricated, it’s time to put the latch back in place. Screw it back into the door securely. Then, test it out a few times to make sure it’s operating as it should. You should notice a significant difference in how smoothly it operates.
If it still feels sticky, you might want to go through the cleaning process again or check for any misalignment.
Common Mistakes to Avoid
While cleaning a door latch might seem straightforward, there are a few common pitfalls to watch out for:
- Not drying properly: Leaving moisture can lead to rust or corrosion, especially on metal components.
- Using harsh chemicals: Strong cleaners can damage the finish on your latch. Stick to mild soap or vinegar solutions.
- Neglecting lubrication: Even a well-cleaned latch can gum up if not properly lubricated.
It’s like baking a cake—every ingredient has to be right for the best result. If you skip a step or use the wrong method, you could end up with more problems than you started with.
When to Call a Professional
Honestly, cleaning your door latch is something that most people can handle. But there are times when you might want to call in a pro. If your latch is still malfunctioning after cleaning, or if you notice any broken parts, it’s worth getting a locksmith involved. They can assess the situation properly and provide solutions you might not have considered.
Also, if you have a more complex locking system, like a smart lock, it might be best to consult with an expert who understands the technology behind those devices.
Maintaining Your Latch Moving Forward
Once your latch is clean and working well, maintaining it is a breeze. Make it a point to check it every few months. Giving it a quick wipe and reapplying lubricant can prevent a lot of future problems.
You could even set a reminder on your phone to perform this simple maintenance task. Consider it a small investment of time for a hassle-free entry to your home!
Keeping your door latch mechanism clean isn’t just a chore; it’s a step towards better security and convenience. Think of it as part of your home care routine, much like changing the oil in your car or vacuuming the carpet. With these simple practices, you can ensure your door latches smoothly and securely for years to come—no more fumbling at the door when you’re in a rush!
