You might not think much about the inside of your Schlage or Kwikset deadbolt cylinder until it starts sticking or refusing to turn. Here’s the thing: regular cleaning can extend the life of the lock, keep your key moving smoothly, and help you avoid sudden lockouts or even the need for a full replacement. If you’re using a standard keyed deadbolt—whether it’s a classic model or a smart lock with a manual override—these best practices will help you clean it up safely and keep it working dependably.
It doesn’t matter if you’re a handy homeowner or someone who’s new to DIY chores. With the right approach, cleaning a deadbolt cylinder is easier than you’d think. Let’s break down what that involves, step by step, so your lock can do its job without hiccups.
Why Cleaning Your Deadbolt Cylinder Matters
First off, let’s talk about why anyone should bother cleaning a deadbolt cylinder in the first place. Most folks assume locks are “set it and forget it” hardware. In reality, even the best deadbolt—like a Schlage B60 or a Kwikset 660—needs a little attention occasionally.
What happens inside the cylinder is a lot like what’s going on in a watch or a bike chain. Dust, lint, old graphite, and even stray bits of metal from your keys can sneak into those tiny moving parts over time. This debris makes everything sluggish. If left unchecked, it can even make the lock jam or wear out faster. Suddenly, you’re wrestling with your door when you should be walking through it.
Here’s the thing: A clean deadbolt cylinder won’t just feel smoother—it will actually make your home more secure, saving you money on repairs and headaches down the road.
A grimy lock also wears down keys quicker, leading to chipped or bent keys that get stuck. Keeping your cylinder clean prevents these annoyances and ensures you won’t get locked out at the worst possible time—like when it’s raining, late, or you’re carrying groceries.
How the Deadbolt Cylinder Works
Before diving into the cleaning process, it helps to know what’s going on inside a deadbolt cylinder. Imagine putting a key into a puzzle. When you slide the key in, its unique pattern pushes tiny pins and springs into just the right positions. If they line up perfectly, the cylinder turns and unlocks.
But, as you probably guessed, those bits are tiny and easily jammed up by debris. Even a little bit of grit or the wrong kind of lubricant can throw the whole mechanism out of sync. That’s why cleaning isn’t just about making it shiny on the outside—it’s about keeping each pin and spring moving freely.
Deadbolt brands like Schlage and Kwikset use similar pin-and-tumbler tech, but there are differences in how their cylinders come apart or get reassembled. No matter the brand, regular cleaning keeps these guts moving properly, whether you’re dealing with a traditional deadbolt or a modern smart lock with a manual override.
Signs Your Deadbolt Cylinder Needs Cleaning
You might be wondering, how do you know when it’s time to clean that deadbolt cylinder? Good question. Most people notice something’s off when:
- Keys start feeling sticky or rough: If you’re forcing the key or have to jiggle it, debris is probably the culprit.
- The lock feels hard to turn: Turning the key shouldn’t feel like arm day at the gym. If it does, the cylinder might be gummed up.
- Key won’t insert or remove smoothly: This is usually a hint that something’s blocking the pins or they aren’t sliding correctly.
- The lock won’t turn at all: This is the “uh-oh” scenario. If cleaning doesn’t help, the lock might need repair or replacement.
If you notice these issues—especially with a high-traffic door or a remote-entry system that still has a key backup—don’t ignore them. It’s easier to clean now than to pay for a locksmith later.
What You’ll Need: Tools and Supplies
Let me explain the gear you’ll need, because honestly, using the wrong stuff is the fastest way to damage your lock. Luckily, you don’t need anything fancy or expensive. Here’s what works best to clean a deadbolt cylinder safely:
- Graphite powder or a lock-specific lubricant (avoid WD-40 or oil-based sprays—those attract dirt)
- Compressed air (like the cans you use to clean keyboards)
- Dry, lint-free cloth or paper towels
- Cotton swabs for detail work
- Phillips and flathead screwdriver (only if you’re removing the cylinder)
- Optional: Rubbing alcohol (for tough gunk, but never soak the cylinder)
Each of these serves a purpose. Graphite powder creates a slick surface that pins love—no gumming up. Compressed air will blow out lint, dust, and metal shavings that get trapped inside. And if you ever need to take things apart, the right screwdrivers make it much easier, especially with Schlage or Kwikset models that use universal deadbolt designs.
Step-by-Step: How To Clean A Deadbolt Cylinder
Here’s the step-by-step process, from quick maintenance to deeper cleaning if your cylinder is especially stubborn or hasn’t seen any love in years.
1. Remove Surface Dirt
First, wipe down the outside of the lock with a dry, lint-free cloth. Pay special attention to the keyway (the slot where you insert your key). This removes loose grime and stops it from being pushed inside during the next steps.
2. Blow Out Debris
Take your can of compressed air and shoot a few short bursts directly into the keyway. This will push out dust, lint, and even tiny metal shavings. You might be surprised what comes out—especially if it’s been a few years since the last cleaning.
3. Lubricate the Cylinder
This is where many people go wrong: never use standard oils or WD-40. These can gum up pins and make things worse over time. Instead, use a graphite powder or lock-specific dry lubricant. Insert the nozzle into the keyway and squeeze gently. Work your key in and out of the lock several times to spread the lubricant and sync up the pins.
4. Wipe and Test
Wipe off any excess lubricant, then insert your key and turn it a few times. The cylinder should feel noticeably smoother—almost like the lock has been reset to factory fresh. If things are still sticky, repeat the compressed air and lubricant steps, but never force anything. If all else fails, you may need a deeper clean or professional help.
When To Remove The Cylinder For Deep Cleaning
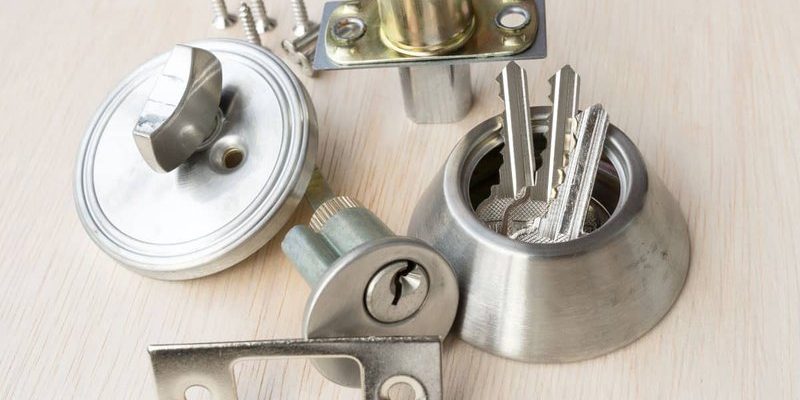
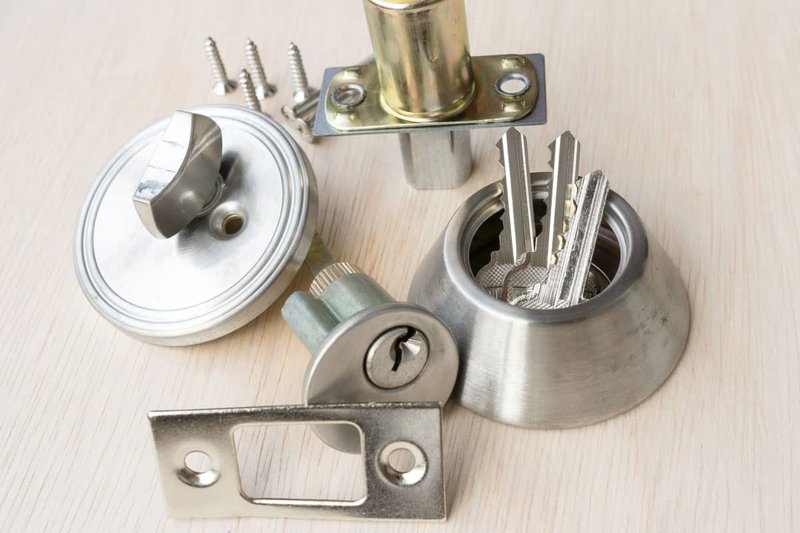
Sometimes surface cleaning isn’t enough—especially if your lock is old, exposed to the elements, or you’ve tried everything else without luck. In these cases, you may need to remove the cylinder from the door for a more thorough job.
Taking the cylinder out sounds scary, but in most Kwikset and Schlage deadbolts, it’s pretty straightforward. Use your screwdriver to unscrew the deadbolt from the inside plate. Pull the cylinder out gently—don’t yank or twist too hard.
Once out, you can use a cotton swab and a tiny bit of rubbing alcohol to remove stubborn grime from the keyway. Just don’t soak the cylinder, and let it dry out completely before re-lubricating and reinstalling. This is a good time to check for obvious damage, too—bent pins, rust, or broken springs may mean a full reset or replacement is your best option.
If this step feels overwhelming, there’s no shame in calling a pro locksmith, especially if you recognize you’re out of your depth. Everyone’s skill level is different, and a stuck lock isn’t worth risking your door frame.
Common Mistakes When Cleaning Deadbolt Cylinders
Let me save you some headaches by listing a few common missteps beginners make. Even though cleaning a deadbolt cylinder feels straightforward, doing it wrong can cause more trouble than it’s worth.
- Using oil-based lubricants or household grease: These may seem slick at first, but they trap dirt and lead to jams over time.
- Forcing stuck keys: If your key won’t budge, don’t muscle it. This can break pins or, worse, snap your key off inside.
- Soaking the cylinder in liquids: Too much moisture risks rust and internal damage. Always go light with solvents and let the cylinder dry.
- Skipping regular maintenance: Waiting until the lock fails is asking for trouble. A quick clean every six months keeps things moving and prevents future problems.
A little patience and the right technique go a long way. Don’t try to reset or disassemble the lock’s innards unless you know exactly how it syncs back together. With Schlage, Kwikset, and other popular brands, reassembly mistakes can leave you with a non-working lock or a call to customer support.
Alternatives: When To Replace Instead of Clean
There comes a point where cleaning just isn’t enough. If you’ve done everything—reset the cylinder, cleaned every piece, replaced batteries in a smart lock remote, and things still aren’t working—then it’s time to consider a replacement.
Strong signs it’s time to swap your deadbolt cylinder include:
- Visible damage, like cracked or bent pins
- Major corrosion or rust that won’t clean off
- Lock refuses to work even after multiple cleanings
- Repeated key or remote sync issues (especially with modern smart locks)
Let’s be honest: No lock lasts forever. Sometimes, upgrading to a new deadbolt is safer and cheaper than ongoing troubleshooting. Universal deadbolt cylinders are available at most hardware stores, and many new models are just as easy to install as the originals by Schlage or Kwikset.
Keeping Your Deadbolt Cylinder Clean: Long-Term Tips
Now that you’ve cleaned your lock, how do you keep it that way? Regular, gentle maintenance is the trick. Here’s what works best for long-term care:
- Clean the cylinder every six months: Even a quick blast of compressed air can prevent big problems.
- Avoid spraying chemicals near the lock: Harsh cleaners can seep into the cylinder and damage the pins.
- Keep keys clean: Wipe down your keys every so often—dirty keys are a main source of gunk.
- Check key shape: If your keys are bent, chipped, or worn out, replace them. Damaged keys can harm the lock cylinder.
If you ever have to reset, re-code, or troubleshoot a smart deadbolt with a manual cylinder, keep the backup key clean and well-lubricated too. After all, all the electronics in the world won’t help if the physical lock is jammed.
In short: A tiny bit of regular care beats any marathon cleaning. Protect your locks the same way you’d protect your phone, your bike chain, or your favorite kitchen knife.
Closing Thoughts
Cleaning a deadbolt cylinder is one of those simple chores that pays off big in peace of mind. Honestly, taking a few minutes every so often to blow out dust, use the right lubricant, and test your key can save you from unexpected lockouts or costly repairs down the road. Whether you’re dealing with a classic Schlage deadbolt or a modern Kwikset smart lock with manual override, keeping the cylinder clean ensures your locks work smoothly whenever you need them most.
Stay patient, use the right supplies, and never force things if you get stuck. If you come across a situation outside your comfort zone, there’s always a locksmith happy to help. A little routine care can make your home feel safer—and that’s something worth locking in.