
Here’s the thing: Paint doesn’t just magically come off. It can cling to surfaces tighter than your best friend after a scary movie. Whether you’re restoring an old door or simply refreshing your hinges, knowing how to properly remove that paint is key. In this guide, we’ll explore various methods, from simple household hacks to more involved techniques, so you can choose what works best for you.
Understanding Your Hinge Pins
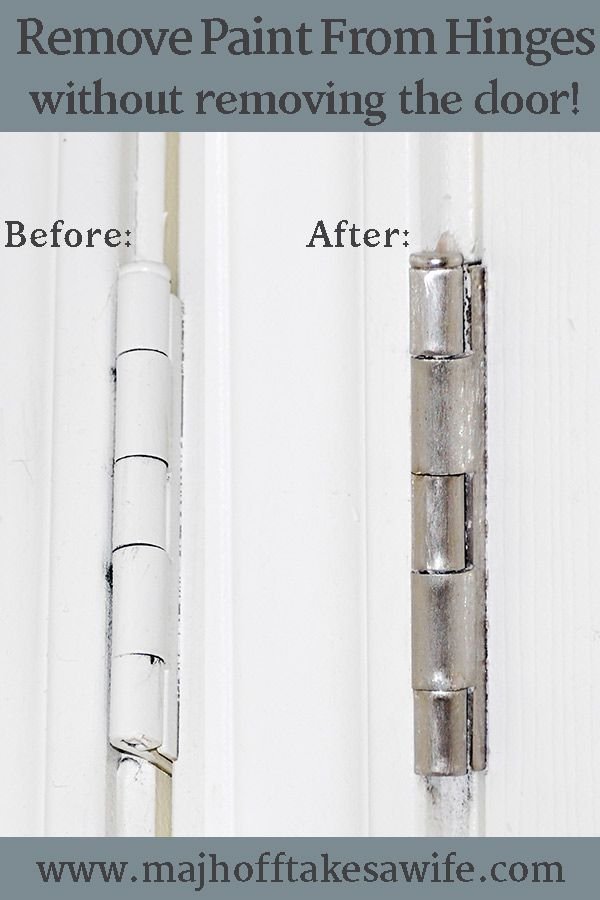
Before diving into paint removal techniques, let’s take a moment to understand what hinge pins are and why they matter. Hinge pins are the small cylindrical rods that fit through the hinge plates, allowing doors to open and close smoothly. When they get painted over, it can lead to stiffness and even prevent the door from functioning properly. Imagine trying to open a door that’s stuck—frustrating, right?
Also, note that the material of your hinge pins can vary, affecting how you should treat them. They might be made of brass, steel, or another material. Each type may react differently to various cleaning methods. So, knowing what you’re working with is important before you grab your paint remover.
Basic Tools and Materials You’ll Need
Getting ready to tackle paint removal means gathering the right tools. Trust me, having everything on hand can save you a lot of hassle. Here’s a quick list of what you might need:
- Paint remover: A chemical stripper or a natural one like vinegar can be effective.
- Brush: A stiff-bristle brush can help scrub away paint.
- Rags or paper towels: For wiping down surfaces.
- Sandpaper: Fine-grit sandpaper is great for getting into tight spots.
- Safety gear: Gloves and goggles to protect your skin and eyes.
Having these on hand will set you up for success. Plus, it’ll make the process smoother if you don’t have to run out for supplies halfway through.
Method 1: Chemical Paint Stripper
Using a chemical paint stripper is often one of the most effective ways to remove stubborn paint from hinge pins. These products are designed to break down the paint, making it easier to wipe away.
1. Preparation: Start by removing the hinge pins from the door. You can usually do this by tapping them out with a hammer or mallet.
2. Application: In a well-ventilated area, apply the paint stripper following the manufacturer’s instructions. Make sure to wear gloves and goggles for safety.
3. Scrub Away: After the recommended time, use your brush to scrub the paint off. You should see it lifting away. Wipe down with a rag to catch any remaining residue.
4. Rinse: Finally, rinse the hinge pins in warm water to remove any leftover chemicals.
While chemical strippers are potent, they can be harsh, so use them with care. You might be wondering if there are alternatives for those who prefer a more natural approach.
Method 2: Vinegar Soak
For a gentler and more natural approach, vinegar can be a game-changer. It’s a common household item that packs quite the punch against paint. Here’s how to use it:
1. Soak: Place the hinge pins in a bowl of white vinegar. Let them soak for at least an hour or even overnight for tougher paint.
2. Scrub: After soaking, use a brush to scrub the remaining paint off. The acidity in the vinegar helps break down the paint.
3. Rinse and Dry: Rinse the pins thoroughly in water and dry them with a cloth.
This method might take a bit more time, but it’s safe and eco-friendly. Plus, if you happen to spill any, you won’t have to worry about harmful chemicals.
Method 3: Baking Soda and Water Bath
It might sound a little odd, but using baking soda as a paint remover can be incredibly effective. Here’s how it works:
1. Prepare a Solution: Mix equal parts baking soda and water in a pot.
2. Boil: Bring the solution to a boil and carefully add your hinge pins.
3. Simmer: Let them simmer for about 15–20 minutes. You’ll notice that the paint begins to bubble and lift off.
4. Scrub and Rinse: After boiling, take out the pins, scrub with a brush, rinse, and dry.
Baking soda is a great alternative because it’s non-toxic and inexpensive, making it a fantastic option for those on a budget.
Method 4: Sanding Away the Paint
Sometimes, the simplest solution is the best. If you have a little elbow grease to spare, sanding the paint off hinge pins can do the trick.
1. Select Sandpaper: Use fine-grit sandpaper—around 220 grit is ideal to avoid scratching the hinge.
2. Sand the Pins: Rub the sandpaper over the painted areas until the paint is gone. This method can be labor-intensive, but it gives you full control over the process.
3. Clean Up: Wipe down the hinge pins with a cloth after sanding to remove dust.
While this approach takes more time, it can be satisfying to see your hard work pay off, plus it saves you from using chemicals.
Preventing Future Paint Buildup
Once you’ve successfully removed paint from your hinge pins, you’ll want to keep them looking good moving forward. Here are a few tips to prevent future paint buildup:
– Regular Maintenance: Periodically check your hinges for any signs of paint buildup and clean them as needed.
– Avoiding Over-Spraying: When painting nearby surfaces, cover the hinges to protect them. A little painter’s tape can go a long way here.
– Use Quality Paint: If you’re painting a door or nearby surfaces, consider using high-quality paint that adheres better and is less likely to drip.
By taking these preventative measures, you can keep your hinge pins looking their best and functioning smoothly for years to come.
Removing stubborn paint from hinge pins can feel daunting, but with the right approach and a bit of effort, it’s entirely doable. Whether you opt for chemical strippers, natural methods like vinegar or baking soda, or even sanding, each technique has its advantages. Just remember to protect yourself with safety gear and take your time for the best results.
Keeping your hinge pins paint-free not only enhances their appearance but also ensures they work smoothly. So grab your tools, choose your method, and tackle that paint like a pro! You’ve got this.