Honestly, getting scratches out of stainless steel can feel a bit like trying to un-crumple a piece of tinfoil. It seems impossible at first, but with a little patience and the right know-how, you can bring back that clean, brushed finish. The best part? You don’t need to be a pro or own fancy equipment. Most methods use simple household items or affordable kits, no matter if you’re dealing with a Baldwin, Schlage, or even an off-brand stainless steel kick plate.
Let’s break down how to polish out scratches, whether your goal is to make things look brand new or just less obviously “lived-in.” I’ll walk you through the easiest, most effective options step-by-step, so you can tackle this project with confidence.
Why Stainless Steel Kick Plates Get Scratched
Let me explain what’s really going on with those kick plates. Stainless steel is strong, but it’s not invincible. In homes, offices, or schools, kick plates see a lot of abuse—kicked shoes, rolling carts, dog paws, and even cleaning tools. All of these can leave scratches, scuffs, or little dings on the surface.
Here’s the thing: stainless steel has a visible *grain* running in one direction. Scratches that run with the grain are less obvious, but anything that goes across it stands out like a sore thumb. Plus, the polished surface tends to highlight even shallow marks.
You might be wondering if it’s possible to prevent scratches altogether. Honestly, not really. Even the best stainless steel finish will pick up minor marks over time. It’s just the nature of the material. The good news? You can buff out most of these scratches and keep your kick plates looking sharp without replacing them.
Check The Finish Before You Start
Not all stainless steel finishes are created equal, so it’s important to take a good look before you break out the polish. Most kick plates have a *brushed* finish (fine lines all in one direction), but some are mirror-polished (super shiny, almost like chrome). Each finish needs a slightly different approach.
For a brushed finish, you’ll want to polish along the grain—never across it. Going against the grain makes things worse, not better. If you’re not sure, run your finger or a soft cloth over the plate until you feel the direction of the lines.
Mirror finishes are trickier. Scratches show up much more, and you’ll need a gentler touch. In either case, always *test any method in an inconspicuous spot first*. If your kick plate is a unique brand or color, check the manufacturer’s guidance, as some have special coatings.
Tip: Before you start, clean the plate thoroughly with mild soap and water to remove dirt, dust, and fingerprints. You don’t want to grind debris into the metal.
Polishing Light Scratches With Everyday Products
If you’re just dealing with a few light scuffs or swirl marks, you might not need anything fancy. Sometimes, you can buff these out using household products you already have.
- Baking soda paste: Mix baking soda with a bit of water to form a thick paste. Dab it onto a soft microfiber cloth (never use paper towels!) and gently rub along the grain.
- Toothpaste (non-gel type): Squeeze a little onto your cloth and polish along the grain. The mild abrasives can help fade very fine scratches.
- Olive oil or baby oil: These won’t remove scratches but can *hide* small imperfections by adding shine and filling in micro-abrasions.
Keep your pressure light and check your progress often. Wipe away residue with a clean, damp cloth and look at the plate from different angles. Sometimes, scratches are just stubborn smudges.
Let me give you a real-world example: I once used plain toothpaste to polish out a handful of shoe scuffs on a friend’s Baldwin plate. Took about five minutes, and the surface looked almost new—no special tools needed. If it’s a deeper scratch, though, you’ll need something a bit more heavy-duty.
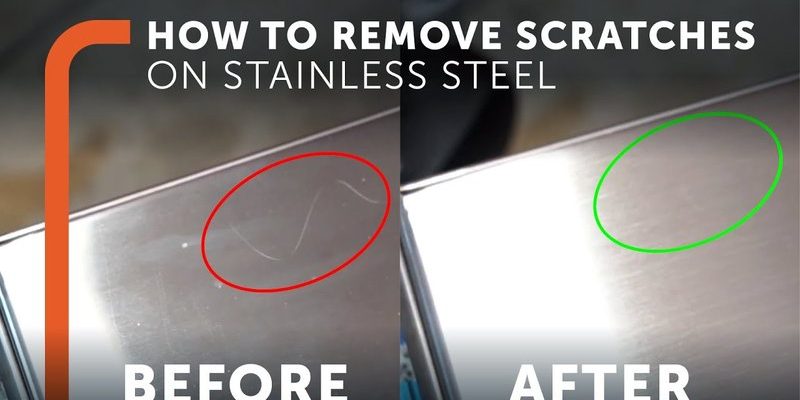
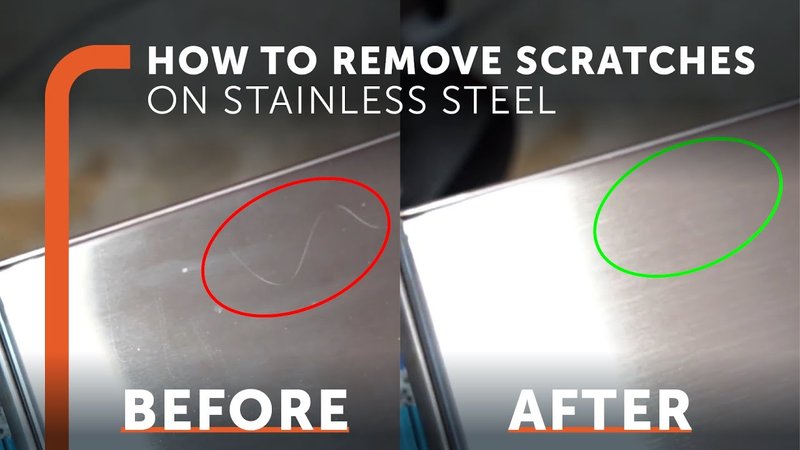
Using Stainless Steel Scratch Removal Kits
For anything more than superficial marks, a dedicated stainless steel scratch removal kit is your best bet. Brands like 3M, Rejuvenate, and Weiman sell kits that come with abrasive pads, compounds, and clear instructions. They’re designed for beginners and can handle most kick plate scratches.
Here’s how a typical kit works:
- Pick the right abrasive pad (usually color-coded for depth of scratch) and a small dab of the supplied compound.
- Rub gently along the grain, starting with light pressure. Let the pad do the work—don’t force it.
- Wipe the area with a clean cloth to check your progress. Most kits have a finishing pad or polish for that final shine.
What I like about these kits: they’re almost foolproof if you follow instructions, and they’re safer for deeper scratches than trying to improvise with household grit. Just be patient and resist the urge to “overdo” it—too much pressure can create new swirls or flatten the grain.
Kits are great for any brand of plate—Schlage, Master Lock, you name it. Just be sure you’re buying one that matches your finish (brushed vs. shiny). If you’re worried about making things worse, do a small test section first.
Sanding Out Deeper Scratches (Advanced)
If you’ve got one of those deep, catch-your-fingernail scratches, you might need to level up to wet sanding. Sounds scary, but if you take it slow, it’s manageable for most DIYers.
You’ll need:
- Fine-grit sandpaper (start with 600 or 800 grit, and go finer as you finish—up to 2000 grit)
- A sanding block to keep things even
- Clean water, and a spray bottle if possible
- Soft cloths for wiping away grit
Here’s the step-by-step:
1. Wet the sandpaper and the plate—you want things slippery, not dry.
2. Sand gently along the grain. Never go across. Make slow, even passes.
3. Check your progress often. If the scratch is fading but the grain is getting a bit dull, that’s normal—you’ll restore the shine in the next step.
4. Move up to finer grits, repeating the process.
5. Finish with a metal polish or a scratch removal kit for that last bit of shine.
Honestly, sanding is best saved for the worst scratches or when you’re comfortable being precise. If your kick plate is painted, coated, or doesn’t have real stainless steel, avoid sanding—stick with polishing.
What About Universal Stainless Steel Cleaners?
It’s tempting to grab a universal stainless steel spray or wipe and call it a day. While these are great for routine cleaning and adding shine, they won’t remove real scratches. They *can* help blend the look of light scuffs, though.
If you’re doing monthly upkeep or just want to hide a few smudges before company comes over, sprays like Weiman or Bar Keepers Friend are handy. They’re safe for most brands and finishes, and they won’t harm your hardware code, pair, or battery if your kick plate has smart features (rare, but not unheard of on modern commercial doors).
But let’s be real—if you can actually feel the scratch with your fingernail, a cleaner won’t fix it. You’ll need to polish or sand to see real results.
When To Call In A Pro
Sometimes, scratches are too deep, or the kick plate is part of a designer door with a unique finish (think Baldwin estate series or custom brands). In these cases, it pays to call a pro who can reset the finish without damaging the metal.
Professional polishers use specialized pads, buffing wheels, and compounds you probably don’t have at home. They can often restore even badly damaged plates, saving you the cost of a full replacement. If your plate is scratched *and* bent, or if you’re worried about voiding a warranty, skip the DIY and get expert help.
Most of the time, though, a little patience and the right method are all you need. Don’t panic—stainless steel is more forgiving than it looks.
Preventing Future Scratches (And Keeping That Shine)
Now that your kick plate looks sharp again, keeping it that way is all about routine care. Here’s how to avoid frequent scratches and keep up the polish:
- Wipe down regularly with a microfiber cloth and mild cleaner—no abrasive pads or harsh chemicals.
- Train family (and pets, if possible) not to kick or scratch the door more than necessary.
- If you use carts or bikes, add a rubber bumper or mat where they’re likely to make contact.
- For smart plates with reset, code, or battery features, keep electrical components dry and avoid spraying directly on the hardware.
The grain on stainless steel can be surprisingly resilient. Most light scuffs come out with a little polish and elbow grease. Keep scratch removal supplies handy—you’ll thank yourself every time that next mark appears.
Insider insight: If you polish too often or with too much force, you can dull the finish. Think gentle and infrequent, not daily scrubbing.
Final Thoughts
Polishing scratches out of stainless steel kick plates isn’t magic, but it’s pretty satisfying when you see that dull old plate gleaming again. Whether you use household products, a scratch removal kit, or even try sanding, the trick is to go slow and respect the grain. A little patience pays off, and with the right touch, you can make even an old kick plate look brand new.
In the end, stainless steel will always get some character over time. But knowing the best scratch removal methods means you’ll stay one step ahead—no matter how many shoes, paws, bags, or keys come your way.