Honestly, you don’t need to be a contractor or even particularly handy to fix hinge sagging or binding. Most modern steel, fiberglass, or wood entry doors (from brands like JELD-WEN, Masonite, or Feather River) use standard hinges and can be adjusted with just a few tools. It’s a little like tuning a bike chain or tightening a loose doorknob: the right tweaks can bring everything back into smooth alignment. Let’s walk through how to diagnose, adjust, and even prevent exterior door hinge sag, all in plain English.
Why Do Exterior Door Hinges Sag Or Bind?
First off, let’s talk about why this happens. Exterior doors are heavier than interior ones, since they have to keep out weather—and sometimes unwelcome guests. Over time, the sheer weight, plus temperature swings and humidity, can pull hinges out of alignment. If you’ve got a wood door and live somewhere damp, it’ll swell and shrink with the seasons, putting extra stress on those hinge screws.
Here’s the thing: Even small shifts make a big difference. A hinge that’s just a fraction off can throw your entire door out of whack.
You might notice the top of your door rubs against the frame, or the bottom drags on the threshold. Sometimes, the latch won’t line up with the strike plate, so your door bounces right back open. These are all classic signs you need to adjust your exterior door hinges.
How To Spot A Sagging Or Binding Door
You might be wondering if your door is really sagging—or if it’s just a sticky day. There are a few simple ways to tell. First, open and close the door slowly. If there’s resistance, scraping, or if the door doesn’t sit flush against the weatherstripping, it’s likely a hinge issue. Look closely at the gap (called the “reveal”) around the door. It should be the same width all the way around.
- If the gap is wider at the top on the latch side, your door is sagging down and away.
- If the door touches or rubs along the bottom or the side, that’s binding.
- If the latch doesn’t catch (or you have to really yank the handle), misaligned hinges are probably to blame.
Another trick: try lifting your door by the handle (with the door open). If you feel it move up and down, the hinge screws might be loose or the hinge leaf could be bent. It’s not high-tech “troubleshooting” like you’d do with a code reader or smart lock, but it’s just as effective.
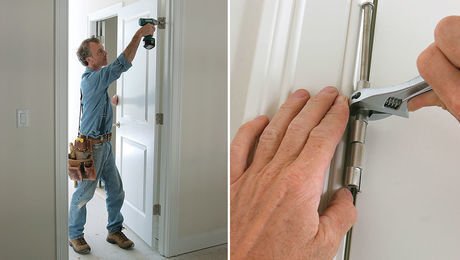
What Tools You’ll Need For Hinge Adjustment
You don’t need a full toolbox—just a few basics. For most exterior door hinges, you’ll want:
- Screwdriver (usually Phillips, but sometimes flat-head for older hinges)
- Drill/driver (for stubborn or stripped screws—totally optional, but saves time)
- Wooden toothpicks or matchsticks (for fixing loose hinge holes—more on this in a minute)
- Longer screws (if you need more grip;
- Hammer (occasionally needed if hinge pins are stuck tight)
Most modern doors, like those from Masonite or Feather River, use three standard butt hinges. These can be adjusted by tightening, replacing, or shimming screws.
Step-By-Step: Adjusting Exterior Door Hinges
Let me break it down in easy, no-nonsense steps. This is the “code” for fixing a sagging exterior door—no need to call in a pro.
- Check the screws first. Close the door and look at the hinges. Are the screws loose, especially on the top hinge? Tighten them with a screwdriver. If they just spin or don’t hold, you’ll need to fix that hole (hang tight—the next section covers this).
- Swap in longer screws. If tightening isn’t enough, replace one screw in each hinge (preferably the top hinge, and the screw closest to the door frame) with a longer
- Lift the door gently. Sometimes just supporting the door (with a wedge or thick magazine) while you tighten screws will help pull it back in line. This can “reset” slight sagging.
- Adjust hinge position. If things still aren’t lined up, loosen the hinge screws slightly, nudge the door into the proper position, then retighten. Don’t force it—small shifts make a big difference.
If your door is still binding, check for bent hinges or try adding thin cardboard shims behind the hinge leaf. It’s a bit like using a washer on a bolt—just a little boost to get everything square.
Fixing Stripped Or Loose Hinge Screws
Here’s a common problem: the screw holes have gotten chewed up, so tightening doesn’t do much. Instead of getting frustrated (or worse, grabbing the wood glue), try this:
- Poke a few wooden toothpicks or matchsticks—dipped in basic wood glue—into the stripped hole.
- Snap them flush with the surface.
- Reinstall the screw. The wood filler gives it fresh grip, sort of like resetting a smart device to “factory settings.”
Honestly, this little hack is a lifesaver and works for most exterior doors, regardless of brand or material. If you’re constantly fighting loose screws on an old JELD-WEN or Masonite front entry, this is a quick, cheap fix.
When To Replace Or Upgrade Hinges
Let me explain: Sometimes, even after you’ve done everything, the door still sags. That’s a sign your hinges are just worn out, bent, or rusted—especially on older steel doors or cheaper contractor-grade hardware. Investing in new, heavy-duty ball bearing hinges (the kind Feather River or JELD-WEN often use on premium models) can make a huge difference in performance and lifespan.
Here are signs you should swap your hinges:
- Visible rust or cracking
- Bent or warped hinge leaves
- Hinge pins that wobble or won’t stay in
- Repeated binding even after adjustment
Replacing hinges is straightforward: unscrew the old one, line up the new, and screw it into the same holes (or use the toothpick trick if needed). Just make sure you match the size and “hand” (left or right)—otherwise, your door won’t close right.
Preventing Future Sag Or Binding
Once your door swings right, you’ll want to keep it that way. Most sag happens because of loose screws or undersized hardware. Here’s how you can prevent trouble:
- Check hinge screws every few months—especially after big weather changes.
- If you repaint or refinish the door, don’t let paint clog hinges or screws.
- Choose long screws that anchor into the frame, not just the trim or jamb.
- Clean and lubricate hinges once a year—just a dab of light oil keeps things moving.
If you’re thinking about upgrading, heavier ball-bearing hinges are worth the investment for larger exterior doors. They handle weight better and last longer, much like a universal TV remote is less likely to break down than a cheap one.
Common Mistakes To Avoid
You might be tempted to force the door closed or shave off wood from the edge. Honestly, don’t. Those “shortcuts” can make things worse and create bigger gaps down the line. Always start with the hinges before breaking out sandpaper or saws.
Pro tip: Never ignore squeaks or misalignment—the sooner you tackle it, the less likely you’ll end up with a door that hangs like a crooked painting.
Another mistake is overtightening screws, which can strip them out and leave you worse off. Go firm, not Hulk-strong. If you ever feel lost, don’t be shy about looking up your specific door brand’s hinge adjustment instructions—manufacturers like JELD-WEN and Feather River have solid troubleshooting guides online.
Closing Thoughts
Here’s the big takeaway: Adjusting exterior door hinges to prevent sagging and binding is straightforward, satisfying, and way less intimidating than it sounds. All it takes is a little patience, some basic tools, and a methodical approach. With a few tweaks, any beginner can “pair” their door back with the frame, making daily ins-and-outs feel brand new. So, the next time your front entry sticks or scrapes, you’ll know exactly where to start—and your door will thank you with a quiet, effortless swing for years to come.