Here’s the thing: whether you’ve got a beefy Schlage deadbolt or a basic Yale rim lock, the cam disc is what actually moves the locking mechanism when you turn your key. If it’s damaged, bent, or broken, your key won’t do its job, no matter how much you jiggle it. Fixing it can seem intimidating, but with the right approach and a bit of patience, you can often swap it out yourself—no need to call in a locksmith for this one.
Let’s walk through exactly how to spot a damaged cam disc, what it looks like, and how to replace it step by step. You’ll get your lock working smoothly again and maybe pick up a new DIY skill along the way.
What Is a Cam Disc and Why Does It Matter?
Before you start poking around inside an exterior lock, it helps to know what a cam disc is and what role it plays. In simple terms, think of a cam disc as the “translator” inside your lock. When you put your key in and turn it, the cam disc takes that motion and converts it into a push or pull that slides the deadbolt or latch open or closed.
Most exterior locks—whether they’re popular brands like Kwikset, Schlage, or Yale—use some variation of a cam disc. It’s usually a small, round metal piece with a few cutouts or notches. These allow the disc to catch and move the locking bolt when the key rotates. If you’ve ever noticed your lock turning but nothing happening, that’s often a clue the cam disc is stripped, cracked, or loose.
Why does this little part matter so much? Without a working cam disc, your key loses all its power—you’re left locked out or unable to secure your door. And since exterior locks face weather, dirt, and constant use, cam discs wear out more often than you’d think.
Common Signs Your Cam Disc Is Damaged
You might be wondering how you can tell if the cam disc is actually the culprit. Let me explain—there are a few telltale signs that point to this tiny part being damaged.
- Key spins with no resistance: This is the classic symptom. You insert the key, turn it, and it just keeps spinning without catching or unlocking anything. Usually, this means the cam disc isn’t connecting with the bolt anymore.
- Lock feels “mushy” or loose: Instead of that satisfying click or snap when locking/unlocking, everything feels soft, like something inside isn’t clicking into place. This can mean the cam disc is slipping or the notches are worn down.
- Key gets stuck or won’t turn: Sometimes, damage to the cam disc causes misalignment, so the key jams or won’t rotate fully. Don’t force it—this can make things worse.
- Lock suddenly stops working after years of use: If your exterior lock has been dependable for years, then suddenly fails, it’s often the cam disc wearing out rather than the whole lock failing at once.
Here’s a pro tip: if you’re having trouble, try your spare key. If both keys fail the same way, it’s almost always an issue inside the lock, not the key itself.
Tools and Parts You’ll Need to Replace a Cam Disc
Swapping a cam disc isn’t rocket science, but you will need a few basic tools to do it right. I’m a big fan of being prepared—it saves you the hassle of stopping halfway through the job.
- Screwdrivers: Most exterior locks use Phillips or flat-head screws. A good, sturdy set will help with both removing the lock and opening it up.
- Replacement cam disc: This part needs to match your lock model. You can usually find cam discs made specifically for Schlage, Yale, Kwikset, and other brands. Don’t try to force a universal cam disc; the fit must be precise.
- Needle-nose pliers: Handy for gripping small springs or removing stubborn pieces inside the lock.
- Graphite or lock lubricant (optional): Once everything is reassembled, a dab of lubricant will keep things running smoother, longer.
- Small tray or dish: Trust me, those tiny screws disappear fast. Keep them together as you work.
If your lock has special features—like a smart code pad or battery compartment—double-check the manufacturer’s instructions. Sometimes, you’ll need to sync or reset the electronics after reassembly.
How To Remove the Exterior Lock Safely
Now that you’ve got your tools ready, you’ll need to actually get the lock out of your door. Most exterior locks aren’t too tricky, but taking your time here prevents headaches (or scratched doors) later.
Start by opening the door for better access. On the inside face of the door, you’ll usually find two screws holding the lock body or thumb turn in place. Remove those screws and gently pull the interior part away. The exterior cylinder should loosen and slide out with a bit of wiggling.
Be gentle but firm. If the lock feels stuck, don’t pry with excessive force. Some locks, especially smart models, have hidden clips or tiny set screws you’ll need to loosen first. If you’re working with a Yale or Schlage lock and it seems stubborn, look for a pinhole or small slot near the edge—pushing this with a paperclip can release the cylinder.
Once the lock is out, snap a quick photo of how everything fits together. Even if you’re confident, this makes reassembly a breeze later.
Opening the Lock Cylinder and Exposing the Cam Disc
Here’s where things get a little technical, but don’t worry—I’ll walk you through. The goal is to open the lock cylinder enough to get at the cam disc without letting springs or pins go flying.
Most exterior lock cylinders have a retaining clip or cap holding everything together. Place the cylinder on your work surface and use your screwdriver or pliers to carefully remove the clip. Go slow—there’s often a bit of spring tension.
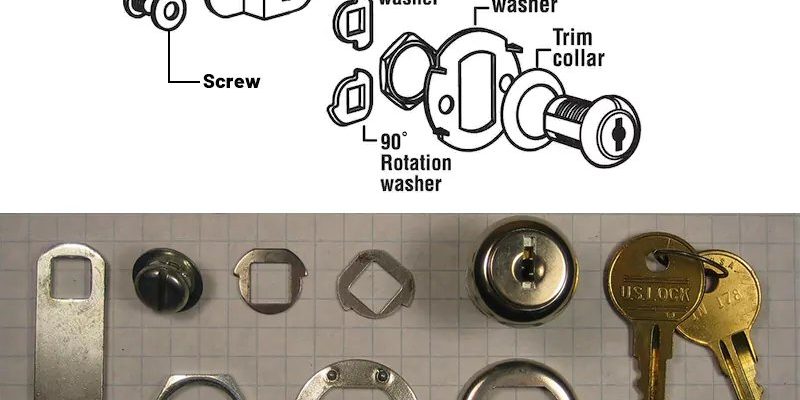
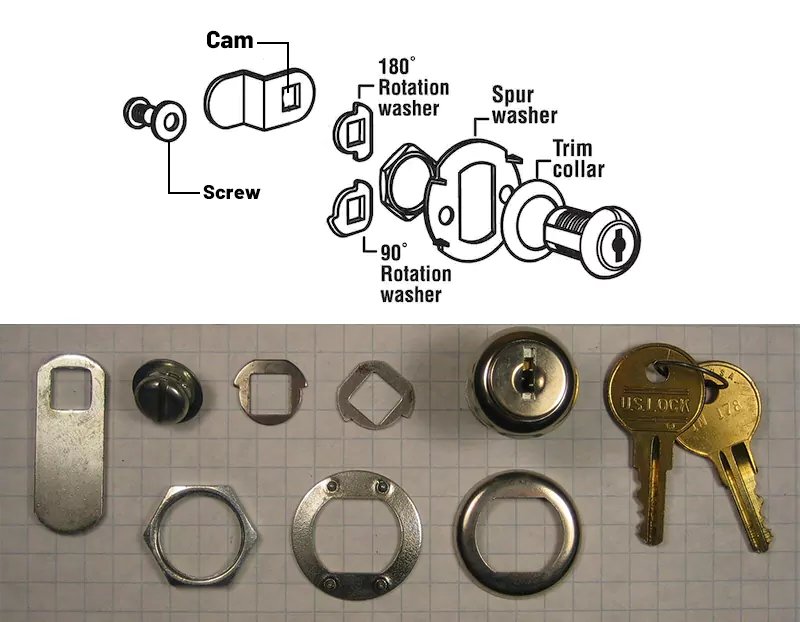
Once the end cap is off, you’ll see the cam disc sitting on the back of the cylinder. It usually looks like a round metal plate, sometimes with a flat edge or notch. Take a close look for cracks, deep grooves, or bends. If it’s misshapen or the teeth look worn, you’ve found your problem.
If parts start to shift or springs pop out, don’t panic. You can usually reset everything—just keep track of the order as you remove each part.
If the cam disc is held in by a pin or tiny screw, use your pliers or screwdriver to remove it next.
How To Install the New Cam Disc Correctly
You’ve made it to the heart of the lock—nice work. Fitting the new cam disc is mostly about lining things up so the lock functions smoothly when reassembled.
Start by seating the new cam disc exactly where you removed the old one. Some models have a slot or keyway that aligns with a tab on the cylinder. Don’t force it; it should fit snug but not overly tight. If your replacement disc doesn’t fit, double-check that you have the right part for your lock model and brand.
Once the cam disc is in place, replace any pins or screws that held it. Spin the cylinder gently—if the cam moves smoothly and catches as you turn, you’ve got it right. This is also a good moment to add a dab of graphite or lock lubricant, especially if things felt sticky before.
With the disc installed, slide the retaining cap or clip back on. Press down firmly to lock it in place, but be careful not to bend or warp any parts.
Tip: If you’re working on a lock that features smart tech—a keypad, battery, or remote sync function—this is the time to reset or pair it again if needed.
Reassembling and Testing Your Exterior Lock
Let me be honest: reassembly is where most DIY repairs go sideways. So go slow, check your photo reference, and don’t rush. Line up the lock cylinder the same way it came out, making sure the cam disc connects with the bolt inside the door.
Push the cylinder fully into the housing. On the inside face, reinstall the thumb turn (or interior plate) and tighten the screws evenly. Avoid overtightening, as this can stress the lock or misalign the cam.
With everything in place, insert your key and turn it gently. The bolt should move smoothly—no sticking, no endless spinning. If something feels off, don’t force it. Remove and check your installation, making sure the cam disc is correctly seated and nothing is binding.
If your lock is part of a smart system, this is also a good time to check the electronic code pad or remote features. Sometimes, you’ll need to re-sync batteries, reset a code, or pair the lock with your home hub again.
If all goes well, you’ll hear that familiar solid “clunk” as the lock engages—a sign that the cam disc is doing its job once again.
Preventing Future Cam Disc Damage
After all this effort, you want your repair to last. Here’s how to keep your exterior lock (and cam disc) working better for longer.
- Lubricate periodically: Every six months, add a squirt of graphite or lock spray to keep things sliding freely. Avoid oil-based products—they attract dust and grime.
- Avoid forcing the key: If your key ever feels stuck, don’t twist harder. It’s usually a sign something’s misaligned inside. Gently jiggle and, if needed, remove and inspect the lock.
- Check and replace batteries in smart locks: For electronic or remote locks, weak batteries can cause sync or reset issues, leading to mechanical strain on the cam disc over time.
- Use the right replacement parts: Always use brand-specific cam discs. Universal options don’t always fit perfectly, especially for high-security brands like Schlage or Yale.
Honestly, a little preventive care goes a long way. Most cam disc trouble happens because of years of neglect or forcing the lock when something feels wrong. Being attentive will save you more repairs in the future.
Is It Worth Fixing or Should You Replace the Whole Lock?
You might be asking yourself, “Is it worth fixing this tiny part, or should I just swap out the whole lock?” Here’s my take. If the lock body is solid, and only the cam disc is damaged, a replacement is nearly always faster, cheaper, and just as secure as a brand-new lock. Plus, you keep your existing keys.
But there are times when a full replacement makes sense:
- The lock housing or cylinder is cracked or rusted through.
- You want to upgrade to a smart lock with code or remote features.
- You’ve lost all copies of the key and want better security.
- The cam disc is unavailable for your old or unusual model.
When in doubt, start by removing the lock and inspecting the cam disc. If everything else inside looks solid, try the repair first.
Final Thoughts: Get Your Lock Working Again
Dealing with a stubborn exterior lock can be frustrating, but identifying and replacing a damaged cam disc often brings the fix within reach. Taking it one step at a time—spotting the symptoms, gathering the right tools, and being patient with reassembly—will get your door secure again faster than you think.
Whether you’re tackling a standard Yale deadbolt or a more advanced Schlage smart lock, most issues boil down to this humble little part. Keep your parts organized, follow each step, and before you know it, you’ll have a lock that feels brand new—no locksmith bill required. And next time your lock acts up, you’ll know exactly what to check first.