Think of a hinge adjuster as a kind of “magic wand” for your doors. Instead of muscling the door frame or stripping out screws, you’re using a tool made just for the job—sort of like how a can opener beats stabbing at a lid with a knife. A hinge adjuster, like the popular Ryobi Hinge Doctor or a universal door hinge adjuster, can help realign a sagging or misaligned exterior door in just a few minutes. And honestly, you don’t need to be especially handy to work one. If you can use a wrench, you can handle a hinge adjuster.
Why Your Exterior Door Needs Alignment
Doors are pretty straightforward, right? They swing open, they close, and they (hopefully) keep the weather out. But, over time, even the best doors start to shift out of place. You might notice gaps around the edge, a latch that won’t catch, or a door that sticks on rainy days. Usually, it’s not the whole frame—it’s just the hinges getting a little tired.
Here’s the thing: exterior doors carry more weight than interior ones, especially if they’re solid wood or insulated for weather. As you open and close them (sometimes dozens of times a day), the hinges take a beating. They can bend, the screws can loosen, or the wood can compress. Weather, humidity, and even slamming the door all add up. What you get is a door that no longer lines up cleanly with its strike plate or the weatherstripping. That’s where a hinge adjuster tool comes in—letting you tweak the hinge without having to uninstall the door.
Most people don’t realize how much the *little things* matter here. A door just a few millimeters off can make a latch refuse to catch, or can create a gap that drives up your heating bill. Using a hinge adjuster is like fine-tuning an instrument: a small adjustment can make a night-and-day difference.
Of course, you could try some “DIY” fixes, like bending hinges with pliers. But that usually causes more trouble. You might strip out the screw holes or even crack the hinge. The hinge adjuster tool is purpose-built, saving you from a full-on door repair or a costly call to the handyman.
What Is a Hinge Adjuster Tool and How Does It Work?
If you’ve never seen a hinge adjuster tool before, imagine a chunky, U-shaped piece of metal or heavy-duty plastic that fits right over your door’s hinge. Some look like a small clamp; others have a ratcheting handle. Universal hinge adjuster tools are made to fit the most common residential hinges, but you’ll also find models designed specifically for certain brands or hinge types (for example, the Hinge Doctor series offers different models for ball bearing hinges versus standard residential hinges).
The genius behind these tools is how simple they are: they use basic leverage to gently bend the hinge barrel (the rounded part in the middle where the pin sits). By turning or applying pressure in the right spot, you can realign the entire door so that it sits properly. No unscrewing, no code to remember, no electrical parts—just some elbow grease and a good grip.
Some hinge adjusters have a screw mechanism you tighten to apply gradual pressure; others let you twist the handle to make your adjustment in one go. Both get the job done, but the ratcheting types tend to give you a little more control.
Pro tip: If the hinge adjuster tool seems confusing at first, just remember it’s doing what pliers or a wrench would do—but it’s designed not to damage your hinge or door frame.
You might be wondering if this is only for pros. The honest answer: if you know your lefty-loosey from your righty-tighty, you’re set. These tools don’t need batteries, there’s nothing to pair or code, and the only troubleshooting is figuring out which way your hinge needs to move.
Getting Ready: What You’ll Need Before Adjusting
Before you jump in with the hinge adjuster tool, there are a couple of things to check. First, make sure your door is actually the problem—sometimes, sticking or rubbing comes from a warped frame, not the hinge. Stand outside and *look at how the door fits in the frame.* Any big gaps or places where it’s hard to pull or push? Wiggle the door and see if it moves up and down or left and right.
- Check the hinge screws. Sometimes, the solution is even easier than you think: loose screws. Use a screwdriver to tighten them first.
- Inspect the hinges. Are they rusty, bent, or covered in paint? If so, you may need to replace the hinge or clean it off before proceeding.
- Gather your tools. Besides your hinge adjuster, keep a screwdriver, WD-40, and a rag nearby. If you’re using a brand-specific adjuster (like the Ryobi Hinge Doctor), check that it fits your door’s hinges.
Here’s the thing—if your door is truly warped or the frame is rotted, a hinge adjuster tool can’t fix that. But for 90% of sticky door problems, it’s all about the hinge alignment.
Also, if you can, get a friend to help. It’s not required, but having someone hold the door steady while you work on the hinge makes things go smoother.
Step-by-Step Guide: Using a Hinge Adjuster Tool
Let me walk you through the process, step by step. Go slow, and don’t worry if it takes you a couple of tries to feel confident.
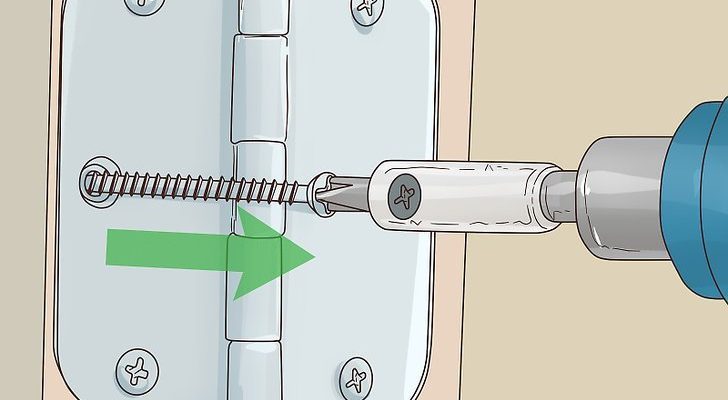
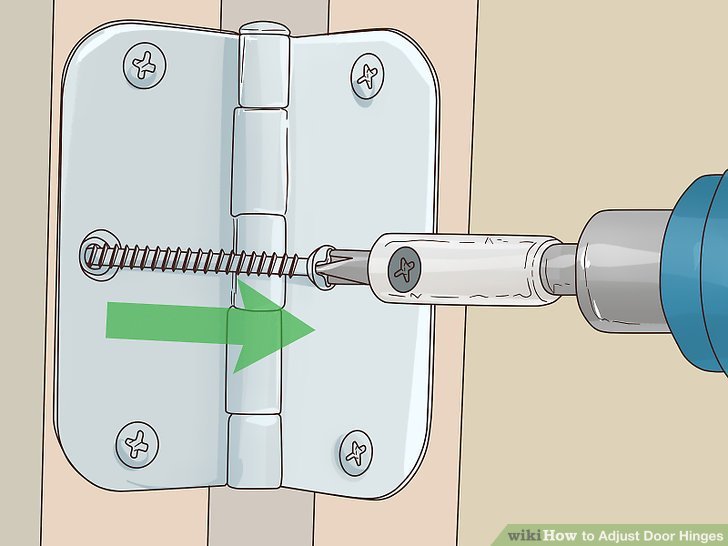
- Close the door. Most adjustments are easier with the door closed, as it keeps things lined up and takes stress off the hinges.
- Position the hinge adjuster. Place the tool over the hinge barrel, making sure it sits snugly. For tools with multiple size slots, pick the one that matches your hinge.
- Apply gentle pressure. Depending on your adjuster’s design, turn the handle or tighten the adjustment screw. You’re slightly bending the hinge barrel—don’t force it! Tiny movements can have a big effect.
- Check your work. Open and close the door after each adjustment. See if the door latches easier, the gap looks even, or the sticking is gone. Repeat if needed.
- Re-tighten hinge screws. Sometimes, after adjusting, the screws will feel looser. Tighten them up for a solid result.
It shouldn’t take more than five or ten minutes. If you overdo it and the door starts to bind in the opposite direction, just reverse the adjustment a bit. There’s a bit of an “art” to getting it just right, but honestly, if you go slow, you’ll get there.
Troubleshooting: If Your Door Still Isn’t Right
Okay, so you’ve used your hinge adjuster tool and the door still won’t close cleanly. Here’s how to troubleshoot the most common issues—no need to panic or start over.
- Latch won’t catch? You may need to adjust the *top* hinge; if the lock side of the door is high, it’s usually a top hinge problem.
- Door still scrapes at the bottom? Try tweaking the *bottom* hinge with your tool.
- Big gap on one side? Sometimes, both hinges need a little adjustment to even things out. Work in small increments.
- Still having trouble? Double-check for loose screws, stripped holes, or warped wood. If the frame itself is out of square, hinge adjusters can only do so much.
You might be tempted to force things—but don’t. If the door feels truly stuck or you’re worried about damage, stop and reassess. Sometimes, doors just need a little patience and some trial and error.
And remember, sometimes the fix really is as simple as a quick spray of WD-40 or tightening a screw. Don’t overthink it!
Comparing Hinge Adjuster Tools: Universal vs Brand-Specific
Not all hinge adjuster tools are created equal. Universal models are designed to fit most standard residential door hinges. They work for most people, especially if you’re not sure what kind of hinge you have. Think of it as the “Swiss Army knife” of door tools—handy to keep around, even for different doors in your house.
On the other hand, brand-specific tools are made to fit a particular hinge style or manufacturer (like the Ryobi Hinge Doctor). These tend to be a little pricier, but they offer a more precise fit and sometimes more robust leverage. If you know you have, say, commercial ball bearing hinges or a very heavy exterior door, it might be worth going with the brand tool.
Here’s my take: For most homeowners, a universal hinge adjuster tool is all you need. But if you’re running an apartment building or fixing extra-heavy doors, grab the specific model.
Another factor to consider:
- Material quality. Metal tools last longer than plastic ones—worth it if you expect to use the adjuster more than once.
- Ergonomics. Some adjusters have better handles or ratcheting action, making the job easier on your hands.
- Compatibility. Double-check hinge size and shape before buying, especially if your home is older or has custom doors.
Alternatives: When a Hinge Adjuster Tool Isn’t Enough
Let’s be real—sometimes, the hinge adjuster tool just isn’t the answer. If the door is warped, the frame is out of plumb, or the weather has done serious damage, you may need to go a step further.
- Installing shims. If the door frame is out of square, adding thin shims behind the hinges can help correct the alignment. This is more work and may require removing the hinge screws, but it’s doable with some patience.
- Replacing hinges. Old, rusty, or bent hinges are sometimes beyond help. Swapping in a new, matching hinge can fix problems that no amount of adjusting would solve.
- Calling a pro. Occasionally, you’ll run into a door that needs full rehanging or the frame replaced. If you’ve tried everything above and the door is still bad, don’t be afraid to get help.
If you’re dealing with a “smart” exterior door or something with electronic locks, always double-check that the adjustments won’t mess with the code or battery power for the remote. Most of the time, the mechanical side is all you need to worry about, but extra caution never hurts.
Tips for Keeping Your Exterior Door in Perfect Alignment
Keeping your exterior door lined up isn’t rocket science, but a little bit of attention goes a long way. After using a hinge adjuster tool, here’s how to keep things smooth and trouble-free:
- Tighten your screws. Every few months, check the hinge screws. If they’re starting to work loose, a quick tighten can save you from bigger problems.
- Lubricate the hinges. A light oil or silicone spray keeps things moving and rust-free. Just wipe away any excess so it doesn’t attract dirt.
- Watch for early warning signs. If you spot a growing gap, a sticking latch, or a new draft, get out your hinge adjuster tool sooner rather than later.
- Don’t slam the door! It seems obvious, but repeated slamming is hard on both the hinges and the frame.
If you’re the kind of person who loves a well-running house, picking up a universal hinge adjuster tool to keep in your toolbox just makes sense. It’s small, cheap, and saves a world of frustration.
Closing Thoughts: Mastering Hinge Adjustment
There’s something pretty satisfying about fixing a stuck or sagging exterior door yourself. Once you understand how a hinge adjuster tool works—and get over the small learning curve—it becomes one of those jobs you can knock out in ten minutes instead of an afternoon.
Whether you’re dealing with a classic wooden front door or a newer insulated model, a few turns of the right tool can bring everything back in line. No special code, no batteries, no need to sync or pair with anything—just mechanical, hands-on know-how. If you ever find yourself staring down a door that just won’t close right, don’t sweat it. Grab your hinge adjuster, go slow, and enjoy the smooth swing of a perfectly aligned door.