Let’s say you have one of those standard aluminum thresholds from brands like Pemko or M-D Building Products. They’re sturdy and common, but even these well-made thresholds can develop problems over time, especially if the adjustable insert has shifted, worn down, or gotten stuck. If you’ve started noticing a breeze under your door, water leaks after a rainstorm, or the door feels harder to close than it used to, your adjustable insert is the first place to check.
Before you call a handyman or start googling new thresholds, it pays to roll up your sleeves and see what’s really going on with your current one. Honestly, most problems with a door threshold’s adjustable insert can be fixed with a little troubleshooting and some basic tools—no pro skills required. Here’s how to break down the issues, figure out what’s wrong, and decide your next steps.
What Is a Door Threshold’s Adjustable Insert?
You might be wondering, what exactly is the “adjustable insert” in a door threshold, and why should you care? Basically, the adjustable insert is a key part of the threshold—the horizontal strip that sits underneath your door, bridging the gap between the inside floor and the outside step. Most modern thresholds, especially those from trusted brands, have an insert in the center that can be raised or lowered using a set of screws.
The adjustable insert’s job is simple but important: to help you fine-tune the height of the seal under your door. If the insert is set too low, you’ll end up with a gap that lets in drafts, bugs, and water. If it’s too high, the door might scrape or not close properly. It’s like finding the sweet spot on a pair of noise-cancelling headphones—just enough to block out the noise, without making things uncomfortable.
Most inserts are made of aluminum, vinyl, or wood, and they typically rest atop adjustable screws or cams. By turning these screws, you can raise or lower the central piece, adjusting the tightness of the seal without having to take the whole threshold apart.
If you’ve noticed your door feels a bit “off” lately, or you find yourself grabbing a towel to block cold air, that insert could be your culprit.
So, when problems pop up around the threshold, focusing on the adjustable insert is usually your best troubleshooting move.
Common Problems with Adjustable Inserts
Before you start fiddling with tools, it helps to know what you’re actually looking for. Adjustable inserts go through a lot of daily wear and tear, thanks to foot traffic, weather, and the constant opening and closing of the door. Over time, a few key problems can crop up.
- Worn-out weatherstripping: The flexible part underneath the insert can crack, flatten, or peel away, which ruins the seal and lets air and water sneak in.
- Stuck or stripped adjustment screws: If you can’t turn the screws at all, or they spin freely without moving the insert, your adjusting days are over—at least until you fix or replace them.
- Insert won’t stay in position: Sometimes the insert drifts or sinks back down after you adjust it, usually because of stripped screw holes or broken cams.
- Visible gaps or uneven sealing: Maybe one side sits higher than the other, or you still see sunlight under the door after adjusting. That’s a classic sign of an insert issue (or sometimes a warped door, but inserts are the easy thing to check first).
What’s really going on here? Usually, it boils down to a mix of wear, dirt buildup, and sometimes a bit of neglect. The good news: these issues are almost always fixable—unless the threshold itself is totally shot.
How To Inspect the Door Threshold’s Adjustable Insert
Here’s the thing—before you can fix the problem, you need to know exactly what’s going wrong. Diagnosing a door threshold’s adjustable insert isn’t rocket science, but it does take a bit of patience and the right approach.
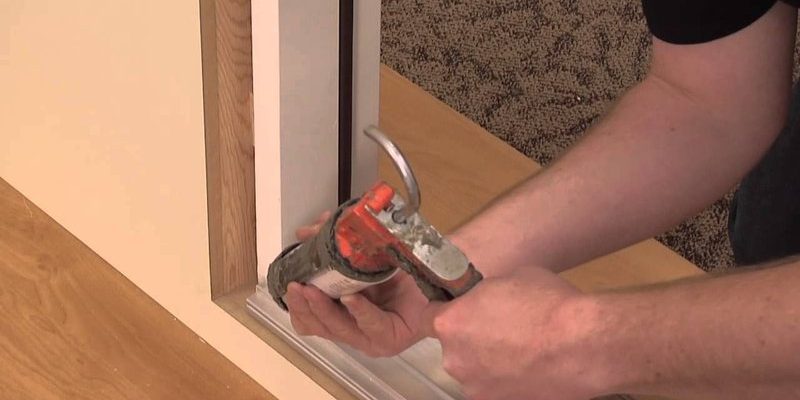
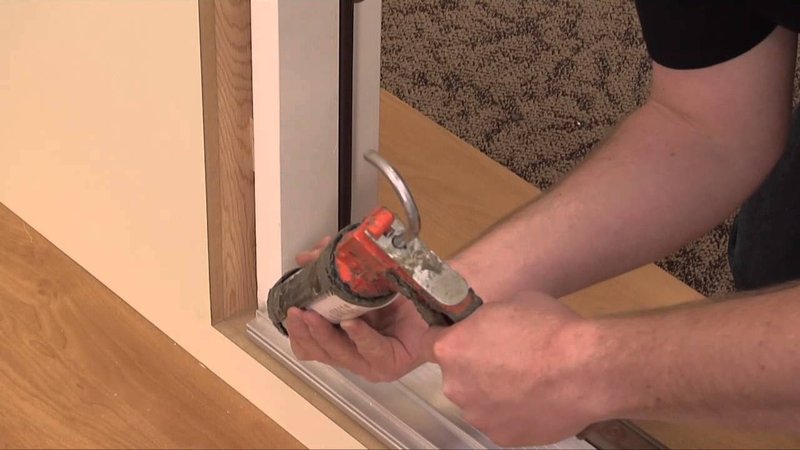
Start by doing a visual check: Open the door and look closely at the threshold. Can you see any obvious cracks, gaps, or worn-out weatherstripping? Take note if the insert looks crooked or if any adjustment screws are missing or rusty.
Next, try the “paper test”: Close the door with a piece of paper or a dollar bill halfway underneath. Try to pull it out. If it slides out easily, the seal is too loose. If it’s hard to pull, the insert might be too high.
Check the adjustment screws: Use a screwdriver to gently turn each screw. If they’re rusted, stripped, or refuse to turn, that’s a sign you’ll need to clean, lubricate, or replace them. If the insert moves unevenly as you adjust different screws, you might have a warped insert or a damaged screw hole.
Don’t rush these steps—sometimes the “little” problems (like a tiny screw out of place) are the ones that make the biggest difference.
Take photos as you go, especially if you’re planning on shopping for replacement parts or asking for advice at the hardware store.
Step-by-Step: How to Diagnose and Troubleshoot Adjustable Insert Problems
Let’s get practical. Here’s a straightforward way to figure out what’s wrong with your door threshold’s adjustable insert—and maybe fix it on the spot.
- Step 1: Clean the threshold
Dirt, dust, and debris can jam the insert or cover up damage. Use a vacuum or brush to clear out everything around the threshold and insert. Sometimes, just cleaning makes a world of difference. - Step 2: Loosen the adjustment screws
Using a screwdriver, gently back out each adjustment screw a bit, then try adjusting the insert up or down. If a screw is stuck, try a little penetrating oil, but avoid forcing it and stripping the head. - Step 3: Test the seal with the door closed
After making adjustments, close the door and look for light or feel for drafts at the bottom. No improvement? Double-check the screws to see if the insert is actually changing height. - Step 4: Inspect for damage
If the insert won’t move or the seal never improves, remove the insert (if possible) and look underneath. Cracked, corroded, or misshapen parts mean you might need a replacement. Take the old insert with you for an exact match.
If you’re lucky, a quick clean and reset solves the problem. If not, you’ll at least know exactly what needs fixing.
When to Repair vs. Replace the Adjustable Insert
Sometimes, despite your best efforts, the adjustable insert just won’t cooperate. Should you keep tinkering, or is it time to swap it out? Here’s where it helps to be a bit realistic.
Repairs are usually enough when:
- Weatherstripping is loose but otherwise undamaged (a little adhesive can work wonders)
- The adjustment screws are dirty or stuck, but not stripped or broken
- The insert itself is just out of alignment, not cracked or crushed
Replacement is the answer if:
- The insert is bent, corroded, or permanently warped
- Screw holes are stripped, so adjustments never hold
- The threshold is older and parts are worn beyond a simple fix
You might be tempted to keep pushing ahead with repairs, but in my experience, if things look rough or you’ve tried everything and the problems keep coming back, spending a few bucks on a new insert or even a new threshold is sometimes just less stress in the long run.
Comparing Different Types of Door Threshold Inserts
Not all adjustable inserts are created equal, and if you’re thinking about repairs or a replacement, it’s worth knowing your options. Most home thresholds come in a few main styles, each with its own pros and cons.
- Aluminum inserts: Durable and common. Great for heavy foot traffic, but can corrode if exposed to lots of moisture (especially if your door faces the weather directly).
- Vinyl inserts: More flexible and quieter underfoot, but can crack or deform in extreme temperatures. Good for mild climates.
- Wood inserts: Classic look, but higher maintenance. Wood has a way of swelling or shrinking with the seasons, so you’ll be doing more adjustments throughout the year.
If you’re shopping for a replacement, stick as close as possible to your original insert style—mixing types can sometimes cause weird gaps or make it harder to seal things up right.
If you’re not sure which insert you have, snap a photo and show it to your local hardware store staff. There’s no shame in asking for their opinion—you’ll save yourself a second trip.
Tips for Keeping Your Door Threshold’s Adjustable Insert Working Longer
Once you’ve diagnosed and fixed (or replaced) the problem, a little maintenance goes a long way. Here are some real-world tips that make a difference:
- Clean the threshold regularly: Sweep away dirt, leaves, and debris that can jam the insert or hide damage. Even a quick wipe every month helps.
- Check screws every season: Give those adjustment screws a gentle turn four times a year (think: when you test your smoke alarms) to keep them from freezing up or working loose.
- Watch out for water damage: If you see mold or rot near the insert, dry things out and address leaks right away. Moisture is the enemy of every threshold.
- Lubricate if needed: A touch of silicone spray can keep adjustment screws moving smoothly, but avoid messy oils that attract grime.
Here’s the thing: A threshold in good shape not only makes your doorway feel solid and weather-tight, but it also cuts down on drafts and energy bills. Treat your adjustable insert as a key player in your home’s comfort zone, and it’ll return the favor for years.
Final Thoughts: Getting the Most from Your Door Threshold’s Adjustable Insert
Diagnosing problems with a door threshold’s adjustable insert doesn’t have to feel overwhelming, even if you’re a total beginner. Whether you’ve got an M-D Building Products threshold, a classic Pemko, or something generic, most issues come down to adjustment, wear, or a little neglect—and all of these can usually be spotted with a careful, step-by-step look.
Honestly, sometimes it’s the smallest part of your entryway that makes the biggest difference in your home’s comfort. Taking a few minutes to check, clean, and adjust your threshold’s insert can save you money, prevent bigger issues down the road, and make coming and going just a little more pleasant. If all else fails, a quick replacement or a call to a pro is always an option—but nine times out of ten, some simple troubleshooting does the trick.