So, why do steel doors need extra attention? Well, think of steel doors the same way you’d think of a raincoat. The coat does its best to keep you dry, but if the seams or zipper aren’t sealed right, you’re still getting wet underneath. The same goes for your door: the strongest steel doesn’t mean much if water can slide right past the screws and fittings. Whether your door is from a familiar brand like Therma-Tru or Masonite, or you’ve picked up a universal DIY steel door kit, the steps for sealing up those trouble spots are surprisingly similar.
Why Water Intrusion Around Hardware Causes Big Problems
You might be wondering, “What’s the worst that could happen if a little water seeps in around the hardware?” Here’s the thing: steel is tough, but it’s not immune to rust. Once moisture sneaks through those tiny openings around your deadbolt, handle, or hinges, it can do a lot of damage over time.
Rust doesn’t just look ugly—it weakens the metal. If your lock or handle mechanism starts to corrode, you might find it harder to turn the key, or even worse, the hardware could become loose. Moisture can also creep into any insulation inside the door, causing it to swell, warp, or become less effective. That leads to poor energy efficiency and can even affect how well the door opens and closes.
Here’s a common scenario: after a heavy storm, you notice the door sticks more than usual the next day. That swelling? Probably caused by hidden water soaking into places it shouldn’t reach.
Even if you have a top-rated steel door or fancy smart lock, if the installation didn’t include proper sealing, you’re on borrowed time. Preventing water intrusion isn’t just about keeping things tidy—it’s a basic step in protecting your investment for years to come.
Choosing The Right Sealant For Steel Door Hardware
Not all sealants are created equal, especially when it comes to steel doors. The type of product you use can make a huge difference in how well it stands up to weather, movement, and daily use. Honestly, picking the wrong caulk or sealant is one of the most common mistakes people make.
Silicone-based sealants are usually the top pick for this job. They stay flexible, so they won’t crack or peel as the door shifts with temperature changes. Plus, silicone is great at resisting water and sticking to both metal and painted surfaces. Some folks reach for acrylic caulk out of habit, but it’s usually better for indoor stuff—it doesn’t handle water and temperature swings as well as silicone does.
You’ll also see “polyurethane sealant” at most hardware stores. It’s tough and paintable, but it can be trickier to apply and clean up. If you’re not sure, check the label—it should say it’s safe for “exterior use,” “metal,” and “waterproof.” Brands like GE, DAP, or Sika tend to pop up often and are dependable choices.
- Silicone: Great flexibility, water resistance, sticks well to steel and paint.
- Polyurethane: Super tough, paintable, but harder to apply.
- Acrylic: Easier to work with, but not for outdoor or exposed hardware.
If your steel door comes with a special finish or warranty (like some Therma-Tru models), always check the manufacturer’s recommendations before sealing. Using the wrong product can sometimes void the warranty, or even cause paint or coatings to peel.
Step-by-Step: How To Seal Around Hardware On A Steel Door
Ready to get hands-on? Honestly, sealing steel door hardware isn’t as intimidating as it sounds. You don’t need to be a pro—just patient and a bit detail-oriented. Here’s how to make sure you’re locking out water for good.
1. Clean the Area: Start by wiping down the hardware and the area around it with a damp cloth. Remove any dust, old caulk, or loose paint. For stubborn gunk, a little rubbing alcohol on a rag works wonders.
2. Remove Hardware (If Possible): If you’re up for it, taking off the lock or handle makes it easier to get a tight seal. If not, just make sure all the gaps are accessible.
3. Apply Painter’s Tape: This step keeps the sealant line neat. Tape a border around the hardware so your lines are straight and the mess is minimal.
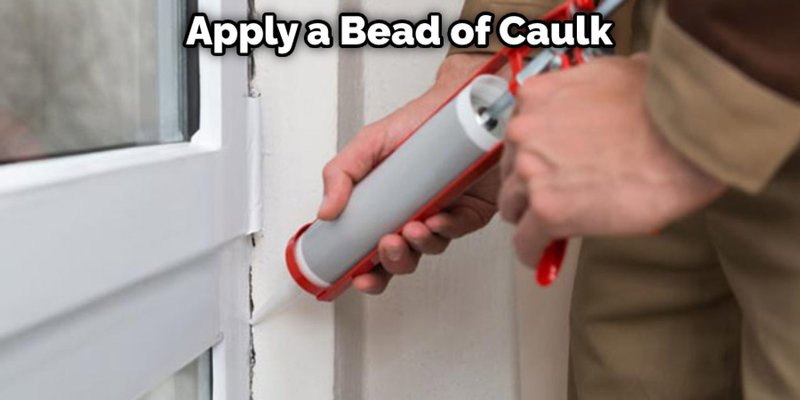
4. Choose And Apply Your Sealant: Load your caulk gun with a fresh tube of exterior-grade silicone (or whatever the brand recommends). Run a steady bead along the seam where the hardware meets the door. Use a wet fingertip to smooth it out, pushing the sealant into the gap.
5. Remove Tape And Let Cure: Peel off the painter’s tape before the sealant dries. This gives you a crisp edge. Leave the door open if you can, and avoid touching the sealant until it’s fully cured (check the label—usually 24 hours).
“Don’t rush,” as my handyman uncle always says, “or you’ll be doing it again next season.”
It’s a simple job, but doing it carefully means you won’t have to worry every time the forecast calls for rain.
Pay Attention To Hinges, Screws, And Other Small Hardware
You might focus on the big, obvious pieces like locks and handles, but honestly, the small stuff can be just as vulnerable. Hinges, screws, peepholes, and even nameplates are all places water loves to sneak in.
Hinges are usually attached with screws that run straight through the steel door’s edge or frame. If these aren’t sealed, water can travel along the threads and into the door’s core. The same goes for fasteners—even a tiny gap next to a screw head can let in enough moisture to cause problems.
What should you do? For hinges and exposed screws, dab a little sealant right over the screw head and around the base of the hinge. This creates a “gasket” that blocks out water but doesn’t keep you from removing the screws later if needed.
- Check for missing screws or loose hinges before sealing.
- Use a toothpick to work sealant into skinny gaps around peepholes or nameplates.
- Wipe away excess before it dries, so it doesn’t look messy or block moving parts.
It’s the kind of detail work you might be tempted to skip, but a little patience here can save you from a lot of frustration (and rust) down the road.
Spotting And Fixing Common Sealing Mistakes
Nobody’s perfect, and even pros mess up sometimes. But let me explain—most sealing fails come down to the same few issues. If you know what to watch for, you can avoid having to redo the job or call in a repair service.
1. Incomplete Coverage: It’s shockingly easy to miss a section, especially under the hardware or in shadowy corners. Always double-check your work from different angles before the caulk sets.
2. Using The Wrong Product: I’ve seen homeowners use interior caulk outside, or even construction adhesive thinking it’s “close enough.” Trust me, it won’t hold up. Exterior silicone or polyurethane is the way to go.
3. Too Much Sealant: More isn’t always better. Thick, lumpy beads don’t just look bad—they can keep the hardware from fitting snugly or gum up moving parts. Aim for a thin, even line.
4. Skipping Prep: If you don’t clean the area, the sealant won’t stick. Even fingerprints can keep caulk from bonding to steel or paint.
Once you spot a mistake, don’t panic. Use a razor blade or plastic scraper to carefully remove old, failed caulk. Clean the spot, let it dry, and try again. No shame in needing a second pass—especially if it means your steel door stays watertight through the toughest weather.
How Sealing Differs For Universal Vs. Brand-Specific Steel Doors
Here’s a question that comes up a lot: “Does it matter if my steel door is a big-name brand like Therma-Tru, or just a basic universal model from the hardware store?” In most cases, the basics of sealing are the same, but there are a few differences to keep in mind.
Brand-specific steel doors may come with pre-installed weatherstripping or special gaskets around hardware holes. Some even use proprietary mounting systems or recommend a certain type of sealant to keep warranties valid. If you’ve got paperwork or instructions from the manufacturer, it’s worth a quick read.
Universal steel doors are designed to fit lots of different hardware styles. That flexibility is convenient, but it sometimes means the pre-drilled holes are a bit bigger, or the fit isn’t as tight. These gaps are the spots where water is most likely to slip in, so you’ll need to be extra careful when applying sealant. Go slow, and make sure you’re filling the entire gap without any pinholes.
- Check brand instructions before you start—especially if your door has a finish or coating that could react with certain sealants.
- On universal doors, test the hardware fit before sealing. If there’s a lot of wiggle room, add a backing bead of sealant inside the hole before installing any hardware.
- Keep receipts and photos of your sealing job in case you need to make a warranty claim in the future.
The truth? No matter the brand, attention to detail always makes the biggest difference.
Extra Tips For Long-Term Protection Against Water Intrusion
Sealing steel door hardware isn’t a one-and-done job—you’ll need to check it occasionally, especially if you live somewhere with wild weather swings. But with a little extra effort upfront, you can keep water out for years.
Inspect Your Door Every Spring And Fall: A quick visual check for cracks, peeling, or gaps can help you catch issues before they get serious. Tug gently on the hardware and look for movement.
Touch Up Paint Or Sealant As Needed: Even the best products can wear out or separate over time, especially if the door gets a lot of sun. It’s way easier to fix a tiny gap you spotted in October than replace a rusted lock in January.
Consider An Overhang Or Storm Door: If your entryway is really exposed, something as simple as a cheap awning or secondary storm door can keep most rain off the main steel door and help your hard work last longer.
- Keep a tube of your favorite exterior sealant handy—you never know when you’ll spot a new gap.
- If your hardware loosens over time, re-tighten the screws and reseal the base when necessary.
- For double doors or sidelites, make sure all hardware—deadbolts, flush bolts, etc.—is sealed on both the active and inactive sides.
Taking these extra steps is a bit like putting tire sealant in your bike before a long ride—you hope you’ll never get a flat, but you know you’re ready if you do.
When To Call A Pro For Sealing Steel Door Hardware
Most folks can tackle sealing hardware on a steel door with a little patience, but there are times when it pays to bring in a professional. For example, if you see signs of deep rust, swollen insulation, or water stains that keep coming back after DIY fixes, the problem might be bigger than sealant alone can solve.
Professional installers know how to spot underlying issues—like door alignment problems, frame rot, or even hidden leaks behind the trim. They’ll use commercial-grade products and can usually guarantee the work. If your door is still under warranty with a brand like Masonite or Therma-Tru, pro installation might even be required for certain repairs.
The bottom line: If your steel door feels “spongy,” is hard to close, or shows bubbling paint around the hardware, don’t just seal and hope for the best—get it checked out.
That said, most water issues around hardware are simple and fixable at home. It’s only when the damage looks advanced or the leaks don’t quit that you’ll want an expert on your side.
Wrap-Up: Keep Water Out And Your Steel Door Strong
Sealing hardware on a steel door to prevent water intrusion isn’t glamorous, but it’s one of those tasks that can make all the difference. When you take the time to use the right sealant, cover every screw and hinge, and double-check for gaps, you’re doing more than just basic maintenance. You’re protecting your home, your floors, and the life of the door itself.
Honestly, the hardest part is usually just starting. But once you’ve got the hang of it, a sealed, weather-tight steel door gives you peace of mind through every storm. Whether you’re working with a big-name brand or a universal steel door, a little attention now saves a lot of hassle (and dollars) down the line. So grab that tube of silicone and get sealing—you’ve got this.