Here’s the thing: thresholds take a beating. Every time you open or close your door, run the vacuum, or drag in groceries, you’re putting a lot of pressure on that tiny strip of wood, metal, or vinyl. Over time, screws work themselves loose, wood swells or shrinks, and gaps start to show. If you’re picturing a big, expensive repair job, don’t panic. With a few simple tools and a little patience, you can reset, repair, and secure your threshold so it’s solid—and stays that way. Let me walk you through it, step by step, no handyman badge needed.
Why Does a Threshold Separate From the Door Jamb?
When a threshold starts drifting away from its snug position against the jamb, it’s usually not random. Most of the time, it’s a mix of moisture, temperature swings, and good old wear and tear. Let me explain by painting a quick picture: imagine your threshold as a bridge between your cozy living room and whatever’s outside. The jamb is like the anchor. If that anchor loosens—even a bit—the bridge can’t help but slip.
Common causes include:
- Expansion and contraction: Wood and even some metals expand in the heat and shrink in the cold. This seasonal movement can push screws out and widen tiny gaps over time.
- Water damage: Any moisture sneaking in can swell wood or break down adhesives holding the threshold in place.
- Constant foot traffic: Every step puts downward and side pressure on the threshold, gradually wiggling it loose from the door jamb.
- Poor original installation: If someone skipped a step or used the wrong size screws, the threshold might never have been fully secure.
You might be wondering if this is just “one of those things” you have to live with. Good news: it’s very repairable, and most times, you’re just a few screws, some adhesive, and a little troubleshooting away from a solid fix.
Signs Your Threshold Needs Repair
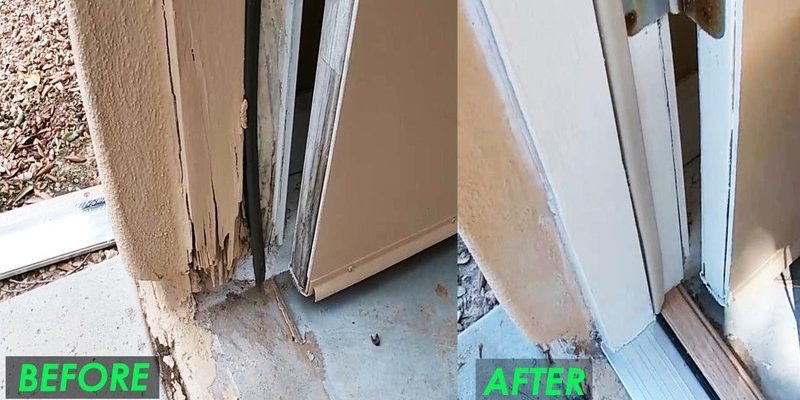
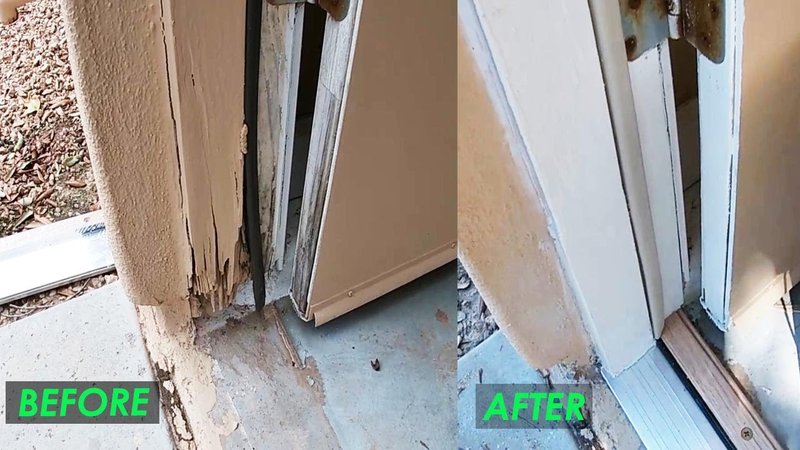
Sometimes the trouble is obvious—maybe you can see daylight through the crack at your door, or you actually feel the threshold wiggle under your feet. But other times, the symptoms are sneakier.
Look for these telltale signs:
- Visible gap: If you can see a noticeable space between the threshold and the jamb, it’s not doing its job.
- Drafts or leaks: Feeling a cool breeze (or worse, spotting water after rain) near your door means your seal is broken.
- Loose or missing screws: Peek at the sides and ends—if screws are popping up or missing, the threshold can’t stay anchored.
- Movement or flexing: Step on it. Does it shift, rock, or make a sound? That’s a red flag.
- Debris buildup: Sometimes the gap creates a perfect trap for dirt, leaves, and bugs right at your entryway.
Ignoring these signs can turn a simple repair into a much bigger—sometimes rotted—mess. So, if you spot any of these issues, it’s time to get hands-on.
Tools and Materials You’ll Need
You don’t need a full-blown workshop to fix a separating threshold, but a few basics make the job much smoother. Here’s what you’ll want on hand before you start code-level troubleshooting mode:
- Screwdriver or drill: Phillips or flat-head, depending on your existing screws.
- Wood screws or threshold screws: Go for corrosion-resistant if this is an exterior door.
- Adhesive (like construction adhesive or wood glue): This helps add extra holding power where the threshold meets the subfloor or jamb.
- Utility knife: For removing old caulk or trimming edges.
- Caulk and caulking gun: To reseal the edge when you’re finished.
- Hammer or pry bar: For gentle nudging or removing stubborn thresholds or nails.
- Shims or filler strips: If the gap is especially wide or uneven.
- Measuring tape: Just to make sure everything lines up perfectly.
- Protective gear: Gloves and safety glasses (no one likes splinters or gluey fingers).
Of course, some threshold brands use specialty fasteners or parts—if you have a name-brand piece, it’s smart to check for their specific recommendations online or in the package.
Step-by-Step Guide to Repairing a Separating Threshold
Ready to roll up your sleeves? Here’s how to fix a threshold that’s pulling away from the door jamb. Don’t rush—give yourself time to do it right, and you’ll only have to do it once.
1. Remove the Old Screws and Inspect the Area
Start by taking out any loose or popped screws. If the threshold is really loose, gently lift it up so you can peek underneath. You’re looking for moisture, rot, or anything that might keep it from sitting flush against the jamb.
If you spot a lot of rot or damage, honestly, that might mean the threshold itself needs to be replaced. If it’s just a little rough, you can patch minor damage with filler or wood glue.
2. Clean the Area
Dirt, dust, and old caulk are the enemy here. Use your utility knife and a brush to clear away debris, sweep out the gap, and make sure the jamb and the floor are dry. Any leftover gunk will keep adhesive from sticking later.
3. Add Adhesive or Filler
Apply a layer of construction adhesive or wood glue at any place where the threshold meets wood or underlayment. If there’s an uneven gap, now’s your chance to slide in a shim or filler strip for better support.
Give the adhesive a minute to set up—don’t rush, or you’ll just end up chasing the same problem again.
4. Reset and Reattach the Threshold
Push the threshold snugly against the jamb. If it’s a tight fit, tap it gently with a rubber mallet. Then, drive new, slightly longer screws through the existing holes (or drill new pilot holes if the old ones are stripped out). Sink the screws until they’re just below the surface, but don’t overtighten—too much force could crack wood or warp metal.
5. Caulk the Edges and Seal
Run a neat bead of caulk along the joint where the threshold meets the jamb and flooring. Smooth it with a damp finger or a tool so you get an airtight, watertight seal. This is what keeps water, bugs, and drafts out.
Let the caulk and any adhesive cure for at least a few hours before walking over the threshold again. Patience here makes all the difference.
What If the Threshold Keeps Pulling Away?
Sometimes a separating threshold is a sign of a bigger problem. If you’ve repaired it once or twice, only to see the gap return, there could be something else going on behind the scenes.
- Uneven subfloor: If the floor under your threshold is sloped or sagging, no amount of screws will keep things tight for long. You might need to level the floor first—sometimes with shims, sometimes with a little patching compound.
- Water intrusion: If rainwater is getting under your door, the repeated expansion and contraction will keep pushing out the threshold. Check your door sweep or weatherstripping, and make sure your exterior caulking is solid.
- Door misalignment: If the door itself isn’t closing squarely, it could be putting uneven pressure on the threshold. Sometimes adjusting the hinges or replacing the sweep makes a world of difference.
It’s easy to feel frustrated if your fix doesn’t stick the first time. Don’t just repeat the same steps—pause and look for underlying issues. Sometimes a quick bit of troubleshooting now saves you a ton of hassle later.
Comparing Permanent vs. Quick-Fix Threshold Repairs
Here’s a common scenario: you’re in a hurry and just want to slap the threshold back down so the door will close. I get it. But not all fixes are created equal.
Quick fixes—like hammering in a bigger nail or smearing on caulk without cleaning—might buy you time, but the threshold will almost always separate again. These are fine if you’re in a pinch, but you’ll probably be back under the door with your tools in a month or two.
Permanent repairs—the kind we detailed above—take a little longer but almost always last longer. Using the right screws, adding shims where needed, and sealing things up means you shouldn’t have to revisit this project for years.
You might be tempted by “universal” threshold repair kits or snap-on covers, and they have their place—especially if your old threshold is beyond saving. But for most standard separations, a hands-on repair is cheaper, more satisfying, and honestly, sturdier.
When Should You Replace the Entire Threshold?
Sometimes, despite your best troubleshooting, repairing a threshold that’s separating from the door jamb just isn’t possible. If you see signs of severe rot, crumbling wood, or bent/damaged aluminum, that’s your cue to swap it out entirely.
Here’s how you know it’s time for an upgrade:
- Big chunks missing or obvious structural weakness
- Persistent water damage that keeps returning
- Repeated failed repairs (you’ve fixed it twice, and it still pulls away)
- The threshold doesn’t sit flush no matter what you try
Replacing a threshold isn’t much harder than repairing it—it just means picking up a new piece (match the brand if you can, especially for unusual sizes) and following steps similar to what we outlined above. Measure carefully, cut if needed, and take your time lining everything up.
Maintaining Your Threshold After Repair
Now that you’ve got everything solidly in place, keeping your threshold tight against the jamb is mostly about routine TLC. Here’s how to make sure it stays that way:
- Check seasonally: Every spring and fall, do a quick “wiggle test.” Step on the threshold and make sure nothing moves.
- Look for water: After heavy rain, make sure there’s no pooling or dampness near the joint—this is often an early warning sign.
- Re-caulk as needed: Caulk doesn’t last forever. If you see cracking or peeling, scrape it out and reapply a fresh bead.
- Tighten screws: Over time, even the best screws may work a little loose. Give them a half-turn now and then.
Staying ahead of these little issues means you won’t have to do a major repair again anytime soon. Plus, it keeps your entryway looking sharp and feeling secure.
Final Thoughts: Safety, Security, and Peace of Mind
Repairing a threshold that’s separating from the door jamb isn’t just about looks or convenience. It’s about keeping your home comfortable, safe, and energy-efficient. Gaps under your door don’t just let in cold air—they invite in moisture, bugs, and sometimes even trouble with your door’s electronics and remotes (especially if water gets into the wiring or sensors).
Take a little time to do the repair right, and give yourself a pat on the back every time you walk through a door that feels solid instead of wobbly. If you ever need to repeat the process or help out a friend, you’ll know exactly what to do. And, honestly, there’s a certain satisfaction in fixing something that greets you every time you come home.