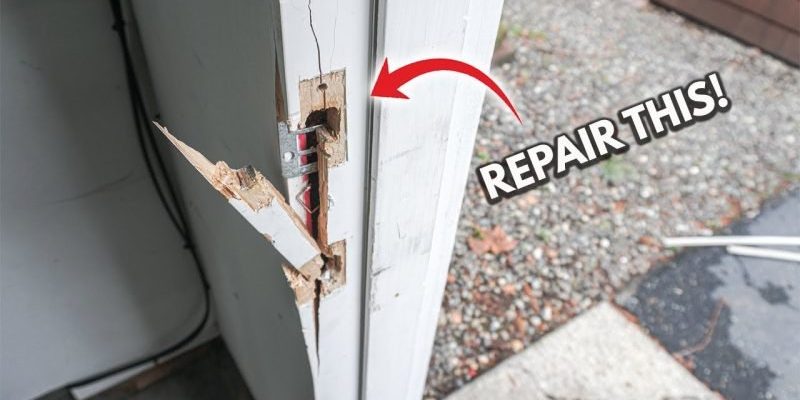
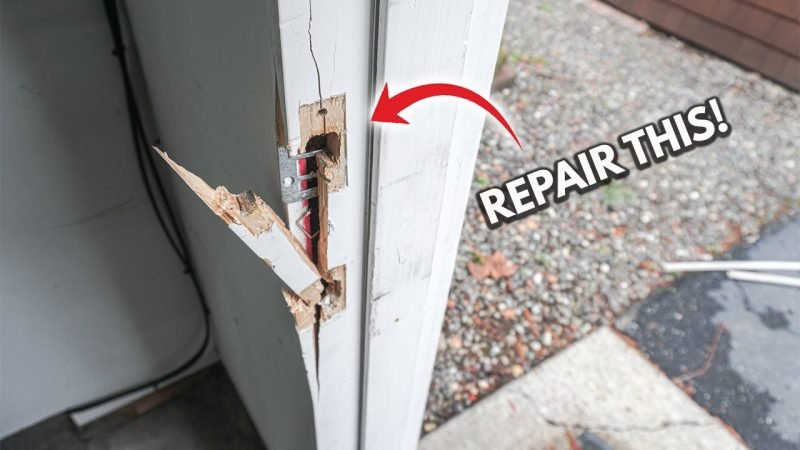
Let’s be honest: a strong door is only as good as its frame. Even if you’ve got a premium Schlage or Kwikset lockset, a damaged wooden frame, a splintered jamb, or rotted wood around the hinges can turn a simple close-and-lock into a daily wrestling match. And if the strike plate or latch has shifted, you might as well be trying to lock a screen door with a twist tie. Here’s the thing: fixing a door frame isn’t rocket science, but you do have to go slow and get the details right—especially if you want your hardware to actually work.
Why Damaged Door Frames Cause Hardware Problems
Most people think of the door itself when a latch sticks or a deadbolt jams, but honestly, nine times out of ten, it’s really the door frame causing trouble. The frame is the anchor for every bit of hardware—from hinges to locks to latches. If it warps, cracks, or rots, the rest of the system goes out of sync.
A common sign of a bad frame is when the door handle feels out of alignment or you have to give the door a hip check to get it closed. That’s not just an annoyance; it can grind your hardware, chip your paint, and even make your home less secure. You might even notice cold drafts sneaking through, or daylight peeking around the jamb. All of these are red flags that your door hardware and the frame aren’t working together as they should.
Here’s the tricky part: even a small shift in the frame can send the deadbolt or latch “out of code”—meaning, it no longer lines up with the strike plate. Suddenly, what worked yesterday won’t lock tonight. If you’re using smart locks or keyless entry (like the August Smart Lock or Yale Assure), a misaligned frame can make those gadgets even glitchier, leaving you locked out or burning through batteries as the mechanism strains to work.
Common Causes Of Exterior Door Frame Damage
So, where do these problems start? Usually, exterior door frames take a beating from the elements. Water is enemy number one—rain can seep along unsealed edges, causing wood to swell, rot, or split. Sometimes, the bottom of the frame gets soft and mushy from standing puddles or snow, leading to a door that sags and hardware that can’t latch.
Another culprit is blunt force. Maybe you accidentally bumped the frame with something heavy, or past repairs were done with the wrong screws or fasteners. Over time, these little impacts can weaken the spots where your hardware connects. Termites or carpenter ants also love door frames, especially if the wood stays damp.
In older homes, you might find frames that have simply shifted as the whole house settles. The result? Gaps, drafts, and that classic “the deadbolt used to work—now it doesn’t” complaint. And if you have metal or fiberglass doors, keep in mind that the frame itself is probably still wood and just as vulnerable to water, insects, and age.
How Door Hardware Gets Out Of Alignment
If your lock or latch isn’t working, it’s tempting to blame the mechanism. But often, the hardware is perfectly fine—it’s just not lined up with the strike plate because the frame has shifted. Let me explain a bit more:
- Misaligned strike plate: If the frame warps or shifts, the hole in the strike plate wins up too high, too low, or completely off center. Your latch or bolt misses the mark and won’t set.
- Loose screws or stripped holes: Over time, the screws holding hinges or hardware can dig out the wood, making the connection sloppy. When the frame itself is damaged, screws can’t “bite” into solid wood.
- Sagging hinges: If the top or bottom of the frame is rotted or split, the door hangs crooked, pulling the hardware out of sync.
You might be wondering, “Can’t I just tighten the screws or adjust the hardware?” Sometimes, yes. But if the underlying frame is mushy, split, or falling apart, surface fixes won’t last. You’ll keep chasing the problem until the frame is solid again.
Tools And Materials You’ll Need To Repair An Exterior Door Frame
Before you start, it’s smart to gather everything you need. Fixing a damaged exterior door frame calls for a mix of basic carpentry and a few specialty items, depending on what you’re up against. Here’s what you might use:
- Drill and wood screws: For re-anchoring hardware and strike plates after repair.
- Pry bar or hammer: To remove trim or loosen the frame if needed.
- Wood filler or epoxy: For patching small cracks or holes.
- Replacement wood or jamb repair kits: For larger rot or split sections—these are available at most hardware stores.
- Measuring tape and square: To make sure everything lines up “true.”
- Paint, caulk, and weather seal: For finishing up and keeping future water out.
If you have a smart lock, universal remote deadbolt, or coded entry like the Yale Assure, make sure to remove the batteries before starting so you don’t accidentally “reset” or unpair anything during repairs.
Step-By-Step: How To Repair A Damaged Door Frame
Let’s break down the process so you know exactly what to expect. Don’t worry if you’ve never done this before; patience and a bit of elbow grease go a long way.
- Remove the door: It’s easiest to work with the door out of the way. Pop out the hinge pins and carefully set the door aside.
- Assess the damage: Look for rotted, split, or soft wood. Poke at the frame with a screwdriver. Mark any spots that feel spongy or look cracked.
- Cut out damaged wood: Use a saw or chisel to remove any rotten or split sections. Try to create clean, straight edges for easier patching.
- Patch or replace: For small areas, fill gaps with wood filler or two-part epoxy. For bigger areas, cut a new piece of wood to fit, or use a jamb repair kit. Attach with wood glue and screws.
- Sand and seal: Once your patch is dry and secure, sand it smooth. Add caulk and paint to match the rest of the frame and keep moisture out.
- Reinstall hardware: Drill new pilot holes if needed so screws have good “bite.” Make sure the strike plate lines up perfectly with your latch or bolt.
- Rehang the door: Once the frame is rock solid, hang the door, and test the hardware. Adjust for smooth action.
If you have a universal or code-activated deadbolt, you may need to sync or reset the hardware to ensure the electronic parts know their “home” position. Check your device’s instructions before reinstalling to avoid frustration.
How To Fix Strike Plate And Latch Alignment Problems
Even after you’ve repaired the frame, you might find the latch or deadbolt still not catching perfectly. Here’s what you can do:
Shifting the strike plate: Sometimes just moving the strike plate up, down, or sideways solves the code alignment issue. Take out the screws, fill the old holes with wood filler, and drill new holes in the right spot.
Enlarging the opening: Use a small file to “widen” the hole in the strike plate a hair. This gives the latch or deadbolt more room. Go slow—a tiny bit of metal filed away can make a big difference.
Replacing screws: Use longer screws (at least 3 inches) that reach into the wall stud. This adds strength and helps keep everything synced up even if the frame shifts a little over time.
If you’ve got a coded lock or remote-controlled latch, double-check to make sure the mechanism moves freely before putting the batteries back in or pairing the remote. A stuck bolt can drain batteries or even fry the gears.
When To Replace The Whole Frame Or Call A Pro
Sometimes, honestly, the damage goes too deep for a patch-up job. If half the frame is rotted, the whole jamb is split, or your repairs keep failing, it might be time to replace the entire frame. Here’s how you know:
- Extensive rot or insect damage: If the wood crumbles away by the handful, repairs won’t hold hardware tight for long.
- Multiple failed fixes: If you’ve reset, synced, or reset your hardware and it still won’t work reliably, the frame’s probably too far gone.
- Visible warping or shifting: If the whole door opening is out of square—meaning the top and bottom aren’t lining up—replacing the frame can save your sanity in the long run.
If this sounds like your situation, it’s worth calling a professional carpenter or handyman. They can swap in a new pre-hung door and frame, make sure your expensive smart lock or code entry lines up, and weatherproof everything for you.
Preventing Future Door Frame And Hardware Problems
Once you’ve fixed things, a little maintenance goes a long way. Here are practical tips to keep your exterior door frames and hardware working in sync:
- Seal everything: Every year or two, check for gaps where water can creep in. Fresh caulk and paint prevent most wood rot before it starts.
- Lubricate hinges and locks: A quick spray with graphite or silicone keeps things running smooth, especially if you use coded locks or remote-controlled latches.
- Tighten screws regularly: Don’t wait for a hinge to sag—give your hardware a quick once-over each season and tighten anything that feels loose.
- Watch for pests: Keep an eye out for tiny holes or sawdust; this can mean termites are at work. Act quickly if you spot trouble.
Strong, straight door frames don’t just make your home feel solid—they give you peace of mind that your locks, remotes, and codes will work without a fuss in every kind of weather.
Repairing a damaged exterior door frame isn’t just about fixing a bit of wood. It’s about making your entryway feel secure again, making your hardware click into place the way it should, and making sure your home’s first line of defense stands tall.
Wrapping Up: Taking Control Of Door Frame Repairs
Addressing a damaged exterior door frame can feel intimidating, but fixing it is often way simpler—and more satisfying—than you might expect. When the frame is solid, your hardware functions the way it should, whether you’re turning a key, entering a code, or using a remote lock. Take your time with each step, and don’t be afraid to call in backup if you need it. With patience and careful repairs, you’ll enjoy a door that opens, closes, and locks with a satisfying click every time.