That’s where a bore gage becomes your best friend. No, it’s not something only pros use—it’s a straightforward tool that helps you measure the holes in your door so everything matches up. Honestly, if you’ve ever tried fitting a Schlage lockset, a Kwikset lever, or almost any brand of door hardware and felt the urge to “make it work” by forcing parts, you’ll see just how helpful this tool is. Let me explain how you can use a bore gage to check for door hardware bore hole consistency like a pro—even if you’ve never done it before.
What is a Bore Gage and Why Does It Matter for Door Hardware?
A bore gage might sound fancy, but it’s really just a measuring tool designed to check the diameter and position of holes—think of it as a ruler made just for circles. In the world of doors and locks, the “bore hole” is the round hole drilled through your door where the lock or knob sits. Accuracy here isn’t just about looks; it’s crucial for both security and smooth function.
Door hardware brands like Schlage, Kwikset, and Yale all design their products to fit specific hole sizes—usually 2-1/8 inches for the main bore and 1 inch for the latch. If your holes are too small, too large, or slightly off-center, you’ll have trouble mounting anything at all. Maybe you’re upgrading your old handle or switching to a smart keypad—using a bore gage lets you check if the holes will fit your new remote-activated lock before you end up with a half-installed mess.
A bore gage isn’t just for pros or woodworkers. You’ll find basic models at any hardware store, and they’re surprisingly simple to use. Want to get hardware installed right the first time, without hacks or odd gaps? Measuring with a bore gage saves you from those “why won’t this fit?” moments. Trust me, it’s worth it.
How Door Hardware Bore Holes Impact Installation
You might be wondering, “Do tiny measurement differences really matter?” Absolutely. Here’s why: installing door hardware is a bit like putting together a puzzle. If the pieces (in this case, the holes) don’t line up, nothing sits flush and nothing locks properly.
Let’s say you’re working with a universal remote-style lock that claims to fit any door. If your bore hole is off by just a hair, you’ll struggle with the code entry pad fitting or the battery pack not sitting flush. The lock might not sync up with the latch, or the mounting screws won’t catch. Worse, a misaligned bore hole can weaken your door, making it easier to force open—so you’re losing both convenience and security.
Even if you’re not installing a high-tech lock, mechanical issues crop up fast with misaligned bore holes. Levers might not spring back, the key might jam, or you’ll wear out parts trying to force hardware into place. Checking bore hole consistency with a gage takes out all the guesswork. It lets you reset, re-center, or patch things before you end up regretting your install.
Parts of a Bore Gage and How It Works
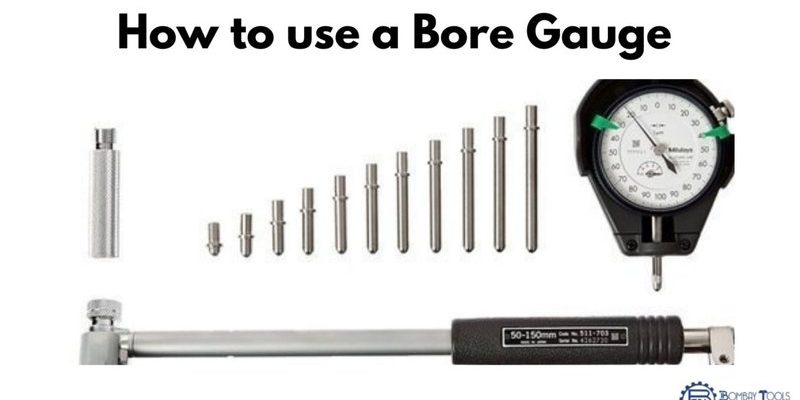
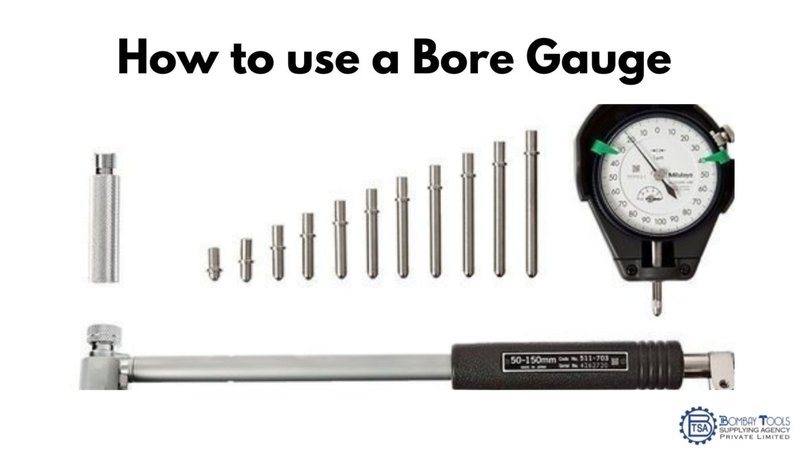
Let me break down the tool itself. Most bore gages have three main parts:
- Measuring Shaft: The long part you insert into the hole. It’s marked for specific diameters.
- Indicator or Scale: This tells you the measurement, usually in inches or millimeters.
- Contact Points: These are the “fingers” or “tips” that touch the sides of the hole, measuring its true diameter.
Some bore gages are accurate down to a few thousandths of an inch, but for door hardware, you don’t need that kind of precision. You just want to confirm the hole is within standard size and shape—the typical ones are pretty foolproof.
When you insert the bore gage into the hole, the contact points expand (or contract) to touch the sides. The indicator gives you a readout, which you compare to the standard size needed for your hardware. If you’re seeing a reading of 2-1/8″ for the main bore, you’re good. If it’s more or less, or not round, you’ll know before you waste time or money on hardware that won’t fit right.
Step-by-Step: How To Use a Bore Gage on Your Door
Ready to check your door? Here’s how to do it, step by step—no fancy skills required:
- Get the right bore gage. For standard residential doors, you’ll want one that covers 1″ and 2-1/8″ diameters. Most home improvement stores sell them near the locksets.
- Insert the gage into the bore hole. Hold it straight, so the measuring shaft is perpendicular to your door. Make sure the contact points touch the sides of the hole fully.
- Read the measurement. Look at the indicator or scale. Match it to the hardware spec—Schlage and Kwikset typically need 2-1/8″ for the main lock, 1″ for latches.
- Check for consistency. Move the gage around inside the hole, checking at several points. If the measurement is the same all the way around, your hole is round and correct.
- Mark or adjust if needed. If you’re seeing different measurements at different spots, you’ve got an uneven hole (sometimes called “wobble” or “drift”). Mark the problem spots so you can reset your drill or patch the area before trying again.
Take your time—rushing is the easiest way to end up with a lopsided install. If something feels wrong, back up and check again. It’s better to correct now than troubleshoot after the hardware is installed (and possibly have to reset everything).
Common Mistakes When Measuring Door Bore Holes
Nearly every DIYer has made at least one of these blunders, so don’t stress—it’s part of the process. Let’s talk about a few classic mistakes, and how a bore gage helps you avoid them.
- Measuring by sight or “eyeballing” it. Our eyes aren’t nearly as accurate as a good bore gage. Trying to guess diameter or location by feel usually leads to weird fits or gaps.
- Not checking both sides of the door. Sometimes, the hole looks good on one side but is way off on the other. Always stick the bore gage through from both directions to confirm the hole runs straight and true.
- Ignoring the latch hole. People focus on the main bore but forget about the 1″ edge hole for the latch. Both need to line up so the lockset can sync up and the code pad or battery pack sits flush.
- Not cleaning out the hole. Sawdust or chips inside the bore can throw off your measurement. Make sure the hole is clean and clear before using the gage.
By using a bore gage and checking carefully, you remove these issues before they cause problems. Even on a universal or remote-activated lock, consistency is key.
Comparing Bore Gage Models: Digital vs. Mechanical
There are a few types of bore gages you’ll run across—let me break them down so you can pick what works best for you.
- Mechanical bore gages use a dial or a sliding ruler. They’re simple, tough, and don’t need batteries. Think of these as the classic “analog clock” of the measuring world.
- Digital bore gages have an electronic display. They’re easy to read and great if you want fast, precise measurements. Some even beep if you’re out of spec, which is handy for beginners.
- Bore gage kits come with multiple sizes and adapters, so you can measure both main bores and latch holes with one set. These are great if you plan to reset or upgrade door hardware often, or if you have several door brands in your home.
For most homeowners, a basic mechanical gage does the job and is easier on the budget. If you’re techy or want to troubleshoot fast, digital models are fun and reliable, just remember to check the battery before starting so it doesn’t die mid-project.
What To Do If Your Bore Holes Aren’t Consistent
So you’ve checked with the bore gage, and the reading is off. Don’t panic—there are a few fixes, depending on how far out of spec your hole is.
- Small inconsistencies: You can often file or sand the inside edge to even things out. Take it slow—removing too much material can make the hole too large, and then you’re into patch-and-reset territory.
- Large misalignments or the wrong size: Sometimes you’ll need to patch the hole and redrill. Use a wood plug or a filler kit, let it set fully, then recheck with your bore gage before drilling again.
- Holes that are oval or “wobbly”: This usually means your drill bit wandered. Mark the correct center, patch any gaps, and reset your guides before trying again.
- If you’re upgrading to a new code-based or battery-powered remote lock: Double-check that both the main bore and latch holes meet your brand’s exact spec—otherwise, you risk a poor fit and annoying troubleshooting down the line.
Honestly, fixing bore holes isn’t glamorous, but it’s better than forcing hardware to fit and ending up with a door that won’t close or lock right.
Alternatives to Using a Bore Gage (And Why They Fall Short)
There are a few other ways you might hear to check bore hole consistency, but honestly, none are as reliable as a bore gage.
- Using a tape measure: Possible, but measuring across a round hole with a floppy tape is frustrating and rarely accurate to the sixteenth of an inch that door hardware expects.
- Tracing hardware plates: You can line up the trim or strike plate and mark the hole locations, but if the original holes aren’t centered or you’re working with a universal remote-style lock, alignment gets tricky fast.
- “Eyeballing it” or guessing: This almost always leads to mistakes. You might get lucky once, but if you’re installing keyed locks, smart remotes, or updating code pads, tiny errors matter more than you think.
A bore gage makes the whole process simple, repeatable, and gives you confidence before you drill, reset, or try pairing up new hardware. It’s a small investment for a smoother, stress-free install.
Wrap-Up: Why Bore Gages Are Worth Using for Door Hardware
Here’s the bottom line: spending a few minutes with a bore gage up front saves a ton of time and frustration later. Whether you’re installing a classic deadbolt or going high-tech with a remote or battery-powered code lock, those bore hole measurements matter. With a bore gage, you can spot issues, fix them early, and make sure every new lock fits perfectly—no hacks or awkward resets required.
Every door, every time, you’re giving yourself a head start on a smoother, more secure install. So next time you’re at the hardware store—or thinking about that Schlage or Kwikset upgrade—grab a bore gage. Your future self (and your doors) will thank you.