Most modern handlesets, like those from Schlage, Kwikset, or Yale, aren’t as intimidating as they look. They’re a collection of solid, simple parts designed to work as a team: the exterior handle, interior lever or knob, deadbolt, spindle, and connecting screws—all held in place by a few well-placed fasteners. If any one part slips or falls out of alignment, the whole mechanism can feel weird or stop working completely. But don’t worry. Let’s walk through how to get everything realigned and put back together—no professional locksmith required.
How Handleset Mechanisms Work (And Why They Get Dislodged)
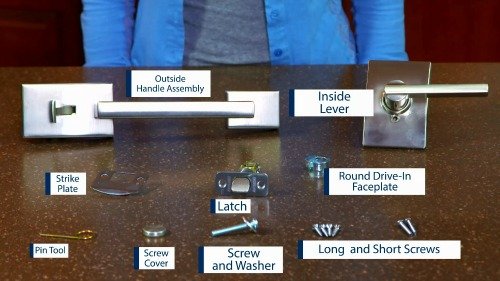
Before you start hunting for the right screwdriver, let’s make sense of what’s actually going on behind your door. A typical handleset mechanism is made up of several linked parts. There’s the outside handle, the inside knob or lever, and the locking mechanism itself—deadbolt or latch, depending on your model.
These pieces connect through a hole in the door. Usually, a *spindle* or rod runs through the latch, linking both sides. If the set screws, mounting plate, or connecting spindle slip even a little—sometimes from a hard slam, sometimes from years of gentle use—things can come loose. Suddenly, you’re faced with a handle that spins, droops, or pulls clear out of the door.
Here’s the thing: even the best handlesets, like those by Schlage or Kwikset, can get knocked out of place if the door shifts, weather changes, or the screws simply work their way loose over time. Kids hanging on the handle, heavy doors swinging shut, or even a botched DIY “fix” can speed up the problem. Knowing how all the pieces fit lets you spot small issues before they turn into major headaches.
Gather the Right Tools Before You Start
You don’t need a fancy workshop to reassemble a dislodged handleset, but having the right tools makes a huge difference. Most modern brands use standardized screw sizes and mechanisms, but there are a few odds and ends worth tracking down.
You’ll want:
- A flathead and Phillips screwdriver (most handlesets use Phillips, but some older ones need a flathead for set screws)
- Needle-nose pliers (for tiny springs or spindle parts)
- A flashlight (trust me, seeing inside the door cavity makes things easier)
- The original handleset screws and spindle (if any went missing, check the floor and inside the door itself)
- Optional: a can of lubricant and a small Allen key for some specialty screws
If you’re working on a Schlage or Kwikset handleset, the screws usually sit just behind the interior plate or under a little decorative cover. Sometimes the hardest part is finding where the screws are hiding! Take a minute to line up everything on a towel or old T-shirt so you don’t lose anything in the chaos of the project.
Step-By-Step: How To Reassemble A Dislodged Handleset Mechanism
Ready to reassemble? Here’s how to get your handleset back in shape, even if you’ve never done this before.
1. Completely Remove the Handleset (if needed):
- If part of the mechanism is still attached, gently unscrew the inside and outside handles, as well as the latch and mounting plate.
- Keep screws and any little springs or washers in a small bowl so nothing rolls away.
2. Inspect Every Piece:
- Look for bent or worn parts—especially the spindle, springs, or screws. If anything looks damaged, now’s the time to replace it.
- Wipe down all the pieces and lightly lubricate moving parts so everything slides smoothly when reassembled.
3. Reinstall the Latch (and Deadbolt, if separate):
- Slide the latch back into the door edge. The angled part should face the direction the door closes.
- Screw the latch in place, ensuring it sits flush and doesn’t wiggle.
4. Align and Attach the Exterior Handle and Interior Plate:
- Line up the exterior handle so the spindle fits through the latch. If there’s a deadbolt, make sure its spindle lines up as well.
- Attach the interior plate and handle, tightening screws gradually to pull everything snug.
5. Test and Adjust:
- Try turning the handle and locking the door before fully tightening all screws. If anything binds or feels off, loosen and adjust the alignment.
- Once you’re sure everything moves smoothly, finish tightening the screws and snap any decorative covers back in place.
Honestly, the hardest part is lining up the spindle with the latch mechanism. Take your time, and don’t force anything—if it doesn’t slide together easily, something’s probably just a hair out of place. Patience saves broken parts later!
Common Problems After Reassembly (And How To Troubleshoot)
You might be wondering, “What if it still doesn’t work right after I put it all back together?” Don’t worry, you’re not alone. Handleset mechanisms are all about alignment and tension, so a tiny misstep can cause a big headache.
If the handle feels loose or wobbly:
- Double-check that the screws holding the interior and exterior plates are fully tightened.
- Look for stripped screw holes—sometimes the wood inside the door gets worn, and you may need larger screws or toothpicks to shore up the holes.
If the latch doesn’t retract or extend fully:
- The spindle might not be seated correctly. Take the handles apart and realign it so it passes cleanly through the latch.
- Check for any debris or leftover hardware jamming things up inside the door.
If the key or thumb latch won’t turn:
- Make sure the deadbolt and latch align with the holes in the strike plate on the door frame.
- If it still won’t budge, try removing the mechanism again and checking that all moving parts are lubricated and free from damage.
Don’t be afraid to take things apart a couple of times. It’s frustrating, but it’s pretty normal. The real secret is patience and a steady hand—there’s no shame in needing a few tries to get all the pieces working together again.
What to Do If You’re Missing Parts or Screws
Let me explain why lost screws and mystery pieces are so common with handleset repairs. Door hardware has a habit of dropping tiny, important pieces in the one spot you can’t reach. If you’re staring at an almost-finished reassembly and realize you’re missing something vital, don’t panic.
First, retrace your steps:
- Check inside the door cavity—sometimes screws or washers fall in there and bounce around.
- Look along the baseboards, on the porch, or under nearby rugs.
If you’re still out of luck:
- Most hardware stores sell universal screw and spindle kits that work with Schlage, Kwikset, Yale, and more.
- Bring a sample (if you have one) to match the size and thread. If not, snap a quick photo of the spot you need to fill, and a helpful employee can usually steer you in the right direction.
You might also find that the original handleset code or model number (usually stamped on the hardware or included in the install instructions) can help you order the exact replacement screws online.
If you’re feeling stuck, remember: most door hardware is modular for a reason. You can almost always find a universal or brand-specific replacement without swapping the whole set.
Comparing Brand-Specific vs. Universal Handleset Parts
Here’s the thing—when you’re searching for missing parts, you’ll see both brand-specific and universal handleset kits. Which should you choose? Here’s a quick rundown.
- Brand-specific parts (like Schlage screw kits) guarantee a perfect fit, especially for unique handlesets with one-off designs. If you can find the exact model, this is usually your safest bet.
- Universal kits are a life-saver for less-common or older mechanisms where the brand is unclear. They come with a variety of screws, spindles, and washers sized to work with most common handleset styles.
Sometimes, universal kits require a bit of trial and error, but they’re great in a pinch. If you have a high-security handleset or something with a smart lock/remote control feature, always go for the manufacturer’s parts to avoid problems syncing, resetting, or pairing digital features down the line.
Maintenance Tips to Avoid Future Handleset Issues
Now that you’ve conquered the reassembly, let’s keep things running smoothly. Handlesets deal with more wear and tear than most door hardware. Here’s what I do to keep my own Kwikset set in shape year after year.
- Every few months, check that all screws are still tight. Doors swell and settle with the seasons, and screws can loosen just from everyday use.
- Wipe down the handle and plate with a damp cloth to keep gunk out of the moving parts. Avoid harsh cleaners that can pit or corrode metal finishes.
- Add a dab of lubricant (the kind made for locks, not WD-40) to the latch and keyhole. This keeps everything moving without attracting dust.
- If you’ve got a smart lock or remote, swap out the batteries once a year and make sure the digital sync and code functions still work after any hardware adjustment.
A little TLC goes a long way. Handlesets don’t ask for much—just a few minutes’ care once in a while can save you the headache of a dislodged mechanism next season.
When to Call a Pro (And When You Really Don’t Need To)
Most people can tackle reassembling a dislodged handleset with a bit of patience, the right tools, and a careful approach. But sometimes, things just won’t cooperate. Maybe you’ve got a super old doorset, a high-security model, or a smart lock that won’t sync, pair, or reset, no matter what you try.
Here’s when I’d say it’s time to call for help:
- The latch or deadbolt is seriously bent, corroded, or broken (replacement is safer than a risky fix).
- The handleset keeps coming loose, even after several reassemblies (the door itself may need repair).
- There’s a digital component—a keypad, code system, or remote—that just won’t pair or work after you’ve fixed the hardware.
But for run-of-the-mill handleset issues—where everything is just loose or out of place—it’s absolutely possible to become your own handyman (or handywoman) for a day.
Wrapping Up: Confidence for Next Time
Reassembling a dislodged handleset mechanism might feel daunting at first, but it’s just a puzzle built from everyday parts. Once you understand how the latch, spindle, and screws work together, it all becomes much less intimidating. Getting your Schlage, Kwikset, or similar handleset back in place doesn’t take special skills—just a bit of care, the right tools, and the patience to troubleshoot.
Next time your handle droops, the latch sticks, or something comes apart, you’ll know exactly what to do. Take it slow, trust your instincts, and don’t be afraid to double-check your work. A solid, working handleset isn’t just a piece of hardware—it’s peace of mind, every time you walk through your door.