Honestly, fixing a deadbolt with a loose spring isn’t rocket science, but it does ask you to slow down and work with your hands. Think of it a bit like spring cleaning for your lock: you’re rolling up your sleeves, looking at things up close, and giving some TLC to a mechanism most people ignore. Whether you have a classic Schlage or a modern Kwikset, deadbolts mostly work the same way. Troubleshooting one is a satisfying mix of logic, patience, and the right screwdriver.
If you’re new to DIY lock repair (or just nervous about poking around inside a deadbolt), don’t worry. The step-by-step process will walk you through resetting that tired spring so your lock feels sturdy and reliable again. Let’s get into the details, down to the very last screw.
How Deadbolts and Their Springs Actually Work
Deadbolts might look simple from the outside, but inside, there’s a small mechanical dance going on. When you turn the key or thumbturn, you’re twisting a cam that pushes or pulls a rectangular bolt in and out of the door frame. The internal spring—sometimes called a return spring—is what pops everything back into its “neutral” resting position. Without that little coil, the lock feels lifeless.
You might be wondering, “Why is that spring so important?” Here’s the thing: the spring keeps pressure on the moving parts, so your key slides in smoothly and the deadbolt doesn’t get stuck halfway. It also helps your lock stay in sync with the rest of your door hardware. A loose or broken spring means you’ll end up jiggling the key, pushing the lock harder, or even forcing the bolt back by hand.
If you’ve ever had a deadbolt that felt limp or didn’t “snap” closed, that’s your sign. Some folks assume the lock is failing or the battery (on smart locks) is dying, but more often it’s just a tired spring. The good news? With a little patience, you can fix it at home—no need to call a locksmith unless things get really hairy.
Signs of a Loose Internal Spring in Your Deadbolt
Before grabbing your tools, it’s smart to double-check that a loose internal spring is actually your problem. Here are a few telltale signs:
- Key turns too easily: If it feels like your key isn’t meeting any resistance, the spring might be off its game.
- Deadbolt doesn’t retract fully: Sometimes you’ll notice the bolt won’t slide all the way back into the door, or it gets stuck halfway out.
- Wobbly thumbturn or key cylinder: If the part you grip feels loose or “mushy,” it’s probably a spring issue inside.
- Lock doesn’t reset itself: When you remove your key, the deadbolt should snap back to a resting position. If it just sits there looking sad, the spring is suspect.
If your deadbolt has an electronic keypad or remote sync feature, you might also notice it’s slow to respond or won’t pair correctly with your smart home system. That’s because a loose internal spring can affect the whole mechanism, not just the old-fashioned, manual parts.
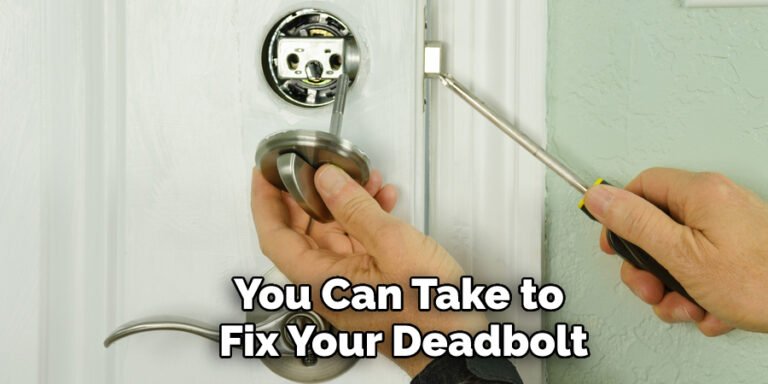
Gathering Your Tools and Opening the Deadbolt
Let me explain: repairing a deadbolt isn’t a high-tech operation, but you will need the right gear. Most deadbolts, whether they’re Schlage, Kwikset, or even a generic house brand, use similar internals. Here’s what you’ll want on hand before getting started:
- Phillips or flathead screwdriver (depending on your lock style)
- Needle-nose pliers for handling small parts
- Small tray or bowl to keep screws safe
- Replacement spring (if you suspect yours is broken—not always needed)
- Optional: smartphone with camera to snap photos as you go (trust me, this helps with reassembly)
Honestly, the trickiest part is opening the deadbolt without losing pieces. Start by unscrewing the two long screws on the interior side of the lock. Gently pull apart the two halves—the exterior cylinder will remain outside, while the internal mechanics stay inside the door. Snap a quick photo of how everything’s arranged before you poke around.
Don’t force anything. If the cylinder feels stuck, jiggle it gently. Sometimes grime or old lubricant makes things sticky. If you see springs or tiny screws, set them aside carefully. You’ll need them when you reset the lock later on.
Finding and Inspecting the Loose Internal Spring
Here’s where things get a little fiddly. Once you’ve opened up the deadbolt, look for a small metal coil—usually hooked onto pegs or sitting inside a groove. This is your internal spring. If it’s just hanging loose, bent, or popped out of place, congratulations: you’ve found your troublemaker.
Use your smartphone to take a close-up photo before you move anything. The spring needs to be positioned just right, and it’s easy to forget how it all fits together. If the spring has snapped or looks stretched-out, you’ll need a replacement. Some brands (like Schlage) use a specific size, so check with your hardware store or order from the manufacturer.
If the spring just looks a bit crooked or has slipped off its peg, you might be able to repair the deadbolt by gently re-seating it. Use needle-nose pliers to nudge it back where it belongs. Don’t twist or stretch the spring unnecessarily—these little guys are sensitive. Once it’s back in place, give the thumbturn or key a test spin (without closing up the lock yet) to see if the action feels firm again.
If the mechanism now snaps back into place like it should, you know you’re onto something!
Reassembling and Resetting the Deadbolt
Once the spring is back in position—or swapped out for a new one—it’s time to put your deadbolt back together. This is where those smartphone photos really pay off. Align the two halves of the lock so that the spindle (the square rod connecting both sides) slots into the cam mechanism. Double-check the spring is still hooked into place and hasn’t wiggled loose while you were working.
Take your time screwing everything back together. If you overtighten, you might pinch the spring and create new problems. Just snug the screws enough so the lock feels secure, then test the key and thumbturn a few times. You want to make sure everything moves smoothly, clicks into place, and “feels right.”
If you’re working on a smart lock with a remote control or pair/sync feature, this is also a good time to check the battery or run a reset. Sometimes, even after a mechanical fix, the electronic side needs a quick reboot to catch up. Follow your brand’s instructions for sync and troubleshooting if things feel off electronically.
Testing the Repair and Troubleshooting Common Issues
Once reassembled, don’t rush to close the door just yet. Run a full “dry test” first. With the door open, turn the key and thumbturn several times. Does the bolt snap back firmly? Is there resistance, but not grinding? If so, you’re in good shape.
But what if it still feels loose or sticky? Here’s a quick troubleshooting table:
| Problem | Possible Cause | Fix |
| Deadbolt still feels loose | Spring not seated correctly, or worn cam | Double-check spring’s position, inspect cam for wear |
| Key won’t turn smoothly | Misaligned parts during reassembly | Open lock, realign spindle and cylinder |
| Electronic remote not syncing | Low battery or reset needed after repair | Replace battery, follow brand sync steps |
If the lock is still misbehaving after two or three tries, don’t get discouraged. Sometimes a deadbolt has deeper issues—worn metal, stripped gears, or broken plastic—that aren’t easy to spot at first. In those cases, replacing the deadbolt (or at least the internal mechanism) is your next best bet.
Comparing Repair Versus Replacement
You might be wondering, “When is repair not worth it?” Here’s the thing: repairing a loose internal spring is usually cheap and satisfying, but it’s not always the final answer. If your deadbolt is decades old, super rusty, or you’ve already tried repair more than once, a full replacement starts to make sense.
Modern deadbolts—whether you go with a classic keyed style or an electronic lock with pairing and code options—are built to be replaced as whole units. Some brands sell repair kits for the internal spring, while others suggest swapping the lock entirely. If you want to upgrade to a smart lock or universal remote system, this is a great opportunity.
There’s no shame in calling in a locksmith, either! Some repairs are tricky, especially on high-security or older locks without clear instructions. A pro can reset the mechanism, replace the spring, or install a whole new deadbolt in under an hour. It all comes down to how comfortable you feel with tools and tiny parts.
Keeping Your Deadbolt in Good Shape After Repair
After you’ve repaired your deadbolt, keeping it running smoothly is mostly a matter of regular TLC. Every few months, give the mechanism a quick check:
- Lubricate the lock: Use a graphite-based powder or a light spray made for locks. Never use WD-40 or oil, as these can gum up the works.
- Tighten any wobbly screws: Over time, screws can loosen with door slams or daily use. Check them now and then.
- Test the spring action: Periodically turn the key or thumbturn to see if the snap feels crisp. If it starts going soft again, you know what to do.
- For smart locks, check batteries and resync remote: Weak batteries or lost pairing can mimic mechanical issues. Replace batteries and run a reset or sync whenever needed.
Good maintenance means you’re less likely to deal with a loose internal spring again—at least for a good long while. Plus, your door stays secure, and you avoid that weird feeling of a “floppy” lock every time you come home.
Final Thoughts: Take Pride in a Job Well Done
Repairing a deadbolt with a loose internal spring isn’t just about saving a little money; it’s a confidence boost. You’ve learned how the lock works, matched wits with some small but mighty hardware, and restored a bit of security to your home. That’s something to be proud of.
If things went perfectly, awesome—enjoy the firm click of your restored deadbolt. If it took a few tries or even a replacement, you’ve still gained some practical know-how. And next time a lock acts up—whether it’s a basic deadbolt or a fancy remote-synced unit—you’ll know exactly where to start.
Here’s to doors that open, close, and lock exactly the way they should.