That’s where a bore sizing guide steps in—it’s the unsung hero of door security. Whether you’re installing your first Kwikset or Schlage deadbolt, or just replacing an old one, matching the right hole size can make all the difference. Think of the bore sizing guide as a template or stencil for drilling clean, accurate holes. It saves you from “eyeballing it,” which almost always leads to off-center, crooked, or undersized bores that make the lock hard to install (or worse, easy to break). Let me explain how this simple tool makes things easier and why it’s a game-changer for anyone—beginner or pro.
What Is a Bore Sizing Guide and Why Does It Matter?
Here’s the thing: doors aren’t one-size-fits-all. Deadbolts come in standard sizes, but your door might’ve been drilled decades ago, or you might be installing a brand or style that uses a different diameter. A bore sizing guide is basically a plastic or metal template with cut-outs for various standard hole sizes. You line it up on the door, mark your spots, and drill with complete confidence you’re getting it right.
Strong deadbolt installation starts with the bore hole. If it’s too small, your lock won’t fit. Too big, and you’ll end up with a wobbly mess that’s easy to kick in. It’s like trying to use a remote with dead batteries—everything looks right, but nothing works. The bore sizing guide removes the guesswork, ensuring the deadbolt sits flush, the code on your smart lock syncs up, and the hardware aligns so your door is as secure as possible.
You might be wondering if you can “just measure” and skip the template. Honestly, you could—but unless you’ve got a perfect eye and steady hand, it’s so easy to end up with something slightly off. That small error can mean you’re back at the store buying a new deadbolt or troubleshooting a lock installation that never quite feels right.
Types of Bore Sizing Guides: Universal Templates vs. Brand-Specific
Not all bore sizing guides are equal. Some are made for specific lock brands—like Kwikset or Schlage—while others are universal and work with any standard lock. Here’s how to tell the difference and decide what’s right for your project:
- Universal Bore Guides are like Swiss Army knives. They have several hole sizes (commonly 1-1/2″ and 2-1/8″ for deadbolts) and various backset options. If you plan to install different brands or update older doors, a universal template gives you flexibility. You can code it for almost any situation.
- Brand-Specific Guides are laser-focused. If you know you’ll always use, say, Kwikset locks, their template lines up with their standard hole and latch placements. Brand guides speed up installs and reduce errors. They might also include details that help with advanced features, like smart lock battery compartments.
Some door installers swear by brand templates for speed and confidence—think of it as getting the factory remote for your TV, instead of a universal one. But if you’re working on older homes or switching lock brands, universal guides are a lifesaver. Just check your deadbolt’s instructions: most include a paper template, but a sturdy plastic guide is way easier to reuse and align.
Steps to Using a Bore Sizing Guide for Deadbolt Installation
Let’s get hands-on. Using a bore sizing guide isn’t complicated, but it does require some attention to detail. Here’s a step-by-step you can actually follow without calling your handy neighbor for backup:
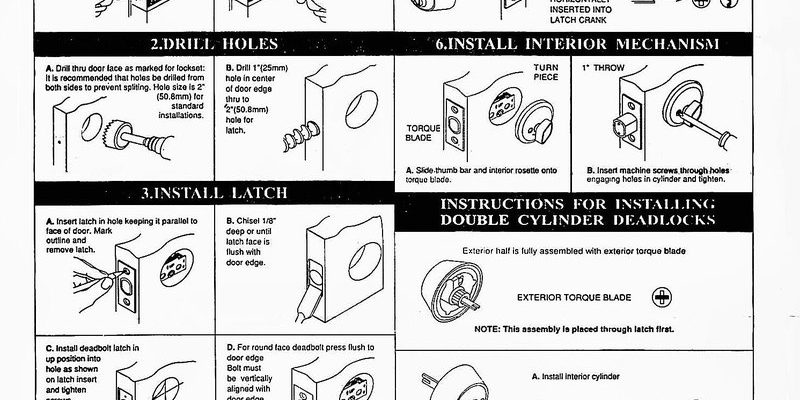
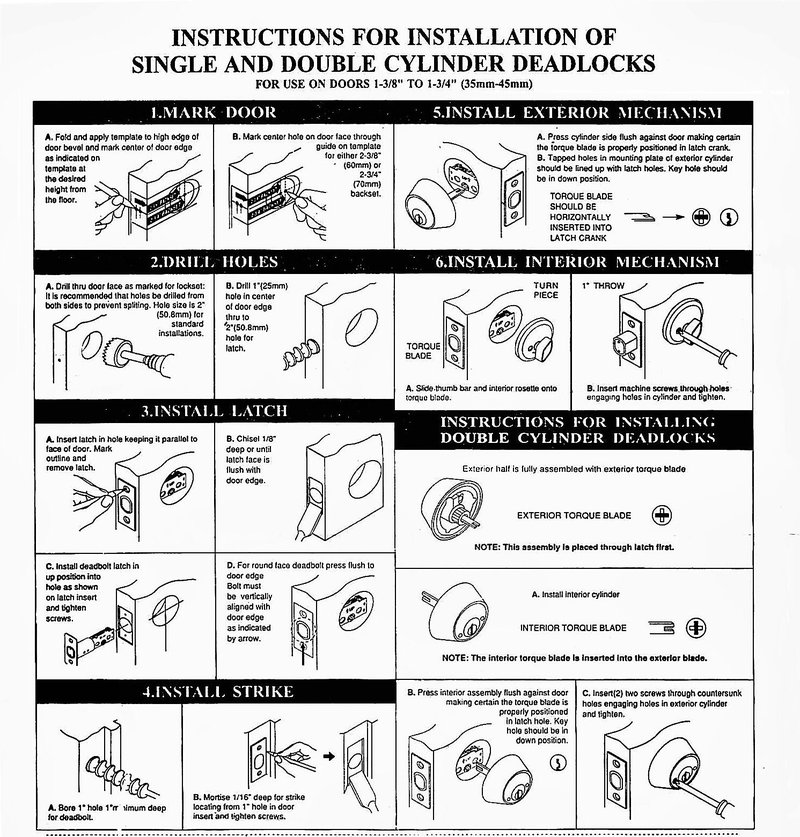
- Check your door’s thickness and backset. Most residential doors are 1-3/8″ or 1-3/4″ thick. Backset—the distance from the door edge to the center of the hole—is usually 2-3/8″ or 2-3/4″. Your guide will have slots for both. If your deadbolt’s instructions mention a code or reset step, note this for later.
- Position the guide. Line up the template vertically and horizontally, making sure it sits flush and centered. Most guides have markings for left or right-hand swing doors. Use a pencil to mark the hole on both sides. Double-check before drilling—this is your “measure twice, cut once” moment.
- Drill the face bore (main hole). With the guide held or clamped in place, use a hole saw matching the template’s diameter (usually 2-1/8″). Drill straight through—let the bit do the work. If you push too hard, you’ll splinter the wood.
- Drill the edge bore (latch hole). Most deadbolts need a smaller, 1″ hole in the door edge. Use the guide’s side cut-out to align this.
- Test fit hardware. Before fully installing your deadbolt, dry-fit all parts. You should feel a snug, secure fit—no wobble, no gaps.
If the lock has electronic features, now’s the time to follow the pairing or battery instructions in the manual. Don’t force anything. If it doesn’t fit, double-check your bores with the sizing guide—sometimes minor adjustments solve everything.
Common Problems When Skipping the Sizing Guide
Trying to go freehand without a bore sizing guide is tempting, especially if you’re impatient or missing tools. Here’s what usually goes wrong:
- Misaligned bores: Even a few millimeters off can make the deadbolt impossible to operate or keep you troubleshooting for hours. It’s like pairing a remote without syncing—it’ll never work right.
- Splintered doors: Drilling without a guide can chip or crack the finish, especially on painted or veneered doors. A template keeps your bit steady and the door looking good.
- Lock won’t fit or operate smoothly: If the holes aren’t right, getting the battery compartment to sit flush or the deadbolt to extend can be a nightmare. No code or reset option will fix a bad bore.
The sizing guide acts almost like a reset button for your install—if something feels off, you can double-check the holes and make quick corrections before the hardware goes in for good.
Tips for an Easy, Clean Deadbolt Install
You might be surprised at how much easier the job feels with a bore sizing guide. Here are a few extra tricks I’ve picked up:
- Clamp the guide. A steady template means a cleaner hole and less “uh-oh” when you pull out the drill.
- Tape up the door surface. Using painter’s tape where you’ll drill helps prevent splintering or paint chipping—just peel it off after drilling.
- Start with a smaller pilot hole. If you’re nervous, drill a small hole first to guide your hole saw. It’s like using training wheels, and no one will judge.
- Use a vacuum. Drilling creates tons of dust and wood chips. Have a vacuum handy (or a buddy to help) to keep things tidy, especially if your deadbolt’s electronics are sensitive to debris.
These simple steps can make the difference between a lock you trust and one you’re always fiddling with or trying to reset.
Comparing DIY and Professional Installation
Sometimes, people ask if using a bore sizing guide is enough for a DIY install, or if it’s better to just call a pro. Here’s my honest take: if you’re comfortable with a drill—and can follow basic steps—you can absolutely install a deadbolt yourself using the template. Modern guides are idiot-proof (in the best way).
But here’s where a pro earns their money:
- If your door is old, damaged, or has been patched before, you may run into weird problems—holes that don’t line up, warping, or structural issues. A pro can reset and repair these with custom tools.
- For smart locks, especially those with keypads, batteries, or code syncing, pro installers handle pairing and troubleshooting extremely fast. If you’re not tech-savvy, sometimes paying for help saves hours.
- If you’re installing multiple locks (say, on a rental property), a professional setup ensures every deadbolt is uniform and secure, with no need to redo anything.
Honestly, for most standard home doors, the bore sizing guide is all you need. Take your time, follow the steps, and you’ll feel like a pro (and save a chunk of change).
Alternative Tools and Workarounds
Lost your template or can’t find a bore sizing guide at your hardware store? There are workarounds, but they’re not perfect. Some folks use:
- Paper templates from lock kits: Most brands, like Kwikset or Schlage, include a folded paper template. Tape it in place; it works, but it’s not reusable, and can shift if you’re not careful.
- Measuring and marking by hand: With a ruler and some patience, you can mark out the hole locations. Double and triple-check your measurements! This is the old-school way, but the risk of error is higher.
- 3D printed guides: If you have access to a 3D printer, you can sometimes find files to print your own bore sizing guide. This is very DIY, but kind of cool for tech-minded folks.
Whatever workaround you use, make sure to check your results before drilling. Once the hole is cut, the only “reset” option involves wood filler and starting over. A real template or guide gives you peace of mind that your deadbolt will fit and secure the way it should.
Wrapping Up: Why A Bore Sizing Guide Is Worth It
Perfect deadbolt installs don’t happen by accident. A bore sizing guide may not look fancy, but it’s the key to making sure your lock fits tight, works smoothly, and keeps your home secure. Using one saves you headaches, protects your door—and your nerves—and lets your deadbolt (smart or standard) work just as the brand intended.
Remember, every great DIY project starts with the right tools. If you want fewer mistakes, less troubleshooting, and a finished job that makes you proud, grab a sizing guide before you pick up the drill. You’ll thank yourself every time you turn the key—or tap in your code—and everything works just right.