Here’s the thing: repairing a door bottom seal isn’t rocket science, but it does take a bit of patience and the right know-how. Whether your wood entry door is from Masonite, Jeld-Wen, or even some no-name brand, the process is pretty similar. I’ve replaced enough seals to know that doing it right not only keeps your entryway looking sharp—it helps your door last for years longer. Let me walk you through it, step by step, so you can skip the rookie mistakes and keep rot at bay.
Why Door Bottom Seals Matter for Wood Entry Doors
At first glance, a door bottom seal doesn’t seem like a big deal. It’s just a strip of rubber, vinyl, or silicone running along the base of your door. But honestly, it’s your wood entry door’s first and last line of defense against a lot of annoying and expensive problems.
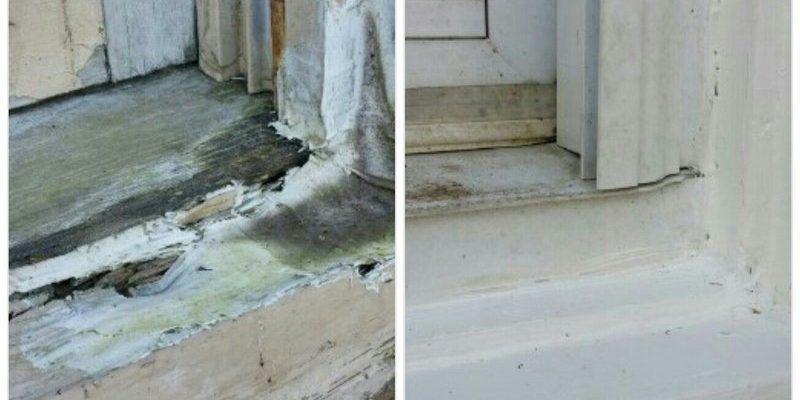
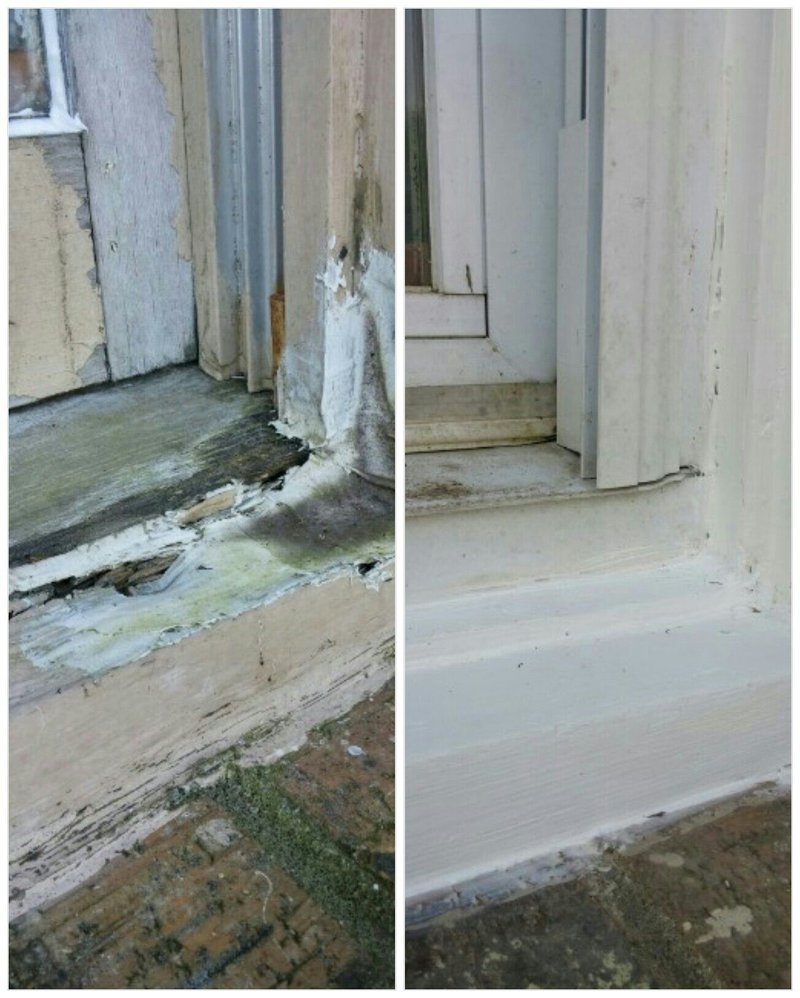
Think about what happens when water seeps under a door during a rainstorm. Once moisture gets to bare wood, it softens the fibers. Over time, this leads to swelling, warping, and eventually, rot. The damage can go unnoticed for months, hidden behind paint or stain. By the time you feel that spongy spot or see black spots, it’s a much bigger repair.
A well-fitted door bottom seal creates a weatherproof barrier that keeps water, bugs, and drafts out. It also helps with energy efficiency. In winter, cold air won’t sneak in, and in summer, cool air stays put. That means lower utility bills—not just a longer-lasting door. If your house ever feels extra chilly by the front door or you spot water, sand, or dust building up inside, your seal is probably shot.
Signs Your Door Bottom Seal Needs Replacing
Most people don’t notice the door bottom seal until it gives up. Here’s what to watch for:
- Visible cracks, tears, or flat spots in the seal.
- Daylight peeking through the bottom when the door is closed (even a sliver is too much).
- Drafts—if you feel a cold or hot breeze by the entry door, suspect the seal.
- Water stains or swelling on the inside lower edge of the door or nearby floor.
- Frequent bug visitors (ants, spiders, etc.) near the threshold.
Let me explain: sometimes, you might not see anything wrong from the outside. But if your wood entry door feels “sticky” when opening or closing—especially after rain—that can mean the seal is failing, letting moisture make the door swell. Or, maybe the bottom edge feels soft when you press it. That’s early rot, and it’s your sign to act fast.
Choosing the Right Replacement Seal for Your Entry Door
Picking a replacement seal isn’t one-size-fits-all, even if it seems that way in the hardware aisle. Wood entry doors use a few different types:
- Door sweeps: These attach to the bottom of the door and usually have a metal or plastic strip with a flexible rubber or vinyl “skirt.” They’re easy to replace, but you need the right length.
- U-shaped (wrap-around) seals: These slide onto the bottom edge and “hug” the door, sealing both front and back. Great for older doors with thicker bottoms.
- Kerf-in gaskets: Some brands (like Masonite and Jeld-Wen) use a seal that squeezes into a slot (kerf) in the door bottom. Measure carefully—these come in different widths.
Honestly, matching the seal style is more important than matching the brand. Bring the old seal with you, or take a photo and measure the length, width, and thickness. If you’re stumped, staff at hardware stores usually know what fits popular wood entry doors.
Tools and Materials Needed for the Repair
Before you start, gather everything you’ll need. Nothing’s worse than stopping halfway to hunt for a screwdriver. Here’s a simple checklist:
- Replacement door bottom seal (sweep, U-shape, or kerf-in, matched to your door)
- Screwdriver or drill (for removing/installing any screws)
- Hammer and small pry bar (if the old seal is stubborn)
- Utility knife or scissors (to cut the seal to length)
- Measuring tape
- Exterior-grade wood sealant or caulk (for sealing any exposed wood before installing the new seal)
- Work gloves and safety glasses
If you discover soft, damp, or crumbly wood during your repair, you’ll need wood hardener, putty, and maybe a sanding block. But most of the time, swapping the seal is quick and clean—just a couple of hand tools and your new seal.
How to Remove the Old Door Bottom Seal
Let me explain how to get that worn-out seal off without damaging your wood entry door. Go slow and don’t force anything—especially with older doors.
- Open the door wide and prop it securely. You don’t want it swinging while you work.
- Inspect for screws: Many sweeps are held by screws along the front or bottom edge. Remove these with a screwdriver or drill.
- Gently pry off the seal: If it’s stuck, slide a small pry bar or putty knife beneath the edge and work it free. Move slowly to avoid splintering wood.
- Clean the area: Scrape away old adhesive and debris. If you spot bare or damaged wood, let it dry fully—then treat with wood hardener or sealant to resist future rot.
If your seal is a kerf-in type, gently pull one corner and slide the old gasket out of the slot. Sometimes it helps to wiggle as you pull, especially if paint or gunk is holding it in place.
Don’t rush. Any exposed wood is a future rot hotspot, so it’s worth taking a few extra minutes to dry, seal, or patch up any trouble spots before installing anything new.
Installing a New Door Bottom Seal—Step-by-Step
Honestly, this is the step where most mistakes happen—usually by rushing or cutting the seal too short. Here’s the best process for a snug, long-lasting fit:
- Measure twice, cut once. Lay your new seal against the door bottom, mark where to trim, and cut cleanly with scissors or a utility knife.
- Test fit first. Hold the seal in place and close the door slowly. Check that it doesn’t drag too hard on the threshold or bunch up at the corners.
- Attach the seal: For door sweeps, align the strip and drive in screws (don’t overtighten—just snug). For kerf-in gaskets, press both edges into the slots, starting at one end and working carefully across. For U-shaped seals, slide them onto the door edge, tapping gently as needed.
- Seal any gaps: If you see tiny spaces on either side, a little exterior-grade caulk can close them up. That keeps water and bugs out for good.
Pro tip: If you feel resistance when closing the door after the new seal is on, check that it isn’t too thick or too low. Sometimes you need to trim a little extra off the seal or adjust the sweep up or down.
Give the door a few test opens and closes. It should work smoothly, without scraping or sticking. The new bottom seal should press gently against the threshold with no daylight showing underneath.
How a Good Door Bottom Seal Prevents Rot
You might be wondering how something so simple really protects your entry door. Here’s how it works: wood doors soak up water like a sponge if left unprotected. Even small drips can collect at the bottom edge, especially in heavy rain or snow. When the seal is in place and snug, it blocks water from ever contacting the bare wood.
Rot prevention isn’t just about moisture, either. A tight seal keeps out dirt, leaves, and even insects—all of which can help trap dampness against your door. Over time, that’s what causes the paint to peel, the wood to soften, and eventually, nasty mold or decay.
If your threshold slopes away from the door and you keep the bottom seal in good shape, you’re basically turning your entryway into a mini weather fortress. Regularly check the seal (at least twice a year—before and after wet seasons) and you’ll dodge 90% of the expensive repairs that come from wood rot.
Comparing Professional Repair vs DIY Door Bottom Seal Replacement
Here’s the honest truth: most homeowners can swap a door bottom seal themselves with basic tools and a little patience. Still, it’s worth knowing your options in case you get stuck.
- DIY repair: Takes about 30–60 minutes, costs $10–$30 for most seals. You’ll save money and learn about your door’s quirks. Plus, you can pair the project with other quick maintenance like tightening hinges or replacing weatherstripping.
- Professional repair: A handyman or door tech will charge $75–$150, including parts. Pros can tackle stubborn or unusual door types (like double-entry, extra wide, or heavily damaged wood) and spot hidden issues, like threshold rot, that you might miss.
If your wood entry door is in generally good shape and just needs a new seal, give DIY a shot. But if you see signs of serious rot, warping, or old repairs that didn’t hold up, calling a pro is smart. They’ll make sure the new seal pairs perfectly with your existing threshold and frame.
Extra Tips for Long-Term Rot Prevention
Replacing the door bottom seal is step one, but a little extra care goes a long way toward keeping your wood entry door in top shape. Here are a few bonus moves:
- Check the threshold slope: Water should run away from your door, not toward it. If it pools at the base, consider adding a threshold ramp or adjusting your patio/stoop slope.
- Seal exposed wood: Anytime you see bare wood at the door bottom, inside or out, hit it with primer and exterior paint or sealer ASAP.
- Monitor hardware: Loose screws, saggy hinges, or a warped door can cause the new seal to fit poorly or wear out fast.
- Pair it with regular weatherstripping checks: Door bottom seals work best alongside tight-fitting weatherstripping around the sides and top.
A little prevention—even just a quick check after big storms—can save hundreds (or thousands) in major repairs later. Rot is sneaky, so don’t give it a chance to start nibbling at your entryway.
Wrapping Up: Protecting Your Wood Entry Door for Years to Come
Repairing a door bottom seal on a wood entry door might seem like a minor chore, but it pays off big time. A tight, well-fitted seal stops water, cold, and critters in their tracks, keeping your home cozy and your door strong. By taking a careful, step-by-step approach—and keeping an eye out for early signs of trouble—you’re not just fixing a draft; you’re extending the life of your entryway and avoiding expensive rot repairs down the road.
So next time you notice a chilly breeze or that telltale line of daylight beneath your door, don’t put off the repair. Grab the right seal, take it slow, and give your entry door the simple protection it deserves. Your wood entry door (and your wallet) will thank you for years to come.