Here’s the thing: hanging hardware on a hollow fiberglass door is totally doable if you follow a few smart steps. You just have to think a little differently than you would with a solid wood door. Instead of relying on the outside “skin,” you focus on creating a strong anchor point inside the door. Let’s break down real-world methods, tips, and hardware choices that’ll help your installations actually last.
Why Hollow Fiberglass Doors Need Extra Reinforcement
Hollow fiberglass doors might look sturdy at first glance, but if you’ve ever drilled into one, you quickly realize just how thin the outer layer is. Think of it as the shell of an egg—it has some structure but not much strength to hold heavier hardware or frequent use. Inside, these doors typically have a foam or honeycomb core designed for insulation, not support. When you mount hardware without proper reinforcement, all the stress is focused on the thin fiberglass, leading to cracks, flexing, or the hardware pulling away completely.
Honestly, it’s a recipe for frustration if you just slap screws into the fiberglass and call it a day. Over time, regular use of a doorknob or repeated tugs on a towel bar will slowly work those screws loose. Understanding this oddball construction is the first step toward a reliable solution. It’s also why manufacturers like Masonite or JELD-WEN often recommend special hardware or kits for these doors if you read the fine print.
Choosing the Right Reinforcement Hardware
You might be wondering, “What’s the actual trick here?” The answer: use reinforcement blocks, toggle bolts, or specially designed hollow-core anchors. These hardware solutions spread the stress over a bigger area, instead of putting all the tension on a tiny patch of fiberglass.
- Toggle bolts are a classic fix. When you squeeze the wings and insert them through the hole, they pop open behind the door’s interior, anchoring your hardware securely against the inside panel. They’re kind of like setting up a tent stake—you’re bracing the load against something solid.
- Hollow-core door anchors look like fat plastic sleeves. You press or screw them into your pre-drilled hole; when you insert the screw, the anchor expands, gripping the interior core more tightly.
- Mounting blocks can be installed inside the door where the lockset or handle will sit. You do this by carefully cutting an opening, inserting a wooden or composite block, and securing it with strong adhesive or screws that catch on both the block and the fiberglass shell.
Not all anchors are created equal—some are only strong enough for light fixtures or artwork, while others can handle the force from a deadbolt or security hardware.
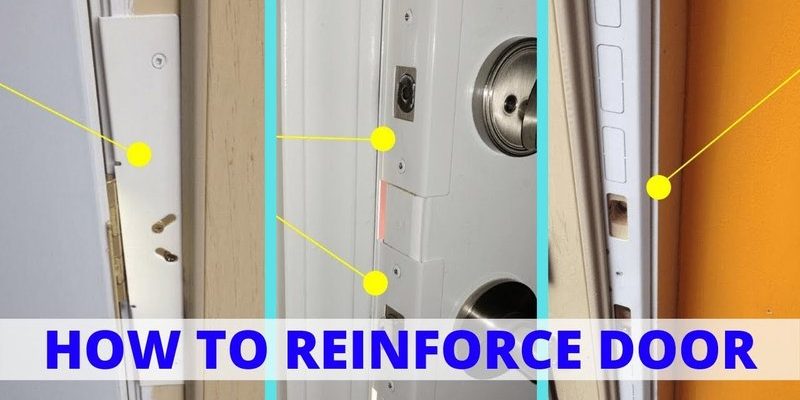
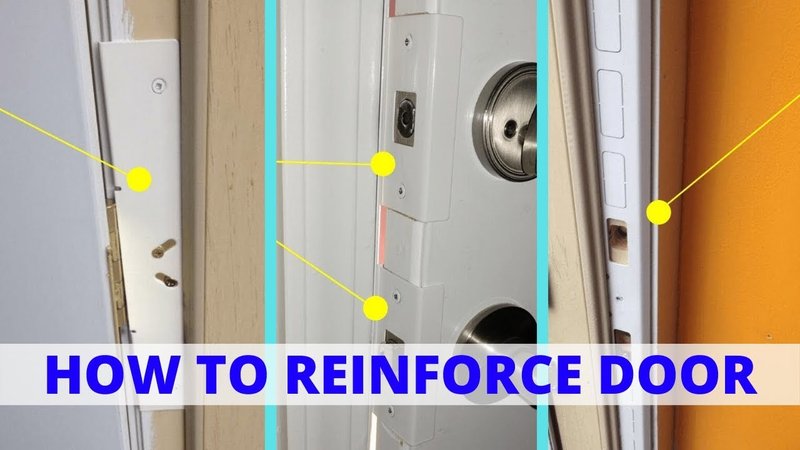
Step-By-Step: How to Install a Reinforcement Block
Let me explain the most foolproof method for heavy-duty hardware: installing a reinforcement block inside the door. This gives your screws solid material to bite into, just like a real wood door.
Here’s how it works:
- First, measure carefully and mark exactly where your hardware will go. You don’t want to cut or drill more than you need to.
- Using a hole saw or jigsaw, cut a small, neat opening in the door’s edge or face (depending on hardware placement). Take your time—fiberglass dust can be messy, and the door skin can crack if you rush.
- Slide a hardwood or high-density composite block (sized to fit snugly) into the hollow space. For extra security, apply a strong epoxy or construction adhesive when inserting the block.
- Let the adhesive fully cure. Then you can screw your hardware right into the block, which now acts as a hidden anchor inside the door.
You’ll want to make sure your block isn’t too loose—any wiggle defeats the whole purpose. Some people even pre-drill the block for their hardware before installing, making things even simpler.
Using Toggle Bolts And Hollow-Core Anchors
If cutting the door sounds intimidating or your hardware isn’t super heavy, toggle bolts and hollow-core anchors can save the day. Here’s the lowdown on both methods.
Toggle bolts are especially useful for towel bars, hooks, or lightweight handles. Drill a hole large enough for the folded wings, insert them, and as you tighten the screw, the wings spring open and brace against the inside of the door. Honestly, it feels a bit like magic—suddenly you have an anchor point that holds firm against regular use.
With hollow-core anchors, the process is similar but less dramatic. You’ll push or screw the anchor into a properly sized hole, then insert and tighten the screw. As it goes in, the anchor expands, locking tightly against both sides of the fiberglass skin and, sometimes, the foam core. They don’t have quite the same brute strength as toggle bolts or reinforcement blocks, but for lighter jobs, they’re quick and reliable.
Both methods avoid the need to stuff a block inside the door, which can be a relief if you’re not keen on DIY surgery. However, I wouldn’t trust them for a high-traffic entry lock or anything that’s going to get yanked on daily.
Comparing Universal vs. Brand-Specific Hardware Kits
You might be tempted to pick up a universal reinforcement kit or anchor at your local hardware store, but sometimes brands like Masonite or JELD-WEN offer their own reinforcement solutions, made just for their doors. So which should you choose?
Universal kits are exactly that—built to work on most hollow-core doors, regardless of brand or style. They’re flexible but sometimes a little generic in fit. Brand-specific kits, on the other hand, are tailored to fit perfectly into your door’s internal structure. If you know your door’s make and model, it’s often worth the slight extra cost for a guaranteed perfect fit.
Here’s a quick comparison:
| Universal Kits | Brand Kits |
| Widely available, affordable | Precision fit for that door |
| May require adjustments or trimming | Less fiddling, cleaner finish |
| Good for most standard jobs | Best for locks or heavy hardware |
If you’re working with a high-security lock or want peace of mind, honestly, the matching brand kit is hard to beat.
Tips For Drilling Into Hollow Fiberglass Doors
Drilling into a fiberglass door isn’t quite the same as drilling into wood or metal. The fibers can fray, the surface can crack, and, let’s face it, the noise is pretty unpleasant if you rush it. To make sure your hardware installation goes smoothly, keep these tips in mind:
- Always start with a small pilot hole to avoid splintering the surface. Gradually work up to the size you need.
- Use a sharp, high-quality drill bit—carbide-tipped if you have it. Blunt bits can burn or shred the fiberglass.
- For larger holes (like for a deadbolt), use a hole saw attachment and keep your drill speed moderate. Too fast and you’ll melt or crack the door skin.
- Support both sides of the door with scrap wood or masking tape to prevent chipping as the bit exits.
- Always wear a mask. Fiberglass dust is no joke—itchy, hard to clean up, and not something you want in your lungs.
Getting clean holes makes all the difference when you go to mount your hardware. No one wants to stare at jagged edges or spiderweb cracks every time they use the door.
Common Mistakes To Avoid
Even if you’ve watched every YouTube tutorial and read every DIY blog, there are a few slip-ups that can sabotage your installation. Here’s what I see the most:
- Skipping reinforcement: Some folks just screw hardware straight into the fiberglass, hoping for the best. This almost always ends in wobbly handles or hardware that rips out after a month or two.
- Wrong anchors: Using drywall anchors or lightweight plastic inserts won’t cut it here. These are designed for walls, not thin fiberglass shells.
- Over-tightening screws: It’s easy to think, “tighter is better,” but you can actually crush the fiberglass or strip out the anchor entirely. Stop tightening as soon as the hardware feels snug and secure.
- Ignoring alignment: If your reinforcement block or anchor isn’t perfectly lined up with the hardware holes, screws can miss their target. Double-check everything before making the final cut or drill.
Let’s be honest—fixing a mistake on a hollow fiberglass door is a pain, often messier than just doing it right the first time.
What If You Need To Remove or Change Hardware Later?
Maybe you need to swap out a lock, upgrade to a smart keypad, or just decided the handle isn’t your style anymore. Is it a nightmare to remove or replace hardware if you’ve used a reinforcement block, toggle bolt, or anchor?
Not really, as long as you take your time. If you used a block, you can reuse the same holes, though you might need slightly longer screws for extra grip. With toggle bolts or anchors, you’ll probably need new hardware and may have to slightly enlarge the hole for a fresh fit. If things have gotten a bit loose, you can inject some wood filler or epoxy, let it cure, and then drill new pilot holes. No, it’s never quite as simple as working with solid wood, but it’s far from hopeless.
The key is to keep all your installation codes, manual instructions, and leftover parts organized. If you’re pairing up a new remote lock or smart hardware, follow the pairing or sync steps strictly—especially for battery-powered or branded remotes that rely on specific reset codes and troubleshooting protocols.
Wrapping Up: Making Your Hollow Fiberglass Door Hardware Last
Reinforcing hardware installation on a hollow fiberglass door doesn’t have to be an uphill battle. Whether you’re using a mounting block, toggle bolts, or the perfect anchor, the main thing is to give your screws something solid to hold onto. Skipping these steps can leave your hardware loose and unreliable, but taking a little extra care means your lock, handle, or towel bar will stand up to daily use for years.
From brand-specific kits that fit just right, to simple hacks with toggle bolts and anchors, you’ve got options that suit every budget and skill level. And if you ever need to code, sync, or reset a smart lock or remote, always trust the manual—and never be afraid to ask for help when troubleshooting tricky installs. By reinforcing your hardware, you’re not just boosting security or convenience—you’re protecting your investment and saving yourself from future headaches.