
Fixing a damaged hinge mortise isn’t just about keeping your door looking sharp. It’s about making sure your home stays secure and energy efficient—nobody wants cold drafts or a sticky door at the worst time. I’ve worked with everything from classic Schlage and Kwikset entry doors to budget home-center brands, and trust me, this is a fix nearly anyone can tackle with a little guidance and patience.
How to Spot Damage in a Door Hinge Mortise
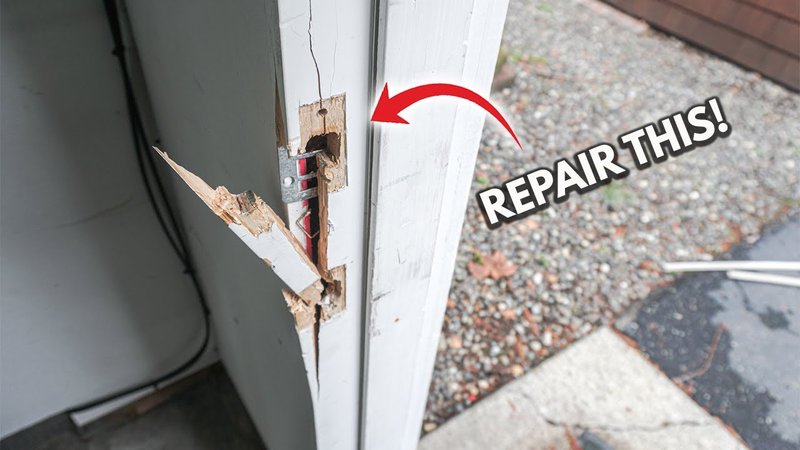
Before you grab any tools, it’s smart to figure out exactly what you’re dealing with. Hinge mortise damage can show up in different ways. Sometimes you’ll see splintered wood where the screws have pulled out. Other times, the mortise might look rounded off or too loose, so the hinge just flops around instead of fitting snug.
A dead giveaway is when the screws refuse to tighten, or they spin uselessly in place. You might also notice cracks running along the frame, or a hinge leaf that won’t sit flush. If your door frame is made of softwood—think pine or fir—this kind of trouble pops up more often, especially in older houses or doorways exposed to weather.
Honestly, it’s worth taking a close look at both the door side and the frame side of the mortise. Problems can hide until you really examine them. If you’re unsure, try closing and opening the door slowly. If it drops, drags, or looks uneven, don’t blame the entire door just yet. The humble mortise pocket could be the real culprit.
Common Reasons Hinge Mortises Get Damaged
You might be wondering, “Why does this keep happening?” Well, exterior doors get a lot of action, and not just from people using them. Weather, moisture, shifts in your house, even an overstuffed bag knocking into the door can start to wear away at the mortise.
Here are some top reasons hinge mortises get wrecked:
- Heavy use: Front doors see more movement than any other door in the house. All that motion loosens screws and stresses the joint.
- Water damage: Rain or humidity can soak into wooden frames, causing swelling and softening. The mortise loses strength fast when the wood’s soggy.
- Improper installation: Sometimes hinges weren’t set deep enough, or the wrong screws were used. That leads to wiggling, gaps, and quick wear.
- Old repairs: If someone already tried to patch things with fillers or glue, it might not hold up—especially on a high-traffic entry like a Schlage or Kwikset.
No single cause is to blame for every door frame issue, but most hinge mortise problems trace back to a mix of these factors.
Gathering Your Tools and Materials: What You’ll Need
Let me explain—the right gear makes all the difference. You don’t need a carpenter’s truckload, but you do want to have everything ready so you don’t have to pause mid-repair. Most basic exterior door frames, even those from popular brands like Schlage, will only need a handful of common tools.
Here’s a simple checklist:
- Wood glue (for bonding filler pieces or shims)
- Wood filler or epoxy (for patching holes or cracks)
- Wood shims or repair plates (for large gaps or deep damage)
- Screwdriver (manual or powered, for removing and resetting the hinge)
- Chisel and hammer (to clean up the mortise edges if needed)
- Sandpaper (to smooth the repair area)
- Longer or thicker screws (to grab better in the repaired wood)
- Paint or finish (to touch up and protect exposed wood at the end)
Depending on your frame, you might use a universal repair bracket—especially if the original mortise is totally wrecked. These products can add strength to a soft or crumbling frame without requiring a full replacement.
Step-by-Step: How to Repair a Damaged Hinge Mortise
Alright, let’s get into the actual repair. Here’s the thing—you don’t want to rush this part. Every door frame is a bit different, but the steps below will get you through most repair jobs, whether your frame is pine, oak, or something in between.
- Remove the hinge: Start by taking out the hinge screws and carefully removing the hinge leaf from the frame. If the screws are stripped, gently pry with a flathead screwdriver.
- Clean out the mortise: Use a chisel or utility knife to scrape out loose wood, debris, or old filler. The goal is a clean, square pocket—don’t go deeper than you must.
- Fill or reinforce the area: For small damage, wood filler or epoxy can do the trick. For larger gaps, glue in a small piece of solid wood (called a “dutchman” patch) or use wood shims. Press and hold until set.
- Let it dry: Patience matters here. Wait for the glue or filler to fully cure—usually at least a few hours, sometimes overnight.
- Sand and test-fit: Sand the repaired mortise until it’s smooth and level. Test the hinge in place to make sure it sits flush.
- Reinstall the hinge: Use new, longer screws (at least 2-inch is best for exterior frames) to bite into fresh wood. Tighten firmly, but don’t overtighten or you might split the repair.
- Finish up: Touch up any exposed wood with paint, varnish, or a matching finish to protect against weather.
I’ve seen quick fixes with toothpicks and glue for loose screws, but those usually don’t last on heavy exterior doors. For best results, use solid wood or a strong wood repair product and give it time to set.
Tips for Aligning and Securing the Hinge After Repair
Getting the hinge back into just the right spot is crucial. Otherwise, your door might still hang crooked or drag, undoing all your hard work. Here are a few tips that save headaches:
- Mark the position: Use a pencil to outline the original hinge location before removing it. That way, you can line things up perfectly when reinstalling.
- Pre-drill screw holes: Especially after a repair, pre-drilling tiny pilot holes helps the screws bite into the new wood without splitting it.
- Try longer screws: Going an inch or two deeper gives the hinge more holding power, especially in an older frame or if the previous screw holes were stripped.
- Test the swing: Before you tighten everything down, close the door gently to check the fit. Make minor adjustments before fully setting the screws.
Pro tip: If you still get sag or misalignment, you might need to adjust the other hinges slightly—especially on taller doors. It’s rare, but sometimes all three (top, middle, bottom) need a tiny tweak after a repair.
Dealing With Tricky Problems: Severe or Repeated Damage
Sometimes a hinge mortise is so torn up that normal fillers or wood patches just won’t cut it. Maybe you notice the screws won’t grab no matter what, or new cracks appear after a few weeks. In that case, it’s time to consider a heavier-duty fix.
- Repair plates or steel brackets: These L-shaped metal plates screw into solid wood beyond the damaged area, basically giving your hinge a new, stronger anchor. They work for any brand—Schlage, Kwikset, you name it.
- Move the hinge location: Shift the hinge up or down an inch to a spot with solid, undamaged wood. You’ll need to chisel a new mortise and fill the old one, but sometimes it’s the only way to get a solid hold.
- Total frame replacement: If your exterior door frame is soft, crumbling, or riddled with rot, a full frame replacement might be the only long-term answer. It’s more work, but sometimes you have to go big to stop repeated issues.
Don’t be afraid to call a pro for big repairs. If you’re dealing with structural damage, rot, or a historic door with unique hardware, professional help protects your investment (and your sanity).
Prevention: How to Stop Hinge Mortise Damage in the Future
Once you’ve fixed the mortise, it’s worth taking a few steps to make sure you don’t have to do this dance again anytime soon. Most hinge mortise problems can be prevented with a little routine care and some smart upgrades.
- Keep moisture at bay: Check your exterior door seal and finish every year, especially after a harsh winter or rainy season. Touch up paint and caulk as needed to keep water out.
- Use proper screws: Those cheap, stubby screws that come with home-center door kits aren’t enough. Upgrading to longer, beefier screws (even if you use a universal repair bracket) keeps hinges solid under stress.
- Tighten loose hinges early: Catching a wobbly hinge before it pulls free from the mortise is the easiest fix. Check for movement every couple of months, and tighten as needed.
- Handle with care: Slamming the door or using it to prop open heavy objects—like carrying groceries inside one-handed—is an easy way to strain the mortise. A little extra care goes a long way.
If you ever need to reset, sync, or code special locking remotes for your smart door locks (like the Schlage Encode), always follow the instructions for your specific brand. Taking doors off frequently or using the wrong tools during troubleshooting can wear out the mortise faster.
Comparing DIY Repairs vs. Replacement and When to Call for Help
Honestly, it’s tempting to jump right into a DIY repair, and in many cases, that’s the smartest, fastest, and cheapest route. A well-done mortise patch or reinforcement can last years, even on high-traffic exterior doors. The tools are affordable, and you get the satisfaction of solving the problem yourself.
But here’s where you should pause:
- If the damage covers more than a few inches, or you see signs of rot or water intrusion
- If your door frame is splitting, or the whole door is pulling away from the wall
- If you’ve tried patching more than once but still have trouble
In these cases, a pro can help assess whether you need a full frame replacement, more serious reinforcement, or even a door upgrade. Sometimes what looks like a hinge mortise issue is actually a bigger problem—settling in your home, foundation movement, or hidden moisture damage.
Compare the cost and time for a solid DIY fix ($10–$30 in materials, an hour or two of work) with the peace of mind of a proper pro job. For most folks, starting with a repair makes sense, but don’t be shy about asking for backup if the project starts spiraling.
Wrapping Up: A Stronger Entryway Starts With a Solid Mortise
Repairing an exterior door frame where the hinge mortise is damaged might seem intimidating, but with the right approach, you can bring your entryway back to life. Whether you’re working on a sturdy Schlage door frame, a vintage wooden entry, or a modern home-center kit, the simple act of reinforcing and resetting that little mortise makes all the difference.
Take your time, use the right materials, and don’t cut corners. Your door will swing smoothly, stay secure, and stand up to years of daily use—whatever life (and the weather) throws your way. And if you run into a stubborn problem, remember: every pro was once a beginner too. Good luck, and here’s to a door that works better than new!