Honestly, swapping that tall edge for something smoother and easier doesn’t just make your space safer—it also makes day-to-day living much more comfortable for everyone. Whether you’re modifying a front door, a patio slider, or even an interior space, tackling this project isn’t as intimidating as it sounds. We’ll walk through the process step by step—no contractor needed. Grab your notepad (or just bookmark this page), and let’s talk about what it takes to install a low-profile threshold for accessibility.
Why Switch to a Low-Profile Threshold?
If you’re on the fence about this upgrade, let’s talk about what it actually means. *Low-profile thresholds* are designed to bridge the gap between rooms or the outdoors and indoors while keeping the transition as smooth as possible. The regular, taller styles might be fine for most folks, but for anyone with wheels, a walking aid, or even a rolling suitcase, that bump can be a deal-breaker.
Here’s the thing: accessibility isn’t just a buzzword. It’s about comfort, independence, and dignity. When you install a low-profile threshold, *you’re not just ticking a box for code compliance*. You’re making life easier for a lot of people—maybe even yourself someday. Picture your aging parents coming to visit, or a friend after surgery. Suddenly, that tiny strip at the door matters a lot.
Plus, some building codes now require accessible entries for new construction and remodels, so upgrading might even be a necessity, not a luxury. And let’s not forget—low-profile designs tend to look cleaner and more modern, too. If you care about resale value or just want your home to work well for everyone, this is a change you’ll appreciate every single day.
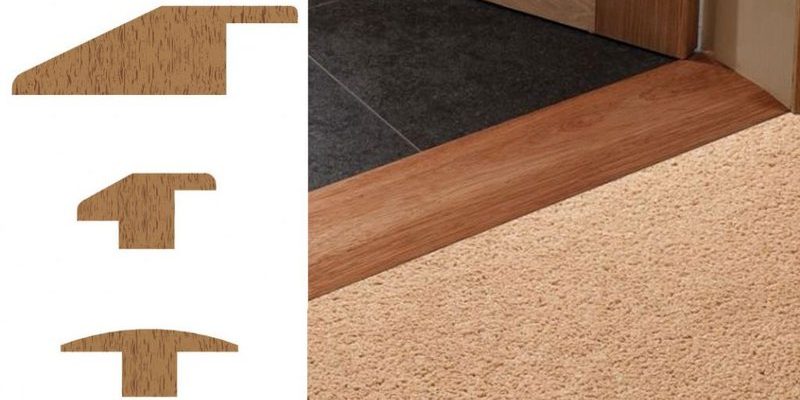
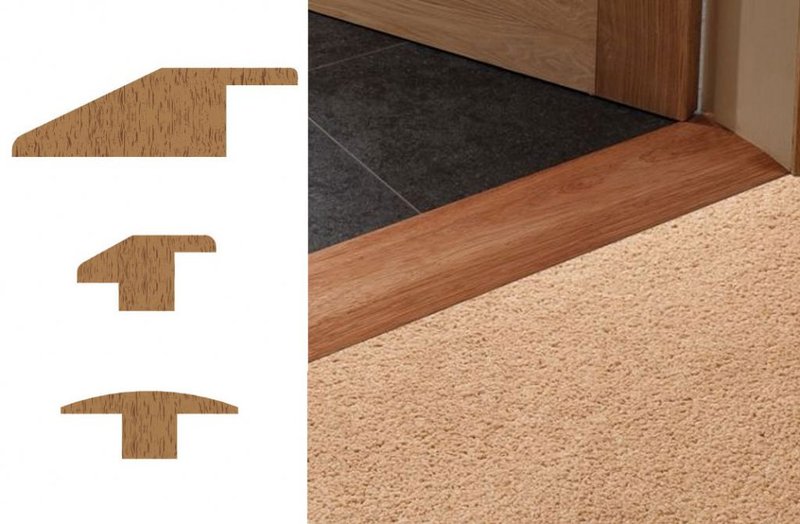
Choosing the Right Low-Profile Threshold for Your Doorway
Not all thresholds are created equal. Take a stroll through your local hardware store, and you’ll find several types—aluminum, vinyl, wood, even rubber. So, how do you pick the right one? First, *consider the specific doorway you’re updating*. Is it outside, where weather resistance matters? Interior, where aesthetics are key? Maybe it’s a high-traffic area where durability trumps everything else.
Here’s a quick comparison:
- Aluminum thresholds: Sturdy, easy to clean, good for outdoor use, and often come with rubber ramps for extra grip.
- Vinyl or rubber options: Great for uneven floors, gentle on wheels, and flexible to install but might wear faster.
- Wood thresholds: Blend with classic interiors but can swell or crack if exposed to moisture.
Pay attention to the *height* of the threshold—ADA guidelines recommend less than 1⁄2 inch for most accessible entries. Some products even mention “ADA-compliant” right on the box.
You might be wondering about universal vs. brand-specific solutions. Universal thresholds fit most standard doors, but you’ll want to grab your measuring tape and check for width, length, and under-door clearance. If your door or frame is an oddball size, you might need to look for brand-specific models or get creative with a little cutting and customizing.
Gathering Tools and Materials Before You Start
Let me explain why prep work matters: nothing kills your DIY confidence faster than dashing back and forth to the garage for missing tools. For this project, most of what you need is probably already in your toolbox, but here’s a checklist to keep you organized.
- Low-profile threshold (chosen for your door type and width)
- Measuring tape and pencil (for marking cuts and screw holes)
- Hacksaw or miter saw (to trim the threshold to fit, if needed)
- Drill and drill bits (to make mounting holes)
- Screwdriver or power driver (for fastening)
- Caulk and caulk gun (for sealing against drafts and water—weatherproof doors only)
- Level (to make sure your threshold sits perfectly flat)
- Hammer (sometimes included, especially for composite or wood options)
Before you start unscrewing anything, check if your new threshold includes screws or installation hardware. Some kits are refreshingly complete, but others assume you have a well-stocked garage. And if you’re working on concrete or masonry, you might need anchor plugs or special masonry screws—double-check those instructions first.
Removing Your Old Threshold Safely
This might sound dramatic, but sometimes getting the old threshold out is the trickiest part. Older ones can be weathered, warped, or painted in place. Start by opening the door wide and giving yourself plenty of light. *If the threshold is held down with visible screws*, simply unscrew them. If it’s nailed or glued, you’ll want a pry bar and maybe a utility knife to carefully break the seal along the edges.
Work slowly so you don’t damage the surrounding flooring or the door frame itself. If you start pulling and it won’t budge, check for hidden fasteners or old caulk holding things in place. Use the hammer gently, and always pull up at a shallow angle—you’re aiming for “lift,” not “pile driver.” Once the old piece is gone, scrape away any leftover glue or debris. Get the area as flat and clean as possible, because a bumpy surface will make your new threshold squeak, rock, or sit unevenly (nobody wants that).
Proper prep is half the battle. A clean, even base means your new low-profile threshold will fit snugly and last longer.
Measuring and Cutting Your New Threshold
Alright, here comes the hands-on part. Take your measuring tape and carefully check the *width of the door frame opening*—measure in two or three spots just in case things aren’t perfectly straight. Mark that length on your low-profile threshold, and double-check before making a cut. Remember the old saying: “measure twice, cut once.” This is where most mistakes happen, and it’s way easier to trim off a little more than to glue something back on.
If your threshold has end caps or needs to slot into a groove, take those into account. Some aluminum and vinyl models have flexible “legs” that tuck into the frame, while others just sit on top. For cutting, a *hacksaw* works well for metal, while a fine-tooth *miter saw* is ideal for wood or composite. Smooth any sharp or rough edges with sandpaper. If you skip this step, you’ll notice it every time someone catches a shoe or wheel on the edge.
Here’s the thing: pay attention to the height of the replacement threshold. Even a low-profile model can cause issues if it’s not flush with the existing flooring. Use your level and check that there’s no risk of tripping or catching—especially if the area sees a lot of foot or wheelchair traffic.
Installing and Anchoring the Low-Profile Threshold
With everything cut and ready, it’s time to set your threshold in place. Lay the piece in the doorway and check for a snug fit. There should be no big gaps at either end, and the threshold should sit flat without rocking. If your kit includes a rubber or vinyl ramp strip, now’s the time to attach it, following the maker’s instructions (often it just snaps or slides on).
To anchor it, mark screw holes through the pre-drilled slots or, if there aren’t any, measure and mark evenly spaced spots—about every 6–8 inches. Pre-drill the holes with a bit slightly smaller than your screws. For wooden subfloors, regular wood screws are fine. On concrete or tile, use masonry anchors.
Place the screws and tighten them until the threshold is snug, but not so tight you bend or crack it. If the model comes with a *sealing strip*, press that in to stop drafts and moisture. For outside doors, run a thin bead of caulk along the edges for extra weatherproofing. Use your level as you go; even a small tilt can be felt underfoot or wheels.
Don’t rush: a slow, steady install creates a seamless entry—no bumps, no gaps, just smooth sailing for everyone.
Troubleshooting Common Installation Problems
Let me guess—so far, so good, but now you’ve hit a snag. Maybe the threshold rocks side-to-side, the screws don’t want to bite, or the door won’t close over the new strip. Here are a few things to watch for:
- Threshold too high: Double-check it’s truly “low-profile.” If the door won’t close, you may need to sand the underside of the door or the threshold, or look for an even thinner model.
- Drafts or water leaks: Check for gaps. Add extra caulk or weatherstripping along the edges. Some thresholds include a rubber gasket—make sure it’s seated tight against the door.
- Unsteady or rocking threshold: Clean and level the base again, or add thin shims in low spots. Try different screw positions if needed for a solid fit.
- Screws strip or won’t hold: Use longer screws, or switch to anchors for hollow or worn-out subfloors. For concrete, use proper masonry anchors—not just regular screws.
If you run into a specialized issue—like fitting around a radiator pipe or solving an odd frame angle—sometimes a universal threshold can be trimmed or notched to fit. Always check the manufacturer instructions and see if your hardware store has tips for trickier doorways.
Comparing Low-Profile Thresholds to Other Accessibility Solutions
You might be wondering, are low-profile thresholds the only way to make an entry accessible? Not necessarily. There are a few alternatives, but each comes with trade-offs.
*Removable ramp mats* can work in a pinch, especially for temporary needs or rental spaces. They’re simple to pop in place, but they can shift underfoot and aren’t as sleek as a built-in threshold.
*Automatic door bottoms* create a tight seal when the door closes and retract completely when open, but these are pricier and installation is more involved—usually requiring professional help.
*Transition strips* (the kind you see between carpets and floors) offer a minor slope and are great in interior spaces, but they often don’t meet the slope or durability needs for wheelchair entries.
When you compare all of these, a properly installed low-profile threshold is the most reliable, permanent, and cost-effective option for most homeowners. It’s a true fix instead of a workaround, especially at exterior doors where weather resistance and stability really matter.
Maintaining Your Accessible Threshold for the Long Haul
Once installed, a low-profile threshold doesn’t need much attention—but a little upkeep goes a long way. Sweep away debris, salt, and leaves regularly, since grit can build up and make things slippery, especially at outside entries. For aluminum and vinyl models, a quick wipe with a damp cloth keeps them looking fresh.
If your threshold has a rubber seal, check it every few months for cracks or wear—those little strips are cheap to replace and make a big difference in draft-proofing and weather protection. Wooden thresholds may need a coat of sealant every year or two, especially in rainy or snowy climates.
Here’s the thing: if you notice rocking, squeaks, or a loose screw down the line, don’t ignore it. Tighten things up before small problems get bigger. A well-installed, well-maintained low-profile threshold can *last for years*, working quietly in the background to keep your home smooth, safe, and welcoming.
Wrapping Up: Make Every Entrance Count
Swapping out a bulky old threshold for a low-profile, accessible one might feel like a small change, but it’s one of those upgrades that has a ripple effect—making daily life easier not just for people with mobility challenges, but for everyone who comes and goes. With a bit of patience, the right threshold, and a few tools, you can ditch that mini-speedbump at the door for good. It’s a simple fix with huge benefits for comfort, style, and peace of mind. And honestly, who wouldn’t want a home that’s just a little bit kinder at every step?