
Aluminum thresholds, like those from brands such as M-D Building Products or Pemko, stand out because they’re sturdy, weather-resistant, and pretty easy to find at any hardware store. They play a simple but crucial role: sealing the gap under your door, keeping out water, dirt, bugs, and saving you money on energy. Honestly, the satisfaction you get from a job well done—no more chilly breeze sneaking in under the door—makes this one of those home fixes that pays off every single day.
Why Replace Your Front Door Threshold?
If you’ve never given much thought to the strip under your door, you’re not alone. Most people only notice thresholds when they become a problem—maybe there’s a draft, maybe water sneaks in during heavy rain, or maybe the old wood or metal is splintering and makes that irritating squeak every time you step on it. Here’s the thing: thresholds are more important than they look. They don’t just keep out the elements; they help insulate your home, save on heating and cooling bills, and even keep pests out.
You might be wondering, “Why aluminum?” Compared to wood, aluminum thresholds are tough, won’t warp if they get wet, and are simple to clean. They don’t rot, swell, or split, even after years of muddy shoes and pet paws. If you want something you can install and then basically ignore for a decade, aluminum is a solid bet.
But it’s not just about durability. A smooth, well-fitted threshold actually helps your door close better. That means the lock lines up, the weatherstripping seals tight, and you don’t get those weird rattles or sticky spots when opening or closing your entry door. If you notice daylight peeking through the bottom or can feel cold air leaking inside, it’s definitely time for an upgrade.
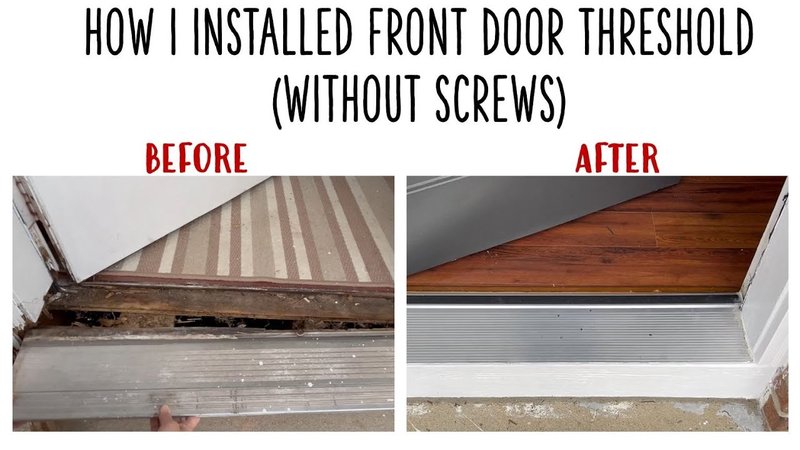
Finally, fixing a threshold just looks better. An old, dented, or stained one can drag down your curb appeal, making even a freshly painted front door seem a little shabby. Swapping it for a shiny new aluminum one is like giving your whole entryway a fresh start.
What You’ll Need: Tools and Materials
Before you start yanking out that old threshold, it pays to gather everything you’ll need. Trust me, running out for a missing screw or drill bit halfway through is a pain, especially with the front door open. Here’s a quick list of the basics:
- New aluminum threshold (measure your doorway for length and width before buying)
- Screwdriver (Phillips and flat-head, just in case)
- Power drill with screwdriver and metal drill bits
- Measuring tape and pencil
- Caulk gun and exterior-grade caulk (look for silicone or polyurethane)
- Utility knife
- Hammer and small pry bar
- Wood shims (if your subfloor isn’t even)
- Safety glasses and gloves
A couple tips: Most aluminum thresholds come in standard sizes like 32, 36, or 48 inches. Measure your existing threshold from jamb to jamb before heading to the store. If your entryway is a weird size, pick something longer and plan to trim it with a hacksaw.
If your door has a storm door or unusual flooring, check clearances before picking a threshold height. Sometimes, the new one needs to be thinner or thicker than what’s there. Always check the packaging on your threshold; many brands, like M-D Building Products, include installation screws and handy instructions right in the box.
How To Remove the Old Threshold
Let me explain: getting the old threshold out is often the messiest part. Most older thresholds (especially wood or composite ones) are nailed, screwed, or even glued into place. Start by opening your door wide and clearing any debris or dirt from around the entry. You want a clean working space.
First, look for screws holding the threshold down. They might be under old caulk or paint, so scrape around the edges with a utility knife to find them. Unscrew everything you see. If it’s nailed down, gently work a pry bar under the lip and tap it with a hammer to loosen things up. Take your time—if you rush, you could splinter the door frame or damage the subfloor.
Once the threshold is loose, lift it out carefully. Sometimes, the old one breaks apart or leaves behind stuck-on caulk. Use your utility knife and a scraper to remove any leftover glue, weatherstripping, or sealant. The goal is a smooth, clean surface. If you spot rot or damage underneath, now’s your chance to fix it before moving on. A little extra prep here saves tons of hassle later.
Don’t forget to clean out old screw holes and vacuum up dust or debris. Starting with a clean base ensures the new aluminum threshold sits flat, seals tight, and lasts a long time.
Measuring and Fitting the New Aluminum Threshold
This step can feel a bit like Goldilocks—your new threshold needs to fit *just right*. Lay it in the opening to check the fit. If it’s a little too long, mark the spot with a pencil and trim it with a hacksaw. Go slow and double-check your mark before cutting; aluminum cuts pretty easily, but once it’s short, there’s no going back.
Next, check how the threshold sits on the subfloor. You want the top of the threshold to be just below the bottom edge of the door when closed—enough to stop drafts, but not so high that it jams or rubs. If the floor underneath is uneven, use wood shims to level things out. Slide them under the threshold, test fit the door, and keep tweaking until everything lines up.
Hold the threshold in place, then open and close your door a few times. If the door rubs or sticks, adjust the threshold position or trim a bit more if needed. Most aluminum thresholds have a vinyl or rubber insert for extra sealing; make sure this lines up with the door bottom when closed. If you’re using a universal threshold, double-check that the screw holes and edges don’t block your door jambs or weatherstripping.
When you’re satisfied with the fit, mark where the screw holes hit the subfloor. Drill pilot holes to avoid cracking the wood below. Honestly, a careful fit here makes the whole project go smoother, and you’ll get a tight, professional-looking seal once it’s all finished.
Securing and Sealing the Threshold
Once your new aluminum threshold is lined up perfectly, it’s time to secure it in place. Grab your drill, line up the pre-drilled holes (or mark and make your own if your model doesn’t come with them), and screw the threshold down tight. Don’t overtighten—just snug enough to hold everything flat without bending the metal.
Here’s where the magic happens: sealing. Run a steady bead of high-quality caulk along both the interior and exterior edges of the threshold. This is what stops water from sneaking underneath or seeping into your subfloor. Use your finger or a caulk tool to smooth it out and ensure there are no gaps. If your new threshold has a removable vinyl or rubber insert, wait to snap it in until after caulking is dry. If it comes pre-attached, just be careful not to gunk it up with too much caulk.
Let the caulk cure according to the instructions on the tube—usually a few hours to overnight. Try to keep the area dry during this time. Cleanup is simple: wipe away any extra caulk, sweep up metal shavings from cutting and drilling, and double-check that all screws are tight and flush.
Don’t rush the sealing process. A bad caulk job looks sloppy and can lead to leaks, even with the best threshold in the world.
Troubleshooting Common Threshold Installation Problems
You might hit a few bumps during installation—totally normal, especially if your house is older or a bit quirky. The most common issue is the threshold not sitting flat or flush with the subfloor. If this happens, check for leftover debris, old screws, or uneven flooring. Sometimes, adding or trimming shims fixes the problem in minutes.
If your new aluminum threshold rattles or shifts after installation, it’s likely not secured tightly enough. Double-check your screw placement—sink them in solid wood, not just old holes or soft spots. Adding an extra screw or two (as long as you avoid electrical or radiant heating wires below) can help.
Another issue: the door doesn’t close cleanly or rubs against the new threshold. Carefully trim the aluminum, or adjust the threshold position. Sometimes, door sweeps or weatherstripping can cause extra friction—they might need adjusting or replacing to fit the new height. If you’re still getting leaks after sealing, use a flashlight at night to spot gaps or cracks along the edge.
And don’t forget about aesthetics. If you scratched the threshold during installation, a bit of aluminum polish hides small marks. If you see any caulk smudges on the metal, a damp cloth and gentle rubbing usually does the trick.
Maintaining Your New Aluminum Threshold
One of the best things about aluminum thresholds is how little attention they need once installed. But a little care goes a long way toward keeping them looking and working like new. Every few months—or after a big storm—wipe down the threshold with a damp rag to clear away dirt, leaves, or road salt. This keeps the metal and the sealant in good shape.
Check the caulk lines around the threshold once or twice a year. If you notice cracks, dry spots, or peeling, scrape out the old material and reapply a fresh bead. It’s a small job but makes a huge difference in weatherproofing.
If your threshold has a vinyl or rubber insert for sealing, keep an eye out for cracks or signs of wear. Most inserts can be swapped out in seconds with a new strip from the hardware store or the same brand, like M-D Building Products or Pemko.
Honestly, that’s about it. With basic cleaning and a quick checkup every season, your new aluminum threshold should keep drafts and water out—and your energy bills down—for years to come.
Comparing Aluminum vs. Other Threshold Materials
Choosing an aluminum threshold comes with clear benefits, but it helps to know how it stacks up against other options. Wood thresholds look classic and can be stained to match your trim, but they’re vulnerable to rot, swelling, and pest damage—especially if your entryway isn’t well-covered. They also require regular painting or sealing to stay weatherproof.
Vinyl thresholds are inexpensive and lightweight, often included with basic door kits. They’re easy to install and don’t rot, but they can warp or crack from heavy foot traffic or extreme temperature changes. Vinyl also isn’t as strong as metal; a sharp shoe heel can leave a permanent dent.
Aluminum thresholds, in contrast, combine the best of both: lightweight, strong, rust-proof, and easy to trim or drill. They handle years of use without deforming, and their simple look matches almost any style. Brands like Pemko and M-D Building Products often offer models with adjustable plates or built-in weatherstripping, so you can fine-tune the fit even after installation.
If you’re on the fence, compare the feel and look of each option in person. But for sheer durability and “install it and forget it” convenience, aluminum is hard to beat for most front entry doors.
The Bottom Line: A Small Upgrade with Big Impact
Installing a new aluminum threshold on your front entry door is one of those home repairs that looks intimidating but feels easy once you break it down. With the right tools, a careful approach, and a little patience, you can banish drafts and leaks—and make your entryway look sharp and finished—all in an afternoon. Aluminum thresholds from brands like M-D Building Products offer a smart, worry-free upgrade that lasts for years.
Whether you’re fixing up an old home or just refreshing your entry, a tight, well-fitted threshold protects your house, saves you money, and gives your front door a polished, welcoming finish. So when you step back and admire your work, you’ll know you handled a job that really matters—one careful step at a time.