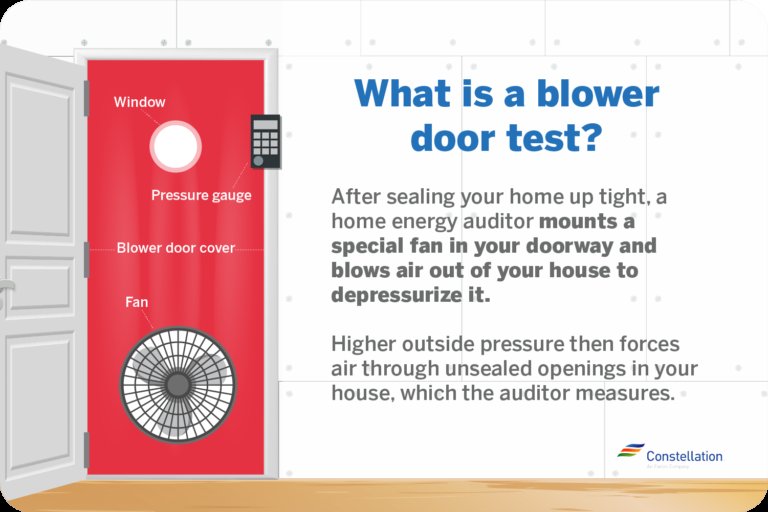
Here’s the thing: finding these air leaks doesn’t have to be a guessing game or a pricey job for a pro. All you need is a simple smoke test—think of it as a “code check” for your home’s insulation. Like syncing up a car remote to check for missed connections, a smoke test helps you pinpoint precisely where outside air slips in. You don’t need fancy tools or tech skills, just a careful eye and a little patience.
What Is a Smoke Test for Door Air Leaks?
A smoke test is a DIY method homeowners use to spot little gaps and cracks around exterior doors where air sneaks through. Think of it as running a troubleshooting script on your house, checking for “bugs” in your weatherproofing. You use a source of visible smoke—like an incense stick, a match, or a smoke pencil—then slowly move it around the edge of your closed door.
When the smoke drifts erratically or gets sucked toward the frame, you’ve found a leak. That’s the “code error” your home’s energy efficiency system is throwing. It’s a cheap, low-tech fix that can save you a lot of money and frustration in the long run.
Pro tip: The smoke test isn’t just for doors! It works around windows, attic hatches, and anywhere you suspect air movement.
Honestly, sometimes you’ll feel a draft, but the test gives you a visual “aha!” moment. It can be much more accurate than running your hand along the door on a cold day, especially if the leak is tiny.
Why Finding Exterior Door Air Leaks Matters
Air leaks around exterior doors are sneaky energy thieves. Even small gaps let conditioned air escape and unwanted drafts in. Imagine trying to sync a universal remote with the wrong code; you never get a perfect connection. The same thing happens with your home—your heater or AC keeps running, but your comfort “code” is out of sync thanks to those leaks.
Here’s why it’s worth the effort to track them down:
- Lower Energy Bills: Sealing leaks means your heating and cooling systems don’t have to work as hard. That translates to immediate savings.
- Better Indoor Comfort: No more cold feet or hot spots near doorways. Air stays where you want it.
- Protects Your Home: Air leaks can let in moisture, leading to damage or even mold over time. Small fixes now can prevent expensive repairs later.
- Improves Air Quality: Sealing leaks keeps out dust, pollen, and even pests. Your home’s “sync” resets to a healthier, quieter environment.
You might be wondering if it’s worth your Saturday afternoon. Trust me, the payoff—especially when you realize how much of your hard-earned conditioned air was sneaking outside—is huge.
What You’ll Need for a Smoke Test
Before you get started, you’ll need just a few simple tools. You won’t need to buy a fancy meter or hire a technician—this is a true DIY save.
- Smoke Source: Most people use an incense stick, which is cheap and produces a steady, visible smoke. You can also use a thin candle, a match (blow it out right away for the smoke), or a “smoke pencil” if you want to go pro.
- Lighter or Matches: To get your smoke source going.
- Flashlight: Not required, but helpful to see edges and cracks clearly, especially on cloudy days or in dim lighting.
- Sticky Notes or Painter’s Tape: Use these to mark the spots where you find leaks—trust me, you’ll want to remember where to come back with caulk or weatherstripping.
- Safety Alert: Make sure to keep anything flammable away from curtains, paper, or anything else that could catch fire.
Let me explain: most of what you need is probably already in your junk drawer. If you want to level up, “smoke pencils” are available at hardware stores. They don’t drop ashes and can be reused. But for most folks, incense sticks do the trick just fine.
How To Prepare Your Door and Home for Testing
Getting a good result from your smoke test is all about setting up the right conditions. If your house is wide open to the outdoors, the test won’t show true leaks—it’ll just show normal airflow. You want to “sync” your home much like you’d reset a remote before pairing it.
Here’s what to do:
- Pick a Wind-Free Day: Try the smoke test when it’s not windy outside.
- Turn Off Fans and HVAC: Shut down your heating/AC and any exhaust fans (bathroom, kitchen) for 10–15 minutes before you start. You want the house as neutral as possible.
- Close All Doors and Windows: Keep only the exterior door you’re testing closed. Everything else should be shut tight.
- Turn On Lights: Good lighting helps you see the smoke clearly.
If you really want to amplify the results, you can turn ON an exhaust fan in another room to create a bit of negative pressure. This can help pull smoke more dramatically through leaks. But for most homes, just shutting things down works beautifully.
Step-by-Step Guide: Performing the Smoke Test
Here’s where you get hands-on. Think of this as running a remote troubleshooting process—each step helps you reveal where the “signal” (in this case, air flow) is sneaking in.
How to do it:
- Light the incense or smoke pencil. Let it burn for a few seconds, then gently blow it out so it just smolders and gives steady smoke.
- Slowly move the smoke around the door frame. Hover it along the top, down both sides, and along the bottom of the door. Watch closely for changes in the smoke’s direction.
- Look for the leak. If the smoke wavers, gets sucked in, or blows outward, that’s your spot. Mark it with your sticky note or tape.
- Repeat as needed. Go over stubborn corners and hinges. Sometimes, leaks hide under the weatherstripping or threshold.
You might be tempted to rush, but go slow. Tiny leaks can make barely-visible movements in the smoke. I like to stand still and count a few seconds per section. The more patient you are, the clearer the results will be.
What To Do If You Find Air Leaks
Congratulations—you’ve synced up your home’s “remote” and found the trouble spots! Now what? Sealing air leaks is the next move. You don’t have to be a pro. Just a little patience and the right products:
- Weatherstripping: If the leak is along the door edges or frame where the door meets the jamb, replace or add weatherstripping. Foam, rubber, or felt types are all easy to install and available at any hardware store.
- Door Sweep: For leaks along the bottom, a door sweep or draft stopper is your best friend. These create a snug seal with the floor or threshold.
- Caulk: If you find air getting in through gaps between the door frame and the wall, use a quality exterior caulk. Just clean the area, lay a smooth bead, and let it dry according to the instructions.
- Threshold Adjustment: Some doors have adjustable thresholds. If you see a gap under the door, tightening the screws can raise the threshold and close the space.
Here’s the thing: sometimes old doors are just plain worn out. If weatherstripping, caulk, and adjustments still leave you with leaks, it might be time to consider a door replacement or professional help.
Common Problems: Why Air Leaks Happen in Exterior Doors
It helps to know what you’re up against. Air leaks don’t just happen—they’re almost always a sign that something is out of sync. Honestly, most issues are from wear and tear, but other culprits can surprise you.
- Aging Weatherstripping: Foam and rubber weatherstripping flatten out, crack, or peel away after years of opening and closing.
- Settling Frames: Houses shift over time. Even brand-new homes can settle, making once-tight doors a little off-kilter.
- Poor Installation: If the original install wasn’t spot-on, gaps can form where there shouldn’t be any.
- Warped Doors: Wood doors can warp from moisture or temperature swings, leaving uneven gaps that standard weatherstripping can’t fix.
- Weak Thresholds: The bottom of the door often takes a beating. If the threshold is loose, missing screws, or worn, leaks sneak under with ease.
You might not spot all these issues at first glance—but with your smoke test, you’ll see exactly where things are going wrong. With that info, fixing the leaks becomes a lot simpler.
Alternatives to Smoke Testing for Air Leak Detection
If you’re not a fan of smoke, there are other ways to spot air leaks. Not everyone loves the smell of incense, and sometimes safety comes first, especially with pets or kids around. Here are a few alternatives:
- Flashlight Method: At night, have someone shine a bright flashlight along the edges of the closed door from outdoors while you watch from inside. If you see light, there’s a gap.
- Hand Feel: On a breezy day, run your hand slowly along the door’s edge. Any chilly or moving air? That’s a likely leak.
- Dollar Bill Test: Close the door on a dollar bill. If you can pull it out easily, the seal is weak.
- Thermal Cameras: If you have the budget, a thermal leak detector or camera shows cold or hot spots. Handy, but pricey for occasional use.
Smoke testing is still the gold standard for DIYers. But it’s never a bad idea to combine methods, especially if you have stubborn spots you just can’t seem to pinpoint.
How Often Should You Check for Door Air Leaks?
If you’re treating this like a remote battery: don’t wait until things stop working! It’s smart to check your exterior doors for air leaks at least once a year—before winter if you live somewhere cold, or in spring ahead of air conditioning season.
- Seasonal Checkups: Major temperature swings often reveal new gaps as materials expand, contract, or warp.
- After Home Projects: If you’ve had new flooring installed, doors replaced, or foundation work, double-check your seals.
- When You Notice a Draft: If something feels off, don’t just reset your thermostat or blame the weather. Run a quick smoke test and see what’s changed.
Think of it as routine troubleshooting—just like you’d pair a new remote to your TV or reset the code after a power outage. Regular attention keeps your home comfortable year-round.
Wrapping Up: Make Your Home Airtight and Cozy
Air leaks around exterior doors might seem like a minor annoyance, but they can seriously throw off your home’s comfort—and your utility budget. Doing a smoke test is one of the easiest, most revealing ways to track down these invisible energy thieves. Once you know where the leaks are, sealing them is quick and inexpensive, and feels like a reset for your whole living space.
Every home will need this “code check” now and then. Whether you use an incense stick, a smoke pencil, or a flashlight, the peace of mind you get is worth every minute. Plus, it’s pretty satisfying to solve the mystery of that chilly draft and finally enjoy a cozy, efficient home—no more troubleshooting required.
