Using a heat gun to loosen stuck exterior door hardware is a trick that’s been around for years, but it requires a careful hand and a clear plan. You might have seen your neighbor waving around a black and orange Wagner or DeWalt heat gun, looking like they’re about to start welding. The truth is, using heat to loosen up metal parts can be incredibly effective, but you’ve got to do it right to avoid damage. So, let’s break down the safe way to use a heat gun, why it works, and what you really need to watch out for—because this isn’t the time to just “wing it.”
Why Door Hardware Gets Stuck: Causes and Common Culprits
Before we grab the heat gun, it helps to know *why* exterior door hardware sometimes refuses to budge. First off, outside doors have a tough life. They’re blasted by sun, rain, snow, and, if you’re lucky, the occasional bird droppings. All that exposure can lead to a few common problems:
- Rust and corrosion: Metal parts, like deadbolts, screws, and hinges, love to corrode when moisture sneaks in. Rust swells inside threads and moving parts, which can glue everything together tighter than you’d expect.
- Paint or finish buildup: If your door’s been painted a few times over the years, there’s a good chance some of that paint has seeped into the tiny gaps around screws and hardware. Dried paint can bond pieces together almost like glue.
- Thermal expansion: Metal expands and contracts as temperatures rise and fall. Over years, this constant movement can twist, pinch, or “bake” hardware into place, especially if it’s not lubricated.
- Gunk and grime: Dirt, old grease, and even spider webs can create sticky, hard-to-move surfaces that act like a soft lock on your hardware.
Honestly, once you know these issues, it makes sense why even the best exterior door locks and handles can become stubborn. That’s why heating them up can be so effective—it reverses some of these processes in a matter of minutes.
How Heat Guns Work: The Science Behind the Trick
You might be wondering, “Why use a heat gun instead of just muscling through?” Here’s the thing: a heat gun blasts hot air that can safely warm up metal parts without open flames or direct contact. Most models, including DeWalt and Wagner, give you temperature controls between 120°F to over 1,000°F, so you can choose just the right amount of heat.
When metal heats up, it expands ever-so-slightly. If you’ve got a rusty or painted-over screw, that expansion can break the bond—just enough for you to turn it. Plus, if there’s old grease, paint, or even some adhesives, heat will soften them, making it much easier to loosen everything up.
But here’s a crucial detail: *you’re not cooking the door.* You’re gently persuading the hardware to let go. If you get impatient or crank the heat too high, you risk damaging paint, warping plastic, or even cracking glass nearby. The trick is to use just enough heat, in just the right spot, for just long enough.
Tip: A heat gun is different from a hair dryer. Standard hair dryers don’t reach high enough temperatures to break up rust or stubborn paint. A real heat gun is essential for this job.
Gather Your Tools: What You’ll Need for Safe Hardware Removal
Let me explain what you’ll want beside you before turning on the heat:
- Heat gun: Look for a model with adjustable temperature settings, like a Wagner Furno or DeWalt D26960. You want control—no wild guessing.
- Basic tools: Have a good screwdriver set, pliers, and possibly a small adjustable wrench. You’ll use these to actually remove the hardware once it’s loosened.
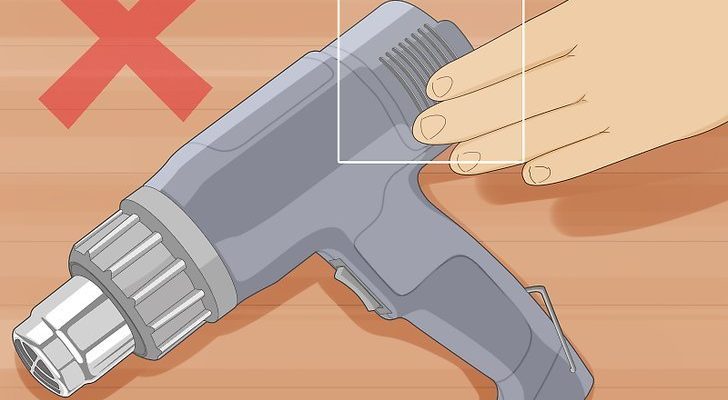
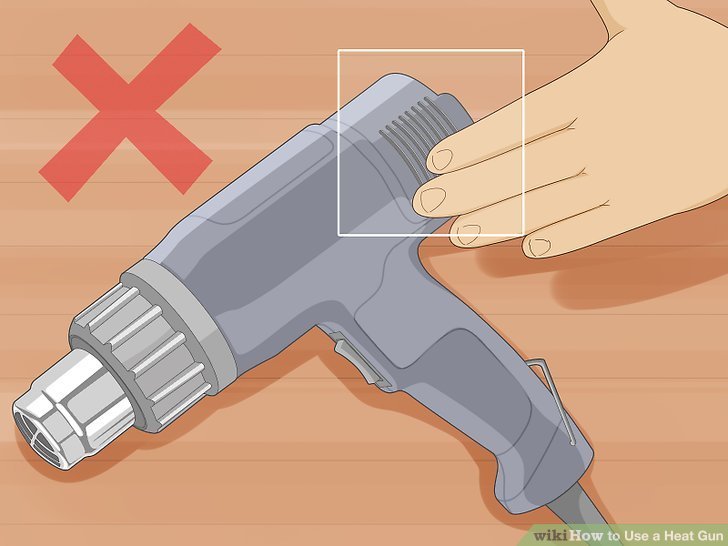
- Protective gear: Safety glasses and heat-resistant gloves are non-negotiable. Metal parts get very hot, very fast. Touching them without protection is a rookie mistake.
- Drop cloth or cardboard: Place this under the work area to catch drips of softened paint or gunk, and to protect your porch or floor.
- Lubricant (optional): A quick shot of penetrating oil, like WD-40, can work wonders right after heating. It seeps in when metal expands, making removal even easier.
Don’t forget: if your door is connected to any security system, smart lock, or battery-powered component, make sure to disconnect the batteries or power source to avoid electrical issues while you work.
Step-By-Step: How To Use a Heat Gun on Stuck Door Hardware
Ready to start? Here’s exactly how to do this, even if you’ve never touched a heat gun before. Take it slow, and don’t rush.
1. Prep the area. Clear away anything flammable—welcome mats, decorations, even that cute rubber doorstop. Plug your heat gun in and put on your gloves and safety glasses.
2. Set your heat gun. Start with a medium-low heat, around 400–600°F. Honestly, it’s better to start too low than too high. You can always turn it up.
3. Aim and heat. Hold the heat gun 2–3 inches from the hardware. Move it slowly back and forth over the stuck screw, bolt, or hinge. Never keep the gun still in one spot. Heat for 30 seconds to 1 minute, then check the metal’s temperature by briefly tapping it with the back of your finger (with gloves on!). It should be warm, not red-hot.
4. Try to loosen. Use your screwdriver or wrench to gently turn the hardware. If it’s still stuck, apply a bit more heat—another 30 seconds or so. A light tap with the handle of your tool can also help break free old rust.
5. Add lubricant (if needed). Once the metal is warm, a drop of lubricant or WD-40 can seep in deeper than when cold. Let it sit for a minute, then try loosening again.
Repeat this process if needed, but don’t overdo it. If paint or rubber gaskets start to smoke or melt, stop and let everything cool. Patience wins here.
Safety Cautions: What Can Go Wrong (and How to Avoid It)
Using a heat gun isn’t risky if you pay attention, but there are real dangers if you get careless. Here’s what you need to watch for:
- Scorched paint or warped trim: Hold the gun too close or linger too long, and you could bubble, blister, or discolor your door’s finish. Painted fiberglass or vinyl especially hates heat.
- Melted plastic parts: Many modern doors have plastic insulation or weatherstripping. If these melt, you’ll have a stubborn smell and possibly a drafty door until you replace them.
- Burns or fire hazards: Metal parts get hotter than you think—seriously, two minutes is enough to blister skin. Keep kids and pets far away while you work.
- Glass nearby: If your door has glass panels, keep the heat gun pointed away from them. Sudden temperature changes can crack glass before you even realize it’s happening.
Insight: It’s better to make three gentle, short passes with the heat gun than one long, “nuclear” blast. If in doubt, let the hardware cool and try again later.
Alternatives to Heat Guns: When to Try Other Methods
Here’s the thing—not every stuck screw or hinge needs a heat gun. Sometimes, milder methods work just fine and avoid the risks listed above. So, what are your options if you don’t have a heat gun handy, or if you’re nervous about damaging your door?
- Penetrating oil: A generous spray of WD-40 or PB Blaster can break up light rust or gunk. Let it soak for at least 15–30 minutes, then try again.
- Hand tools: Sometimes, a good-quality screwdriver and a steady, slow turn is all it takes. Don’t underestimate the value of a tight grip and some patience.
- Manual impact driver: A tool that delivers a sudden, controlled jolt can help loosen stuck fasteners without heat.
- Universal tool sets: These often have specialty bits and adapters that grab and turn even stripped screws.
If none of these methods work and you’ve tried reasonable force and lubrication, that’s when the heat gun becomes the hero. But don’t skip straight to heat unless you really need it—caution is always smart when dealing with hardware and exteriors.
Aftercare: Cleaning Up and Protecting Your Door Hardware
So, you’ve finally gotten that stuck screw or hinge out—victory! But let’s not leave the job halfway. Here’s how to finish up and make sure you won’t have to go through this ordeal again anytime soon.
First, check the removed hardware for excessive rust, damage, or worn threads. If it’s in bad shape, consider replacing it with a high-quality, weather-resistant option. Stainless steel or brass hardware resists rust better than basic steel—worth the upgrade, especially for exterior use.
Secondly, give the door area a quick clean. Remove old paint chips, rust flakes, or lubricant drips. If you’ve accidentally singed any paint, smooth the area with fine sandpaper and touch up with matching exterior paint.
Finally, when reinstalling hardware, add a thin layer of grease or anti-seize lubricant on screw threads. This tiny step will make future removal exponentially easier and will help protect against future rust and seizing. Don’t forget to reconnect any electronic locks or remotes, and test synchronization or battery-powered components before you call it a day.
Final Thoughts: Patience and Precision Win Every Time
Dealing with stuck exterior door hardware is always a lesson in patience. A heat gun, whether it’s a sturdy Wagner or a bright yellow DeWalt, can save the day, but only if you use it with care. The real secret is to work slowly—heat in short bursts, keep an eye on everything around your work area, and remember that you’re persuading the hardware, not forcing it.
If you take your time, gather the right tools, and follow these safety tips, you’ll loosen even the most stubborn lock, handle, or hinge without damaging your door or risking a bigger headache. So, the next time your door hardware won’t budge, you’ll know exactly what to do—and you’ll be able to handle it like a pro, not a frustrated amateur.