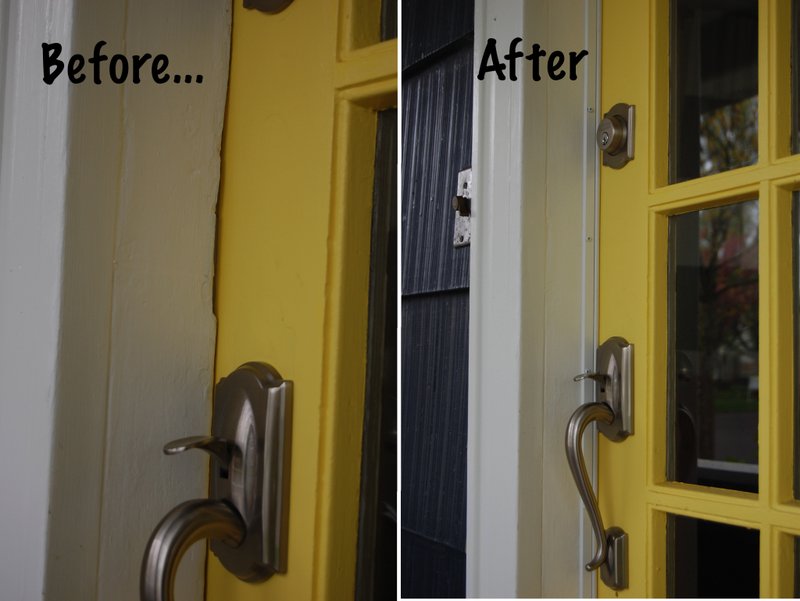
You might be looking at your nice new strip, pressing a hand to the frame, and thinking, “Isn’t this supposed to work?” Honestly, you’re not alone. Lots of homeowners run into the same issue, whether their door is a classic wood design or the latest fiberglass model. The truth is, weatherstripping isn’t always a one-and-done solution. There are a few other sneaky culprits that can cause cold air to slip in, even if you’ve done everything by the book.
Let’s walk through why an exterior door stays drafty after new weatherstripping, how to track down the real trouble spots, and what you can do to finally lock out those pesky drafts.
Common Reasons New Weatherstripping Doesn’t Stop Door Drafts
Here’s the thing about weatherstripping: it’s only as good as the surface it touches. If your door or frame isn’t straight, the seal can’t do its job—even if you’ve picked the fanciest strip on the market. Sometimes, the gaps aren’t even caused by the weatherstripping itself, but by the way your door fits in its frame.
- Worn or warped doors: Over time, wood doors can warp, bend, or swell. Metal and fiberglass can shift, too. These tiny changes create irregular gaps that standard weatherstripping can’t always fill.
- Misaligned hinges: If your door doesn’t sit squarely, even new weatherstripping will leave room for drafts.
- Poor installation: If you didn’t clean the surface, used the wrong type, or cut corners on corners (pun intended), air can find its way in.
- Weatherstripping thickness: Use a strip that’s too thin, and the seal won’t reach the door. Too thick, and the door may not close tightly—sometimes causing the strip to compress unevenly or fall off.
If you’ve ruled out these basics and the problem isn’t solved, don’t get discouraged. Drafts have a way of finding the path of least resistance, so sometimes you need to play detective.
Where Drafts Sneak In: Beyond the Door’s Edge
You might be wondering if you missed a spot when you installed your new weatherstripping. But drafts don’t always stick to the obvious places. Air loves the path of least resistance, and sometimes the trouble is hiding in plain sight.
Think about the spots you might overlook:
- The door sweep or bottom seal: Lots of people focus on the sides and top, but the real action can be at the bottom. If your door sweep is torn, missing, or not making proper contact with the threshold, cold air slips right under.
- The threshold itself: If the threshold is cracked, worn, or not sitting evenly, it can leave a gap that weatherstripping won’t fix. Sometimes, thresholds are adjustable, and tightening (or loosening) a few screws can make all the difference.
- The frame corners: The meeting point where vertical and horizontal weatherstripping meet can leave a tiny gap—think of a badly wrapped present with the corners exposed. Even a fraction of an inch is big enough for a chilly draft.
Sometimes, you’ll find that air is sneaking behind your trim, blowing through old screw holes, or even getting in through the lock or deadbolt cutout. If you shine a flashlight from outside while it’s dark inside, you’ll sometimes see beams of light leaking in—anywhere you see light, air can get through too.
How Door Alignment Impacts Weatherstripping
Let me explain why a perfectly sealed strip isn’t always enough. If your exterior door isn’t hanging straight, the weatherstripping can’t press evenly against the surface. Over time, gravity, slamming, or simply settling can cause even the best doors to sag.
This usually shows up as:
- Uneven gaps: You might see one side with a fat gap and the other pinched tight. The weatherstripping only works where the door is close enough to touch.
- Latches not lining up: If you have to yank or shove to get the lock to engage, your door’s alignment is probably off.
- Visible daylight: If you spot sunlight around the edges, it’s a clear sign your door and frame aren’t playing nice together. Weatherstripping won’t bridge a wide or oddly shaped gap.
The fix here usually means adjusting the hinges. Sometimes it’s as simple as tightening the screws. Other times, you might need to shim the hinge or even move it slightly. If you have a newer door—like a pre-hung fiberglass or steel model from brands like Therma-Tru or JELD-WEN—check that the factory-installed hinges haven’t loosened over time.
Choosing the Right Weatherstripping For Your Door Type
Not all weatherstripping works for every door. There are different sizes, shapes, and materials, and picking the wrong kind can leave you frustrated. It’s a bit like trying to put truck tires on a bicycle—just doesn’t fit.
Some common types include:
- Foam tape: Easy to install and cheap, but can wear out fast, especially on frequently-used doors.
- Vinyl or rubber bulb: These give a tighter seal and last longer but need to match your door’s groove or kerf style.
- Metal strip (like V-strip): Good for older doors with irregular gaps. You bend it to fit the contour, but it takes a little patience.
If you’re working with a newer door, check the manual or the brand’s website—sometimes they have specific products that sync up perfectly. If you’re unsure, bring a piece of your old weatherstripping to the store, or snap a photo of the door edge, so you don’t end up making a wild guess.
Hidden Draft Sources Around Your Exterior Door
Here’s something most folks don’t think about: drafts can sneak in from places you can’t see. Even after sealing the obvious cracks, you might feel air moving if your walls or door frame are letting outside air in.
A few sneaky spots include:
- Gaps between the frame and wall: If the door frame isn’t insulated or caulked properly, air can travel through tiny spaces behind the trim.
- Electrical outlets and switches: Cold air can travel from wall cavities right through your outlets, especially if they’re near the door. Outlet sealant pads can help.
- Sill plates and subfloor gaps: Sometimes, air moves up from the basement or crawl space, right under the threshold. Expanding spray foam can seal this off.
If you’ve sealed everywhere and still get a draft, try removing a bit of trim or sticking your hand near the edge—sometimes you’ll feel a breeze coming through the wall, not the door itself. In these cases, a bead of caulk or some backer rod might be just what you need to finally pair your comfort with an energy-tight home.
How To Troubleshoot a Persistent Draft: Step-by-Step
If you’re ready to tackle this problem like a pro, here’s a simple troubleshooting routine:
- Test for air leaks: On a windy day or with a strong fan outside, run your hand along every edge—especially corners, bottom, and where the weatherstripping meets. You can also use a stick of incense and watch where the smoke moves.
- Shine a flashlight: At night, have someone stand outside and shine a flashlight around the door while you check inside for obvious light leaks.
- Check the threshold and sweep: Inspect for worn or loose pieces. Try adjusting or resetting the threshold if needed.
- Inspect the frame and trim: Carefully pull back trim and check for air behind it. Caulk or foam any gaps you find.
- Double-check door alignment: Look for sagging or uneven gaps. Tighten or reset any loose hinges.
Repeat this process after each fix—sometimes solving one gap exposes the next. Take your time and go step by step. There’s no code to crack, no fancy remote needed—just some patience and attention to detail.
When to Call a Pro for Door Draft Trouble
Let’s be honest: most draft problems can be handled with basic tools and a bit of DIY spirit. But there are times when calling a pro isn’t just smart—it’s necessary.
- Structural issues: If the door frame is damaged, rotten, or shifting, simple weatherstripping won’t cut it. This needs expert repair or replacement.
- Major misalignment: Sometimes, doors are installed out of square or settle badly over time. A pro can reset or rehang the door for a perfect fit.
- Specialty doors: Some high-end doors, like advanced fiberglass or steel models with integrated seals, need custom parts or specific know-how to repair. Brands such as Pella, Andersen, or Therma-Tru often have their own troubleshooting guidelines.
If you’ve tried everything and the draft keeps coming back, there’s no shame in bringing in a bit of expertise. Sometimes, what seems like a simple fix from the outside is hiding a bigger problem underneath.
Solutions You Might Not Have Tried Yet
If all else fails, there are a few less-obvious tricks you can use to outsmart a stubborn draft.
- Foam backer rod: Works great for filling big gaps before installing new weatherstripping—especially in old homes where nothing is quite square.
- Combination seals: Pair a door sweep with a U-shaped under-door seal. This gives a two-layer approach that stops air in its tracks.
- Storm doors: If your exterior door faces harsh weather, adding a storm door can create an extra barrier. It’s like wearing a winter coat over your jacket—double the protection.
- Upgrade to magnetic weatherstripping: Premium options use a magnetic strip (like a fridge door) for a super-tight seal. These are great if your door and frame are metal and line up properly.
You don’t have to settle for a drafty entryway. Sometimes, mixing and matching a few solutions is the secret to finally resetting your home’s comfort level.
The Bottom Line on Stopping Door Drafts—For Good
A drafty exterior door is more than just a minor annoyance—it’s a signal that your door isn’t working as well as it could. It’s not always about the weatherstripping you just installed; sometimes, it’s about fine-tuning the bigger picture. Whether the problem is a wonky hinge, a hidden gap, or a threshold that’s seen better days, there’s usually a fix—no secret code or tricky remote required.
If you work through these steps slowly, checking every edge and corner, you can almost always clear up those stubborn drafts. And if you hit a wall, there’s no harm in calling for backup. A cozy, energy-efficient home is worth the troubleshooting effort—so take your time, keep an eye out for hidden trouble spots, and soon enough, your new weatherstripping will finally get the chance to shine.