
When door hinges get painted over, it’s like they’re trying to swim through molasses—slow and frustrating. This issue can happen with any door, whether it’s in your home, office, or even at a friend’s place. If you’ve got a door hinge that’s stiff and making you work for that smooth opening, you’re in the right place. Let’s unravel this problem step by step.
Understanding How a Door Hinge Works
Before diving into the troubleshooting, let’s quickly break down how a door hinge actually operates. A door hinge is made up of two plates (known as leaves) and a barrel that holds them together. When you swing the door open or closed, the barrel allows for rotation. It’s a simple mechanism that can be easily messed up by paint or grime.
You might think of the door hinge as a dance partner—if one partner is stiff, the whole routine falls apart. The movement of the hinge should be smooth, allowing the door to open and close without resistance. If paint gets sealed inside the barrel, it creates friction, making the hinge feel like it’s trying to move through mud.
Understanding this mechanism is crucial for troubleshooting the issue. If we know where the problem lies, we’ll have a much easier time fixing it.
Identifying Signs of a Stiff Hinge
It’s pretty easy to tell if your door hinge is acting up. Here are some signs to look out for:
- Difficulty opening or closing the door: If it requires extra effort to swing the door, that’s a clear indication.
- Unusual noises: Listen for creaks or squeaks. These sounds are often a red flag that your hinge is in distress.
- Visible paint buildup: If you can see dried paint around the hinge, it’s likely causing the stiffness.
Recognizing these signs early can save you a lot of frustration down the line. You might find that dealing with a stiff hinge isn’t just about the door itself; it’s about the experience of moving through your space smoothly.
Gathering Your Tools for the Job
Now that we know what to look for, it’s time to gather the tools you’ll need. Don’t worry, you won’t need a full toolbox—just a few simple items:
- Screwdriver: Depending on your hinges, you may need a flathead or Phillips screwdriver.
- Paint stripper or solvent: This will help break down the paint in the hinge.
- Rags or paper towels: For cleaning up any mess.
- Lubricant: Once you’ve cleaned the hinge, a good lubricant (like WD-40) will help keep it moving smoothly.
Having these tools ready will make the process much smoother. It’s like preparing for a race; the right gear can make all the difference.
Removing the Paint from the Hinge
Here’s the part where we get our hands a little dirty. If you’ve identified that paint buildup is causing the stiff hinge, it’s time to remove it. Here’s how to do it step by step:
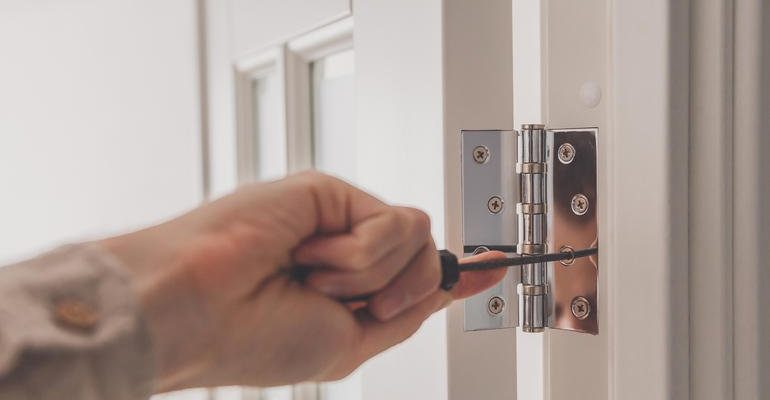
1. Unscrew the Hinge: Use your screwdriver to remove the screws holding the hinge to the door and frame. Be sure to support the door while you do this to prevent it from falling.
2. Apply Paint Stripper or Solvent: Take your paint stripper or solvent and carefully apply it to the hinge. Make sure you’re in a well-ventilated area since some of these chemicals can be harsh.
3. Let It Sit: Allow the solvent to sit for a few minutes. This gives it time to work on breaking down the paint.
4. Wipe Clean: Use a rag or paper towel to gently wipe the hinge clean. You may need to repeat this process a few times if the paint is particularly stubborn.
It’s a bit like peeling an onion—sometimes you have to remove several layers to get to the good stuff. Patience is key here.
Lubricating the Hinge
Once you’ve cleaned the hinge, it’s time for the fun part—lubrication! Proper lubrication is crucial for a smooth operation. Here’s how to do it:
1. Choose the Right Lubricant: WD-40 is a popular choice, but there are many other options available. Just ensure it’s safe for metal applications.
2. Apply the Lubricant: Spray a small amount into the hinge barrel. If your hinge is still attached to the door, it can be helpful to gently move the door back and forth to work the lubricant into the mechanism.
3. Wipe Off Excess: After applying, wipe away any excess lubricant with a clean rag. You don’t want it to attract dust or dirt.
Lubrication works wonders! It’s like giving your hinge a refreshing drink after a long day.
Reinstalling the Hinge
Now that your hinge is clean and lubricated, it’s time to put it back. Here’s how to do that effectively:
1. Align the Hinge: Position the hinge back where it belongs on both the door and the frame.
2. Reinsert the Screws: Using your screwdriver, carefully tighten the screws back into place. Be sure not to overtighten, as this can strip the screws or damage the wood.
3. Test the Door: Once everything is back in place, give that door a gentle swing. If it opens and closes smoothly, congratulations! You’ve done it.
Putting the hinge back is like finishing a puzzle. There’s a sense of satisfaction when everything clicks into place.
Maintaining Your Hinges
To prevent stiffness in the future, a little maintenance goes a long way. Here are some tips:
- Regular inspections: Check your hinges every few months for paint buildup or signs of wear.
- Lubricate periodically: A quick spray of lubricant every six months can keep your hinges happy.
- Be cautious with paint: If you’re painting around hinges, use painter’s tape to keep paint from getting into the barrel.
Think of maintenance like watering a plant. It doesn’t take much effort, but it makes all the difference in keeping things running smoothly.
Fixing a stiff door hinge due to paint buildup isn’t as daunting as it might seem. With a few simple steps—identifying the problem, gathering your tools, cleaning, lubricating, and maintaining—you can turn that stubborn door into a smooth operator once more.
Remember, the key is to be patient and gentle with the hinge. Just like any machine, a little care goes a long way in ensuring it works beautifully. So, the next time you hear that annoying creak, you’ll know just what to do. Plus, you’ll impress your friends with your newfound DIY skills!