Repairing a damaged screw head on an interior door hinge might sound tricky, but it’s more manageable than you think. With the right tools and a bit of patience, you can tackle this project and restore that hinge to its former glory. Let’s walk through the steps together, so you can feel confident every time you swing that door open.
Understanding the Problem
Before diving into repairs, it’s crucial to understand the issue at hand. A damaged screw head often means that the screw can’t be turned or removed, making it difficult to either tighten or replace the hinge. Maybe you’ve tried to unscrew it with a standard screwdriver, only to find that the head is stripped or corroded. It’s like a key that no longer fits the lock—it’s frustrating, but it happens.
When it comes to door hinges, the screws play a vital role in holding everything together. Over time, they can wear out due to frequent use or even environmental factors like moisture. If a screw head is stripped, you won’t be able to grip it properly, leading to more issues down the line, such as squeaky hinges or a door that won’t close properly.
Gathering Your Tools
Let’s talk about what you’ll need before getting started. Preparation is key in any repair task, and having the right tools can make all the difference. Here’s a handy list of what you might need:
- A pair of pliers
- Rubber bands (for extra grip)
- A screwdriver (matching the screw type)
- Your trusty drill (if necessary)
- Wood glue or epoxy (for more extensive repairs)
You probably already have some of these tools at home, but it’s worth checking to avoid that last-minute scramble. If you don’t have a specific type of screwdriver, you might want to pick one up. Sometimes, a special bit like a Torx or an Allen wrench is required depending on your hinge type.
Assessing the Damage
Now that you’ve got your tools ready, it’s time to take a closer look at the damaged screw head. Is it merely stripped, or is it broken beyond recognition? The extent of the damage will determine your next steps.
If the screw head is stripped (meaning it can’t grip), you might want to try the rubber band trick. Place a rubber band over the screw head and then use the screwdriver. This can give you the added grip needed to turn the screw. It’s a handy little hack that many people overlook.
However, if the screw is broken off entirely, you might need to drill it out. But don’t worry—drilling out a screw is easier than it sounds, and it can often save the day. Just remember, patience is crucial here. You want to avoid damaging the hinge or surrounding wood.
Removing the Damaged Screw
Let’s say you’ve assessed the damage and decided it’s time to remove that pesky screw. If you’re using the rubber band technique and it worked, congratulations! You’ve just saved yourself some extra effort. However, if it didn’t budge, grab your drill.
1. Start with a small drill bit: Use a bit that’s slightly smaller than the screw’s diameter. This will help avoid any accidental damage to the hinge.
2. Drill slowly: Once you’ve got the drill in place, start drilling slowly. The goal here is to remove enough of the screw to disengage it from the hinge.
3. Switch to a bigger bit if needed: If the screw is stubborn, you might have to gradually increase the bit size until you can get it out.
Remember, practice makes perfect. If you haven’t drilled out a screw before, it’s okay—take your time and stay focused.
Replacing or Repairing the Hinge
After successfully removing the damaged screw, you’ll need to decide whether to replace it or repair the hinge. If the hinge itself shows signs of wear or damage, it might be time for a full replacement. New hinges can often be found at your local hardware store, and they aren’t too costly.
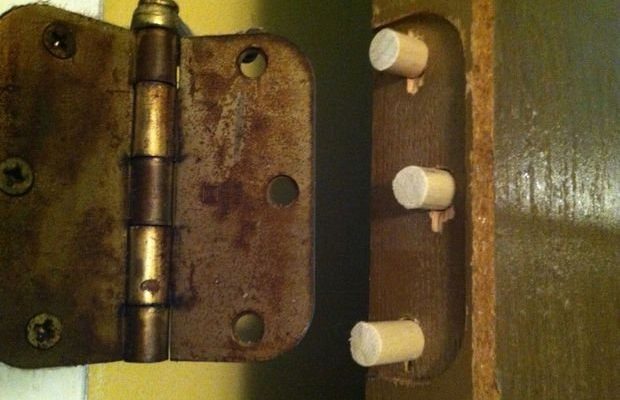
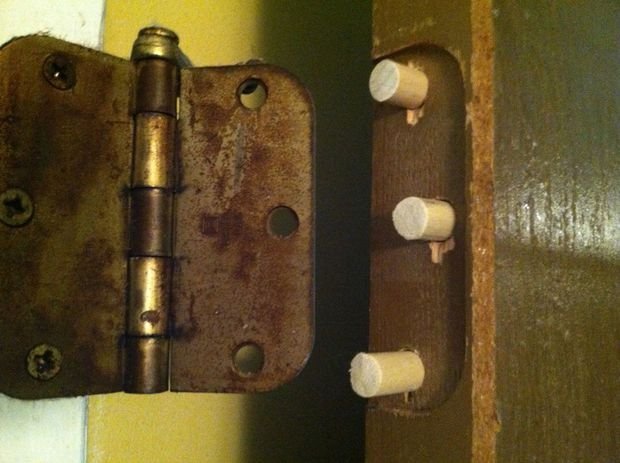
However, if you want to keep the existing hinge, you can repair it using a bit of wood glue or epoxy. This works best if the screw hole is stripped or enlarged. Simply:
1. Fill the hole: Apply wood glue or epoxy into the damaged screw hole.
2. Insert a wooden dowel: If the hole is large, you might want to insert a wooden dowel for added strength.
3. Allow it to cure: Let the glue or epoxy cure according to the manufacturer’s instructions.
Once it’s dried, you can reinsert a new screw and secure the hinge.
Reassembling the Door Hinge
Now that the hinge is either repaired or replaced, it’s time to put everything back together. Align the hinge back onto the door frame and carefully insert the new screws. If you repaired the hinge, use the original screws or pick up some new ones that fit properly.
Tighten those screws well, but don’t overdo it. You want a secure fit without stripping the new screw head. Once everything is back in place, open and close the door a few times to check if it swings smoothly.
If you hear squeaking, a little oil on the hinges can make a big difference.
Preventative Measures for the Future
Now that you’ve invested time and effort into your door hinge, it’s wise to consider how to keep it in good shape. Here are a few easy preventative measures:
- Regular Checks: Inspect your door hinges periodically for any signs of wear.
- Lubrication: Use a lubricant on the hinges every few months to keep them working smoothly.
- Gentle Use: Encourage gentle use of doors, especially in high-traffic areas.
By maintaining your door hinges, you can prevent issues down the line. A little maintenance goes a long way in avoiding future frustrations.
In summary, repairing a damaged screw head on an interior door hinge isn’t just a DIY project; it’s a chance to learn and succeed at home improvement. Whether you choose to replace the hinge altogether or use a repair method, you’ve empowered yourself to tackle this challenge with confidence. Happy repairing!