You might have a remote smart door latch from a brand like Schlage or Kwikset, where the lever duties are more complex. However, the essence remains the same: if the spring isn’t functioning, you might find yourself dealing with a door that doesn’t latch properly or a lever that feels stuck. Let’s walk through how to diagnose and fix this issue, step by step.
Understanding the Lever Return Spring
Before we dive into diagnosing problems, it’s important to understand what a lever return spring actually does. Think of it like a rubber band. When you pull the lever down to open the door, the spring compresses (or stretches), and as you release it, the spring returns to its original shape, pulling the lever back up. This action allows the latch to engage and secure the door when you close it.
If the lever doesn’t spring back as it should, something’s awry. It might be a broken spring or perhaps something is obstructing it. Sometimes, dirt or debris can get lodged in the mechanism, causing all sorts of headaches. A quick visual inspection can often highlight obvious issues like rust or visible damage to the spring.
Common Symptoms of a Faulty Lever Return Spring
Now that you know what the spring does, let’s discuss how to spot the signs of a malfunctioning door latch. Here are some common symptoms you might encounter:
- Stuck Lever: If the lever remains in the down position and doesn’t return to its original state.
- Loose or Wobbly Lever: If the lever feels too loose, it might indicate that the spring isn’t holding tension.
- Difficulty Latching: If the latch fails to engage when you push the lever up.
- Obvious Damage: Any visible bends, breaks, or rust can be your spring’s distress signal.
If you notice any of these issues, it’s time to take a closer look. Let’s start with a visual inspection and see what we find.
Steps to Inspect the Lever Return Spring
Now, let’s get our hands a little dirty. To properly inspect the spring, follow these steps:
1. Gather Your Tools: You’ll need a screwdriver, flashlight, and possibly a replacement spring if a new one is necessary.
2. Remove the Door Handle: Start by unscrewing the handle from the door. Typically, there are screws hidden under the lever or on the base of the handle. Keep these screws safe; they’ll be needed to reassemble.
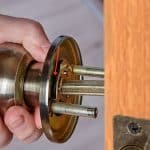
3. Inspect the Mechanism: Once the handle is off, you’ll have a clear view of the spring and latch mechanism. Look for any visible signs of wear or damage. If the spring looks out of place or broken, it’s time for a replacement.
4. Check for Blockages: Sometimes, dust or debris can clog the mechanism. Simply wipe it down with a soft cloth.
This straightforward process can reveal if the spring needs fixing or replacement. Keep in mind; sometimes, it’s something minor, like a bit of dirt, that can cause big issues.
How to Replace a Broken Lever Return Spring
If your inspection reveals a broken spring, don’t panic! Replacing a lever return spring is easier than you might think. Here’s how to do it:
1. Buy a Replacement Spring: Check with your local hardware store or online for a compatible replacement. Brands like Kwikset or Schlage often have specific springs designed for their latches.
2. Remove the Old Spring: After taking the handle off, gently pull out the old spring. Use your fingers or a pair of pliers if needed.
3. Insert the New Spring: Position the new spring in the same spot as the old one. Make sure it’s seated securely and check that the tension feels appropriate.
4. Reassemble the Door Handle: Slide the handle back on, making sure everything aligns as it should. Tighten the screws, but avoid overtightening, as it can cause additional strain on the spring.
5. Test the Mechanism: Once everything is reassembled, give the lever a few pulls to ensure it operates smoothly. If it returns to its original position without issue, you’re all set!
Maintaining Your Door Latch for Longevity
After tackling the spring issue, you’ll want to keep your door latch healthy for as long as possible. Regular maintenance can help prevent future problems. Here are a few tips:
- Regular Cleaning: Gently clean the latch mechanism to remove dust and dirt that can cause wear and tear.
- Lubricate Moving Parts: A silicone-based lubricant can smooth out the operation and prevent rusting.
- Inspect Often: Check the spring and mechanism regularly to catch any wear before it becomes a bigger issue.
By incorporating these steps into your routine, you help ensure that your door latch continues to function properly. Think of it like going to the doctor for a check-up—you want to catch any issues before they grow.
When to Call a Professional
Sometimes, despite your best efforts, things just don’t click. If you’ve gone through these steps and your door latch is still giving you trouble, it might be time to call in a pro. A locksmith or handyman can assess the situation and offer solutions you might not have considered.
Honestly, there’s no shame in asking for help, especially when it comes to something as crucial as home security. They can also offer advice on whether it’s worth it to replace the entire latch or just fix the spring.
Diagnosing a problem with a door latch’s lever return spring isn’t as daunting as it seems. With a little patience and the right steps, you can uncover the issue and even fix it yourself. Remember, the spring is a key player in your door’s operation, so keeping it in shape is vital for a smooth and secure experience.
So whether you opt for a DIY fix or choose to call in a professional, you’re now equipped with the knowledge you need to tackle the problem head-on. Happy fixing!