The thing is, weatherstrips don’t always give up evenly. Over time, opening and closing your door puts a lot of stress near the hinges. Rubber can crack, foam can squish, and suddenly, your front entry isn’t as weather-tight as it was on day one. Whether you’ve got a steel, wood, or fiberglass door, brands like Schlage, Kwikset, Pella, and JELD-WEN all run into the same trouble. Fixing a torn weatherstrip near the hinge isn’t just about patching up the gap—it’s about restoring that snug, draft-free feeling you might not even realize you’ve been missing.
Why Weatherstrips Tear Near Door Hinges
You might be wondering, “Why does the weatherstrip always seem to fail by the hinge instead of anywhere else?” Here’s the thing: hinges are where the real action happens. Every time you open or close the door, the weatherstrip flexes and compresses right at those pivot points. Multiply that by a few months (or years) of daily use, and it’s no surprise the material starts to weaken there first.
Pressure and rubbing aren’t the only issues. Moisture from rain or humidity can get trapped in that spot, especially if the door isn’t perfectly aligned. Over time, the mix of bending and dampness breaks down the rubber or foam, causing it to split or rip. If your weatherstrip is old, brittle, or wasn’t installed perfectly tight, damage comes even sooner.
This kind of tear isn’t just annoying; it undercuts your whole setup. Air leaks near the hinge waste energy and can even let in bugs or noise. If your remote entry system keeps beeping for a “door ajar” warning, a frayed strip could be enough to fool the sensors. That’s why even a little rip deserves your attention—and a real fix.
How to Inspect a Torn Weatherstrip at the Hinge
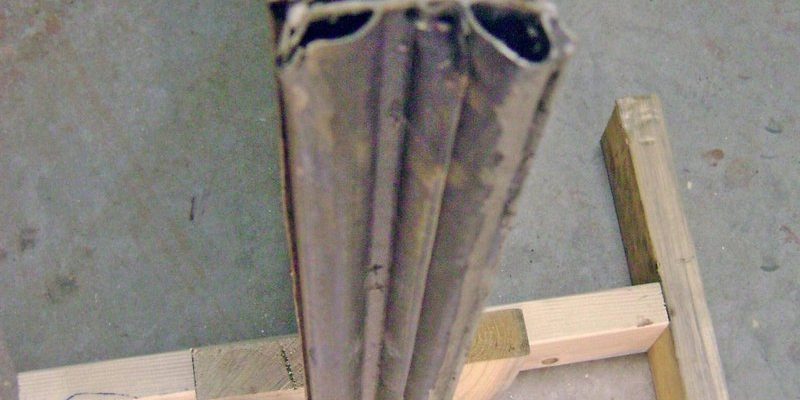
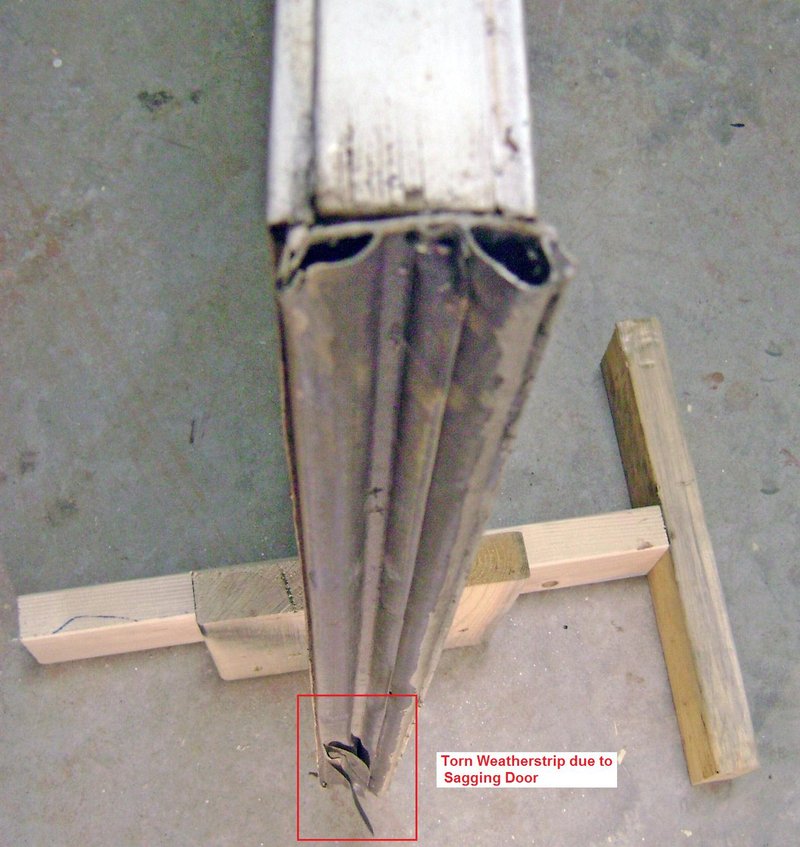
Before you jump into repairs, you’ll want to confirm exactly where, and how badly, your weatherstrip near the hinge is torn. Honestly, it’s easy to spot when you know what to look for. Start by giving the door a gentle wiggle while it’s closed. If you see any light peeking through the edge near the hinge, you’re already halfway to diagnosing the problem.
Next, open the door wide and run your fingers along the weatherstrip by each hinge. If there’s a visible split, squished section, or you feel a spot that’s suddenly thinner, that’s your trouble zone. Sometimes the tear is hidden right where the strip tucks behind the hinge plate. You might need a flashlight to really see what’s going on.
Pro tip: Try slipping a thin piece of paper or a dollar bill between the weatherstrip and the door. If you can pull it out easily while the door’s closed, the seal is broken.
Pay attention to whether the tear runs parallel to the hinge or is more of a jagged split; this shapes your repair plan. Also, check both the door and the frame—sometimes, damage happens in both spots. The more time you take inspecting, the smoother your fix will go.
Choosing the Right Weatherstrip Repair Method
When it comes to fixing a torn weatherstrip near the hinge, you’ve got a couple of choices. You can patch the torn section, replace just the damaged strip, or swap out the whole weatherstrip for a fresh one. Each option has its pros and cons, and the right call usually depends on the size of the damage and what materials you have.
- Patching: Good for small, clean rips (an inch or two). Use weatherproof adhesive or a rubber patch that matches your original strip. Quick, cheap, but might not last forever.
- Replacing a section: Cut out the torn length and install a new piece in its place. Best for moderate damage—keeps costs down and results neat.
- Full replacement: The gold standard if the strip is brittle, old, or failing in several spots. It’s more work but restores a tight seal everywhere.
Let me explain: For new doors (think newer JELD-WEN or Pella models), you might find a “kerf” weatherstrip that pushes into a slot. For older doors, adhesive foam types are common. Check what you have before you buy anything. Universal weatherstripping can work, but sticking with your door’s brand is sometimes smoother—especially if you have trouble syncing the fit.
Gathering Tools and Materials for Repair
The right tools make any repair less of a headache. If you’re patching a torn weatherstrip near the hinge, you’ll usually want:
- Replacement weatherstrip (if you’re swapping out a section or the whole thing)
- Weatherproof adhesive (like silicone caulk or construction adhesive)
- Scissors or utility knife
- Flathead screwdriver (helpful for prying out old strips, especially with kerf types)
- Clean rag and rubbing alcohol (for prepping the surface)
- Measuring tape
- Masking tape (for holding new strips in place as they set)
Don’t be afraid to get a little hands-on. If you’re replacing a section near the hinge, you’ll sometimes need to unscrew the hinge plate for better access—so it’s smart to have a screwdriver handy. And if you run into stubborn, dried-up weatherstrip glue, a little patience (and maybe some elbow grease) is just as important as the fanciest tool.
Insight: If your door uses a magnetic or bulb weatherstrip, make sure you match the style. Swapping a foam strip for something fancier can mess with the way the door closes, or even mess up your electronic lock’s “closed” sensor.
Step-by-Step Guide: Repairing a Torn Weatherstrip by the Hinge
Ready to get your door sealing like new again? Here’s a step-by-step, no-nonsense approach for most brands:
- Open the door fully. If you need more room, pop out the hinge pins or gently unscrew the hinge closest to the torn area. This isn’t always needed, but it gives better access.
- Remove the damaged section. For adhesive strips, peel it back or use a utility knife to cut out just the ripped part. For kerf types, pry out the torn section from the slot.
- Clean the area thoroughly. Wipe away any dirt, old glue, or debris with rubbing alcohol. Let it dry—it’s worth the extra minute.
- Cut your new weatherstrip. Measure the length you need, then cut a replacement piece to match with scissors or a knife.
- Install the new strip. If it’s a push-in (“kerf”) type, slide it into the groove. For adhesive types, apply weatherproof glue to the back of the strip and press it firmly into place. Use masking tape to hold it while the glue cures (usually 30–60 mins).
- Double-check your work. Close the door gently and check for a snug fit—no gaps, no bulging. If needed, adjust the new strip or trim any excess.
- Reinstall the hinge or pins if removed. Make sure everything lines up smoothly—you shouldn’t need to force anything shut.
Don’t rush. Give the adhesive its full curing time before putting your door through heavy use. Honestly, this is the part that separates a quick fix from a fix that lasts all winter.
Common Problems After Weatherstrip Repair—and How to Troubleshoot
Sometimes, even after a careful repair, things don’t go perfectly the first time. Maybe your weatherstrip keeps slipping, the door’s harder to close, or you’re still feeling a draft near the hinge. Here’s how to handle the most common hiccups.
If your strip won’t stay put, you may not have cleaned off all the old adhesive, or you could be using the wrong kind of glue. For persistent drafts, check for hidden gaps—especially if the strip’s too thin or didn’t seat right in the kerf slot. Press gently along the whole install and listen for a solid “seal” sound—like a fridge closing.
What if your remote entry or door sensor is acting up? Some smart locks or alarms use a tiny magnetic sensor that expects a certain kind of contact. If you installed too thick a weatherstrip, or if it’s out of alignment, you might get a “door open” error or random beeping. Fix this by trimming back the strip a bit until the sensor lines up again.
Remember: Universal strips are great in a pinch, but if your door’s fussy (especially with security codes or pairing issues), the original brand part might just work better. Sometimes it’s worth the extra few dollars for a perfect fit.
When to Replace vs. Repair the Entire Weatherstrip
Repairing a torn weatherstrip near the hinge is usually quick and cheap, but honestly, sometimes a patch is just a Band-Aid. If the whole strip’s cracking, discolored, or pulling away from the door, it’s worth swapping out the whole thing—even if you’re only dealing with a localized tear.
Full replacement is best when:
- The weatherstrip is more than 5–7 years old
- You notice drafts in several places, not just the hinge
- The material feels dry, gummy, or brittle
- Your door struggles to close, or the lock won’t sync or reset properly
A good weatherstrip isn’t just about energy savings. It keeps out bugs, noise, and sometimes even that weird smell from your neighbor’s grill. If you’re tackling a bigger job, take the same careful steps for removing and cleaning as you would for a small patch. It’s a little more work, but you’ll be set for years, not months.
Maintaining Your Weatherstrip After Repair
Once you’ve fixed your torn weatherstrip, regular upkeep keeps it working like new. Every few months, give the strip a quick wipe with a damp cloth and mild soap (especially if it’s near a busy entryway or pets like to nose around). Check for signs of wear or spots where it isn’t sealing well.
If your door has an electronic lock or remote code entry, keep an eye out for odd beeping or pairing glitches. Sometimes even a small shift in alignment can throw things off. If this happens, a bit of troubleshooting—like checking the weatherstrip position or giving the lock sensor a quick clean—can save you a headache later.
A tiny bit of silicone lubricant on rubber weatherstrips can help them stay supple, especially in dry or cold climates. Just don’t overdo it, or the strip can become slippery and won’t seal as well. Think of it like conditioner for your hair: helpful in small doses, messy if you get carried away!
Wrapping Up: Keep Your Door Cozy and Secure
Repairing a weatherstrip that’s torn near the door hinge doesn’t have to be intimidating. Whether you’re dealing with a modern Pella entry or a decades-old slab with a universal remote lock, the process comes down to patience, the right materials, and a careful touch. A snug, clean weatherstrip means a more comfortable home—and less fuss with codes, syncing, or troubleshooting your entry system. If you take a little time to do it right, you’ll enjoy fewer drafts, quieter rooms, and doors that just feel better to use. And honestly, isn’t that what we’re all after—just a little more comfort with every open and close?