Here’s the thing: most modern handlesets, especially from big names like Kwikset, come with this adjustable feature so you don’t have to worry about whether your door is “the right size.” It takes a lot of the guesswork out. If you know how to use a screwdriver and follow a few steps, you can install a handleset with an adjustable backset in less than an hour—even if you’ve never tackled a lock or remote entry setup before.
Let me walk you through the process step by step. We’ll go over what tools you need, how to adjust that pesky backset, and even what to do if things don’t quite line up perfectly on your door. Whether you’re replacing an old, stuck latch or just upgrading to something sleeker and more secure, I’ll lay it out in plain English.
What Does “Adjustable Backset” Mean on a Handleset?
Let’s start by clearing up what an adjustable backset actually is. When you look at your door, there’s a main hole drilled through it for the handle or deadbolt. The distance from the edge of the door to the center of that hole is called the backset. Most residential doors use either a 2-3/8 inch or a 2-3/4 inch backset—that’s it. But here’s the catch: not all doors use the same size.
If you’ve ever bought a handleset without checking this, you know the pain of coming home only to realize it doesn’t line up. This is why adjustable backsets exist. The latch mechanism can slide or “click” into two different positions, letting it work on both common door sizes. It takes the headache out of measuring your door and second-guessing which set will fit.
Most major brands, like Kwikset and Schlage, now include this feature in their modern handlesets. It’s a small change that makes a big difference, especially for DIYers. So if the box says “adjustable backset,” it means you can use the kit on almost any standard door. No need to search for model-specific codes, order hard-to-find replacement parts, or cut a new hole in your door.
Gathering Tools and Getting Ready
Before you even open the handleset box, let’s make sure you have everything you need. Here’s a quick checklist to save you from those “Oops, I need to run to the garage” moments:
- Phillips screwdriver (the one with the cross-shaped tip)
- Flathead screwdriver (for prying or popping covers)
- Measuring tape (helpful if you’re unsure about your backset)
- Pencil (for marking holes, just in case)
- Power drill (optional, but makes things quicker)
Honestly, you don’t need anything fancy. Most Kwikset or Schlage handlesets include all the screws and a paper template. Just double-check the box before you start—there’s nothing more annoying than getting halfway through and realizing a critical screw is missing.
It’s also smart to lay out all the parts on a clear table. Handleset kits can have a surprising number of little pieces, including plates, screws, strike plates, and the all-important adjustable latch. Keep the installation instructions handy. While I’ll walk you through the steps, every brand can have a few tiny differences.
How To Remove the Old Handleset
Let me explain—you can’t install a shiny new handleset until you get the old one out of the way. Don’t worry, this usually isn’t as dramatic or difficult as people think.
Start by unscrewing the screws on the interior side of your current handleset. They’re usually right above and below the turn knob or handle. Once those are loose, you can gently pull the handles apart from both sides. (If they seem stuck, use a flathead screwdriver to carefully pry them apart—but don’t use too much force.)
Next, remove the latch. Open the door and look at the edge. You’ll see two screws holding the latch plate in place. Remove those and gently slide the latch assembly out. If it’s been painted over or feels stuck, a little wiggling usually does the trick—no need to break out a hammer.
Don’t forget to take off the old strike plate from the doorframe too. Even if the new handleset fits it, you’ll usually get a strike plate with a tighter fit or better finish in your kit, so it’s worth swapping.
If you run into a stubborn screw—maybe it’s stripped or rusted—try gripping it with pliers or giving it a quick shot of WD-40. Patience beats brute force every time!
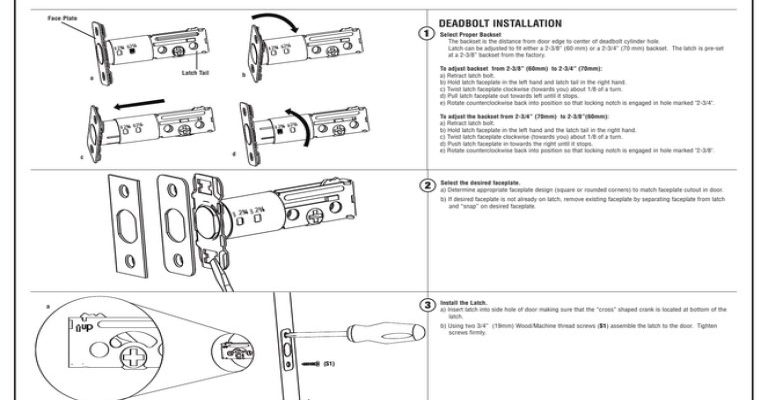
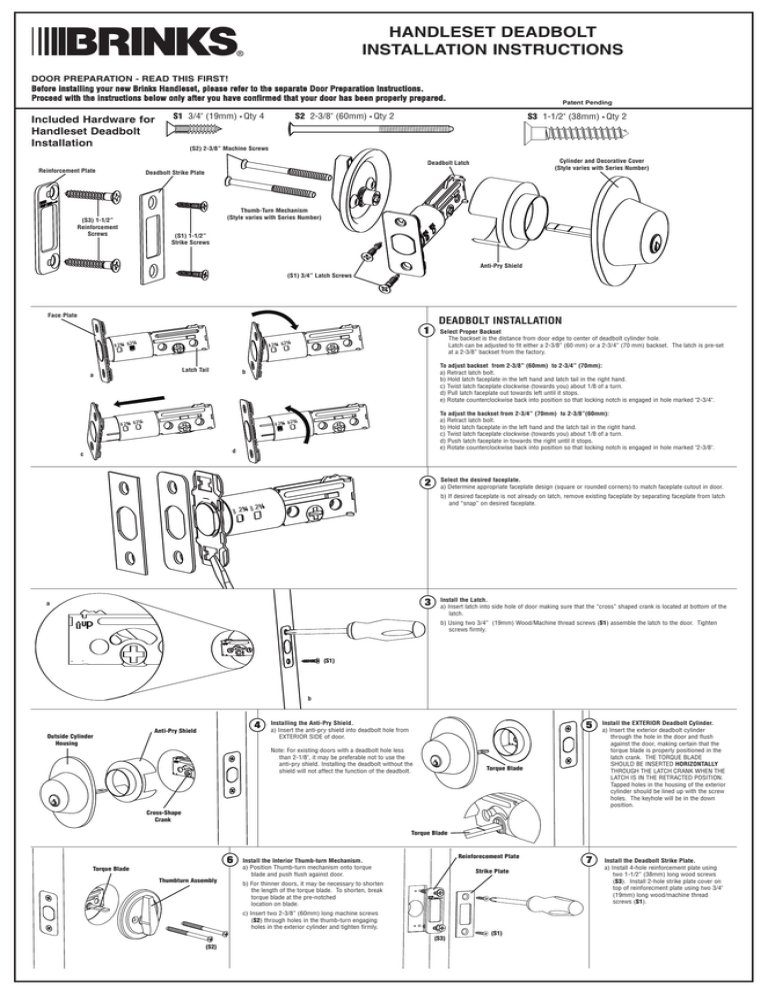
Adjusting the Backset: Step by Step
Here’s where the “adjustable backset” magic happens. Take the new latch out of the kit. You’ll notice it has some moving parts compared to an old, fixed latch.
- Look for a small switch or twisting barrel on the latch body—sometimes it just slides, clicks, or rotates.
- If your door’s hole is 2-3/8″ from the edge, leave the latch in the shorter position. If it’s 2-3/4″, adjust it to the longer setting. Use your measuring tape to check if you’re unsure.
- Once adjusted, test-fit the latch in your door’s side. The flat part of the latch (the beveled edge) should face towards where the door closes.
Different brands handle the adjustment a little differently. Kwikset’s adjustable latch twists to the desired backset, with a clear “click.” Schlage’s may slide along a channel or require pushing a button. Either way, don’t force it—if it feels stuck, re-read the instructions or search the model code online to be sure you’re doing it right.
If the latch doesn’t seem to match your door, double-check the measurements. Sometimes, doors that have been repaired or re-drilled end up with odd-sized holes. In those rare cases, you might need an adapter or to adjust the hole with a simple hole saw kit—though that’s not typical.
Installing the Handleset: Inside and Out
Now for the fun part—putting everything together and seeing your handiwork in action. Start by sliding the adjusted latch into the door edge. Line up the screw holes and attach it with the two screws from your kit. Make sure it’s flush with the edge of the door; if it sticks out or feels wobbly, take it out and try again.
Next, grab the exterior part of your handleset—the part with the keyhole. Feed the spindle (the long metal rod) through the latch mechanism. Hold the exterior handle in place with one hand and, with the other, line up the interior trim and handle. Sometimes, this step feels like trying to pat your head and rub your stomach at the same time, so give yourself a minute.
Insert the long screws through the interior plate and tighten them into the exterior plate. Don’t overtighten just yet—you want a little wiggle room to make sure everything lines up before you lock it down.
If your kit includes a deadbolt, install it using the same steps. Make sure the keyed side faces outside, and double-check that the tailpiece (the square bar) fits cleanly through the latch opening.
Pro tip: If the handle or deadbolt doesn’t turn smoothly, don’t panic. Loosen the mounting screws a bit, jiggle everything into place, and retighten. This usually solves sticky operation.
Attaching the Strike Plate and Testing
The final hardware step is the strike plate, which goes on the doorframe. Remove the old one, then line up the new strike plate with the latch. If the screw holes already line up with your frame, great—just screw it in. If they don’t, you might have to fill the old holes with wood filler and carefully drill new pilot holes.
Pay attention to the alignment. The latch needs to slide easily into the strike plate. If the door sticks or you have to force the handle, try moving the strike plate slightly up, down, or sideways. Sometimes just 1–2 mm makes all the difference.
Once everything is in place, close the door and test the handle and deadbolt several times. Turn the key, check that the latch retracts smoothly, and make sure the door fully closes and locks. If you hear scraping or the latch doesn’t engage, adjust the strike plate until everything feels just right.
Troubleshooting Common Problems
You might be wondering: what if something isn’t working? Handlesets aren’t always perfectly simple, and a few common hiccups can pop up:
- The latch won’t fit: Double-check you’ve adjusted the backset correctly. Some adjustable latches need a good, solid click into place.
- Handle feels loose: Make sure all screws (especially the long ones connecting interior and exterior trim) are tight, but not overtightened. Sometimes, gently wiggling the handle while tightening helps seat everything properly.
- Door won’t lock or latch easily: This usually comes down to strike plate alignment. Loosen the screws and nudge the plate until the latch slides in smoothly. Watch for any misaligned weatherstripping or door warping, too.
- Key won’t turn: Try loosening the mounting screws just a hair. Misalignment can cause the lock cylinder to bind.
Honestly, most issues during installation are minor. If you’ve ever tried to sync a universal remote or reset your smart home device, you know tiny adjustments can make all the difference. The key is to stay patient and make small changes—it’s rarely a lost cause.
Comparing Handlesets: Adjustable Backset vs. Fixed Backset
Here’s a quick story: years ago, a friend of mine bought a gorgeous, vintage-style handleset online without realizing it had a fixed backset. When it arrived, the mounting holes didn’t match up with her door at all. We spent a frustrating afternoon trying to adapt it. Honestly, it would’ve been easier to just buy a modern, adjustable set from a reputable brand like Kwikset or Schlage.
So what’s the big deal? A fixed backset works only for doors with a matching hole spacing. No wiggle room. If your door doesn’t match perfectly, you’re out of luck or facing a tricky, sometimes damaging, installation.
On the other hand, an adjustable backset is all about flexibility. It’s almost universal for standard US doors, making it much more beginner-friendly. You don’t have to memorize model codes or take a leap of faith when ordering online.
If you’re unsure which type you have, adjustable is almost always the way to go. It’s easier, faster, and you’re much less likely to run into headaches down the road.
When To Call a Locksmith (and When Not To)
Let’s be real—not everyone likes tackling DIY home projects, and sometimes you hit a snag that just isn’t worth your time. If you find yourself with a stripped screw that won’t budge, a lock that refuses to turn even after adjustment, or a door that’s warped beyond easy repair, it’s okay to call a locksmith.
Locksmiths have special tools for dealing with stubborn lock hardware and can usually replace or install a handleset in under thirty minutes. They’ll also help with keying your locks to match your other doors if needed. For most folks, though, a standard handleset with an adjustable backset is a totally DIY-friendly project.
If you’ve handled a universal garage door remote, swapped out a light switch, or even just changed a battery in an electronic device, you’ve got the skill set you need for this job. Give yourself a little time, follow the steps, and you’ll be surprised how professional the results look.
Wrapping Up: Enjoy Your Upgraded Door
By now, you’ve installed your handleset with an adjustable backset, tested the latch, checked the lock, and probably admired your handiwork a few times. Upgrading your entryway isn’t just about looks—it’s about making your home feel secure, smooth, and genuinely “yours.” Even if you ran into a few bumps, remember how much you learned along the way.
If you ever need to swap the lock cylinder, match a new remote or keypad, or troubleshoot a sticky latch, the basics are all the same. The adjustable backset means your hardware is future-proofed for almost any standard door. Now go enjoy that satisfying “click” when the door locks—knowing you did it yourself.