
You might be wondering what tools you’ll need or how complicated the installation process is. Well, I’m here to break it down for you, step by step. Think of it as a fun DIY project that not only improves your door but also adds a little charm to your space. Whether you’re working with a specific brand like Johnson Hardware or a universal soft-close system, the process is straightforward, and I’ll guide you through every detail.
Understanding Pocket Doors and Soft-Close Systems
Pocket doors are unique. They slide into the wall when opened, effectively saving space while providing a stylish option for separating rooms. Installing a soft-close system on these doors helps enhance their functionality by ensuring they close smoothly every time. Without this system, the door can close abruptly, which can be jarring if you’re not expecting it. Picture it like a gentle hug at the end of a long day, rather than a surprising slap from an old friend.
A soft-close system works by using a hydraulic mechanism that slows the door’s movement as it comes to the frame. It’s like having a little assistant that helps your door find its place without a fuss. This setup is especially useful in high-traffic areas, where little ones or pets may inadvertently push or pull the door. So, let’s dive into how you can install one yourself!
Gather Your Tools and Materials
Before you start the installation process, it’s crucial to gather all necessary tools and materials. Here’s a handy list to get you ready:
- Soft-close kit: Ensure it’s compatible with your pocket door.
- Drill: For making holes in the door and wall.
- Screwdriver: Phillips and flat-head might come in handy.
- Measuring tape: To ensure accurate placements.
- Level: To make sure everything is straight.
- Pencil: For marking where to drill.
Honestly, it’s a good idea to lay everything out before you begin. You don’t want to scramble around looking for your drill halfway through the process. Once you have your tools ready, you’re one step closer to giving your door a soft touch!
Prepare the Pocket Door for Installation
The first step in the installation process involves preparing your pocket door. This means you’ll want to clear the area around the door and ensure it’s functioning properly. Check if the door slides smoothly in its track. If it doesn’t, you may need to troubleshoot that issue first.
Next, hold the soft-close mechanism against the edge of your door, where it will be installed. Use your measuring tape to find the right spot, typically about 4 inches from the top. Mark this location with a pencil. You want to make sure this is level; otherwise, your door might not close correctly. Trust me, a little extra time spent here can save you a headache later.
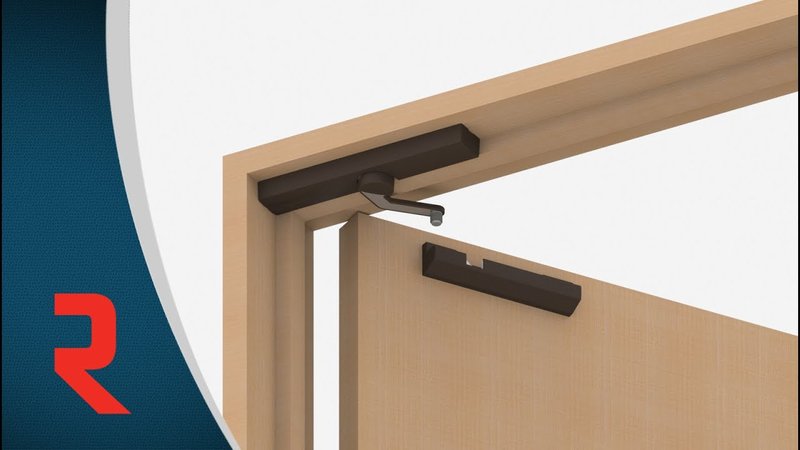
Install the Soft-Close Mechanism
Now comes the fun part—installing the soft-close mechanism. Most kits will include a bracket that needs to be affixed to the top of your pocket door. Follow these steps:
1. Position the bracket: Align it with the marks you made earlier.
2. Drill pilot holes: This helps prevent the wood from splitting.
3. Secure the bracket: Use screws to attach it firmly to the door.
When installing, use your level to ensure the bracket is perfectly straight. If it’s even slightly off, it could affect how the door closes. Here’s the thing: having a good fit makes all the difference in how well the soft-close system works.
Attach the Soft-Close Arm
Once the bracket is installed, it’s time to attach the soft-close arm. This arm connects the mechanism to the door frame and is crucial for that smooth, gentle closing action. Follow these steps:
1. Locate the arm: It should fit snugly into the bracket you just installed.
2. Attach it to the top of the door frame: You may need to drill another pilot hole here.
3. Adjust the angle: Make sure the arm is at the correct angle to allow for optimal closing.
This arm acts like a bridge between the door and the frame, so getting it right is important. If you notice any resistance when you test the door, double-check your alignment.
Testing the Door’s Functionality
After everything is installed, it’s time to test your work! Here’s how to do it properly:
1. Open the door fully: Give it a push all the way open.
2. Release it gently: Do NOT slam it! You want to see how the soft-close mechanism reacts.
3. Observe the closure: Ideally, it should slow down before reaching the frame and close quietly.
If it’s working well, congratulations! You’ve successfully installed a soft-close system on your pocket door. If not, don’t worry; sometimes it just needs a little adjustment. Check the alignment of the soft-close arm and the bracket to ensure everything is still straight.
Troubleshooting Common Issues
Sometimes, even the best installations need a little fine-tuning. If your door isn’t closing smoothly, consider these potential fixes:
1. Check for obstructions: Make sure there’s nothing blocking the track or the mechanism.
2. Reassess the installation position: If the arm is too high or low, it might hinder performance.
3. Inspect the soft-close mechanism: Make sure it’s not damaged or malfunctioning.
If the system seems to be working but still has issues, you might want to reset it. This can usually be done by removing the mechanism and reattaching it, just like how you might reset your Wi-Fi when it’s acting up.
Enjoy Your Newly Installed Soft-Close Pocket Door
Now that you’ve installed a soft-close system on your pocket door, take a moment to admire your work! This simple addition can elevate the look and feel of your space, making it feel just a little more upscale. Whenever you use the door, you’ll appreciate that gentle, quiet close.
Remember, it’s always worth taking your time when tackling DIY projects. If something doesn’t go perfectly, that’s okay—every installation teaches you something new. Plus, you’ve just improved your home’s functionality, and that’s something to feel proud of!
With proper care and troubleshooting, your new soft-close system should give you years of smooth operation. Don’t hesitate to reach out to experts or communities online if you hit a snag. Happy installing!