In this guide, we’ll explore how to use a self-centering drill bit for pilot holes in door hinges. We’ll break down the steps, share tips, and highlight the importance of using the right tools. You might be wondering which drill bit to choose or how to ensure your hinges stay securely in place. Don’t worry; we’ve got you covered. By the end of this article, you’ll feel confident tackling this home improvement task.
What Is a Self-Centering Drill Bit?
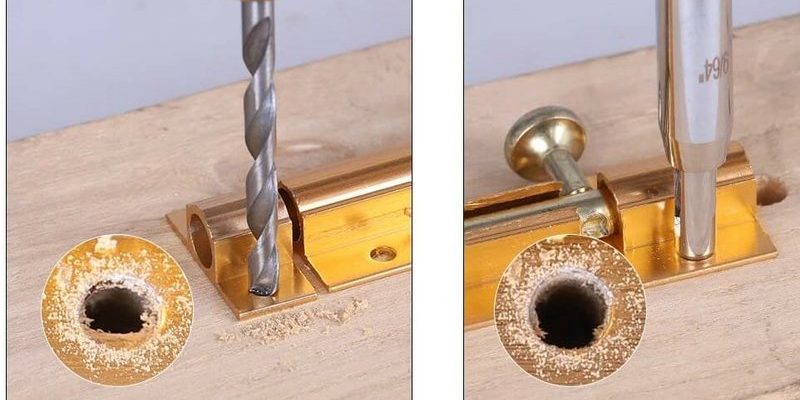
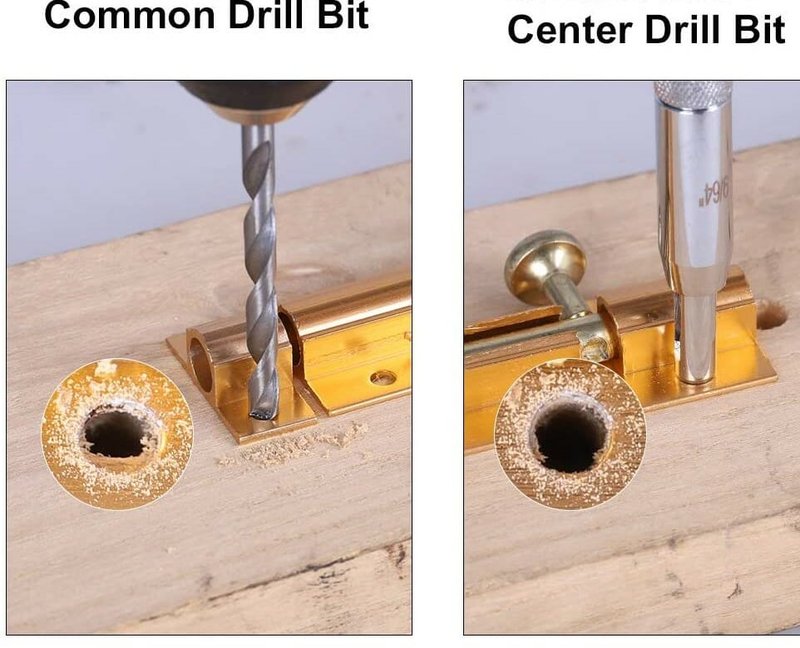
A self-centering drill bit is specifically designed to make drilling easier, especially for tasks like installing door hinges. Unlike traditional drill bits, which can wander as you start drilling, a self-centering bit has a unique design that helps it stay in place. Picture a compass: just like the needle points north, the drill bit’s tip aligns itself with the center of your desired spot.
Most self-centering bits have two sharp cutting edges that guide the drill bit into the wood. This design reduces the risk of slipping, which is especially important when you’re working on something as visible as a door. You wouldn’t want a crooked hinge, right? The self-centering feature saves you time and effort, making the entire process smoother.
Why Use a Self-Centering Drill Bit for Door Hinges?
When you’re hanging a door, precision is key. Using a self-centering drill bit can drastically reduce your chances of making mistakes. Here’s why you should consider it:
- Accuracy: With a self-centering bit, you’ll place pilot holes exactly where you want them. This means your hinges will line up perfectly.
- Reduced Frustration: We’ve all been there—drilling, adjusting, re-drilling. With a self-centering bit, you’ll minimize the hassle.
- Professional Finish: A well-placed hinge gives your door a polished look, making it function properly and enhancing the overall appearance.
Honestly, using the right tool can make all the difference between a DIY success and a DIY disaster. Imagine hanging a door only to find it swings the wrong way. A self-centering drill bit helps you avoid rookie mistakes.
Gathering Your Tools and Materials
Before you start drilling, you’ll want to gather a few essential tools and materials. Here’s what you’ll need:
- Self-Centering Drill Bit: Choose one that matches the size of the screws for your hinges.
- Power Drill: Make sure it’s charged or plugged in. Your drill is the engine behind this project!
- Measuring Tape: You’ll need this to measure the exact placement of your hinges.
- Pencil or Marker: For marking the spot where you’ll drill.
- Hinges and Screws: Don’t forget to have these on hand for installation.
Here’s the thing: having everything you need at your fingertips means you can work more efficiently. No one wants to stop mid-project to hunt for a tool. So take a moment to gather your supplies, and you’ll be ready to dive into the fun part.
Measuring for Your Pilot Holes
Now that you have your tools, it’s time to measure for those pilot holes. This step is crucial for ensuring your hinges fit snugly and operate smoothly. Here’s how you can do it:
1. Select the Placement: Typically, hinges are placed about 7 inches from the top of the door and 11 inches from the bottom. Measure and mark these points with your pencil.
2. Mark for the Holes: Once your hinges are in position, use a pencil to mark where the screws will go. You want to be precise here—double-check your measurements to avoid headaches later.
3. Check and Recheck: Before drilling, take a moment to step back and ensure everything looks right. Trust me; it’s worth it.
Measuring accurately may feel tedious, but it prevents you from having to redo your work later. Just think of it as a solid foundation for a well-hung door.
Drilling the Pilot Holes
Now, we’re ready to drill. The excitement is building, but remember, patience is key. Here’s how to get started:
1. Attach the Self-Centering Bit: Insert your self-centering drill bit into the power drill. Make sure it’s secure—nothing worse than realizing the bit came loose halfway through!
2. Position the Drill: Align the drill bit with your pencil mark for the pilot hole. Keep the drill steady. If you’re feeling nervous, take a deep breath.
3. Start Drilling: Slowly press the trigger to start drilling. Let the bit do the work—in other words, you don’t need to force it. Once you’ve drilled through, stop and pull the drill back gently.
4. Check Your Progress: After drilling each hole, check the depth with a screw. It should go in smoothly without any wobble. Adjust if necessary.
Drilling may seem straightforward, but it’s easy to make mistakes. If you notice misalignment, don’t panic. Just backtrack a step or two and realign your approach.
Installing the Hinges
With your pilot holes drilled, it’s time for the fun part: installing the hinges. Here’s a simple guide to get you started:
1. Position the Hinges: Align your hinge with the pilot holes. Make sure everything looks straight and at the right height.
2. Insert the Screws: Take your screws and use your power drill to insert them into the pilot holes. Again, don’t rush it. You want them tight but not too tight, which can strip the wood.
3. Double-Check Alignment: Before securing everything, pull the door open and close a few times to test its movement. Make adjustments if necessary.
4. Finish Up: Once you’re satisfied, finish tightening the screws completely.
You might feel a sense of accomplishment at this stage—after all, you’ve transformed a simple door into a well-functioning element of your home.
Common Problems and Troubleshooting
Even experienced DIYers can run into snags when installing door hinges. Here are a few common issues and how to troubleshoot them:
- Misaligned Hinges: If the hinge isn’t aligned properly, it may cause the door to not close correctly. Simply unscrew and reposition if needed.
- Stripped Screws: If a screw keeps spinning without going in, it could be stripped. Try using a larger screw or wood glue to stabilize it.
- Hinges Not Flush Against the Door: If hinges are sticking out, you might need to chisel out extra space in the wood for a flush fit.
Let’s be honest—every project comes with its own set of challenges. But with some persistence and a bit of improvisation, you can overcome these hurdles. Who knows? You might surprise yourself with your DIY skills!
Final Thoughts
Using a self-centering drill bit for pilot holes in door hinges is a game-changer for any DIY enthusiast. With a bit of preparation and care, you can achieve professional results right at home. Remember to take your time, measure twice, and enjoy the process.
By now, you should feel equipped to tackle your door hinge project confidently. The satisfaction of hanging a perfectly aligned door is worth every moment of effort. Happy drilling!