Not everyone knows what an exterior door stop actually does until it’s causing trouble. But here’s the thing: you don’t need to be a handyman or own a fancy toolkit to identify a damaged exterior door stop or to replace it. Whether your home has a classic wooden Craftsman door or a modern steel entryway, the concept is the same. Let me break down exactly how to spot a problem, fix it yourself, and get your door back in shape—no contractor required.
What Is an Exterior Door Stop and Why Does It Matter?
Exterior door stops are the unsung heroes of your entryway. They’re narrow strips—usually wood, sometimes vinyl or metal—mounted inside the door frame. Their main job is to create a seal when the door closes, keeping out everything you don’t want: cold air, rain, dust, and even insects that would love an open invitation inside.
You might be wondering why such a small piece is so crucial. Honestly, a damaged or missing door stop is like leaving your car window rolled down on a rainy day: it just opens the door (literally) to all sorts of trouble. Over time, even the best quality door stops can get dented from overzealous swings, warped from moisture, or start peeling away from the frame. When that happens, you’ll notice little chills in the winter, higher energy bills, or even rattling noises every time the wind blows.
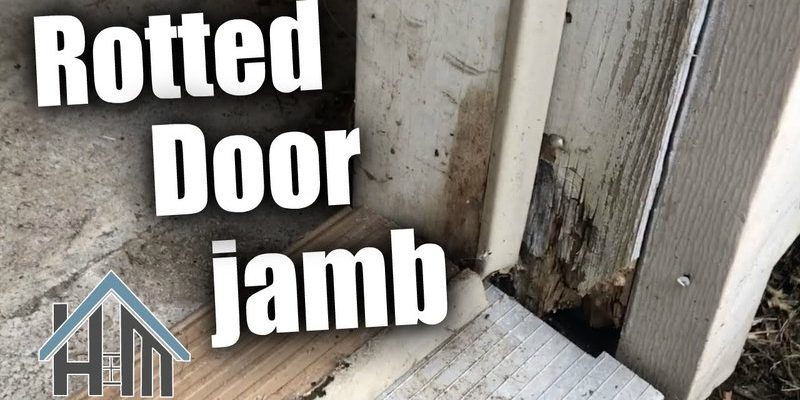
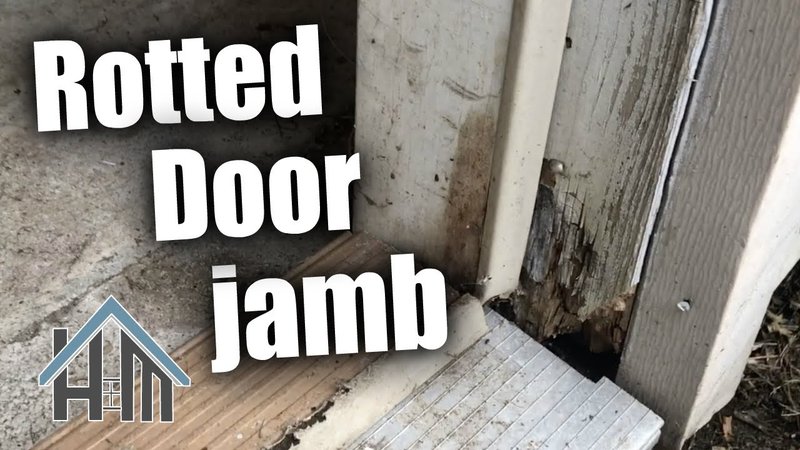
If you ignore a worn-out stop, you’re risking more than just a draft. Water leaks can cause wood rot in the door jamb, and critters can find a way into your home. That’s why spotting the signs of a bad door stop isn’t just handy—it’s essential for keeping your home secure and energy-efficient.
Common Signs of a Damaged Exterior Door Stop
Sometimes the clues are obvious—a chunk of wood missing, or a stop that’s dangling by a nail. But often, the signs of a damaged exterior door stop are subtle and easy to miss. Here’s what you should look out for:
- Drafts and temperature changes: Feel a chill near the door? You might have a gap where the stop has worn or pulled away.
- Visible gaps or cracks: Check for separation between the door and the frame, especially where the stop should meet the door edge snugly.
- Difficulty closing or locking: If your door suddenly needs a shove to shut, or the lock doesn’t line up right, a warped or loose stop could be in the way.
- Peeling paint, rot, or mold: Moisture getting in through a bad seal can cause visible damage to the frame and stop.
- Buzzing insects or rodent evidence: It might sound dramatic, but a small gap is all it takes for pests to find their way in.
Some homeowners only notice a problem after a heavy rainstorm or during the first cold snap. If you’re unsure, hold your hand next to the closed door and move it along the frame. If you feel air, chances are good your exterior door stop needs attention.
Tools and Materials You’ll Need for the Job
Before you start pulling off your door stop, gather the right tools and supplies. You don’t need a professional workshop, but having the basics on hand will make the job a breeze.
- Pry bar or utility knife: For removing the old, damaged stop cleanly without wrecking the door frame.
- Hammer and finish nails: To secure the new stop firmly in place.
- Measuring tape and pencil: Accuracy matters—measure that frame before you cut anything.
- New exterior door stop material: Most hardware stores stock wood, vinyl, or composite stops in standard lengths. Bring a sample if you’re unsure.
- Wood glue or construction adhesive (optional): Adds extra holding power if needed.
- Paint or wood finish: To match the new stop to your existing door frame for a seamless look.
- Sandpaper and caulk: For smoothing rough edges and sealing gaps once the job’s done.
Let me say—you don’t have to break the bank. If your door stop is a plain painted strip, a basic wood replacement will do. Just don’t forget to check for nails or screws when removing the old one; some doors, especially vinyl or steel brands, use screws for extra security.
Step-by-Step: How to Remove a Damaged Exterior Door Stop
Replacing an exterior door stop isn’t rocket science, but taking it step by step prevents headaches later. Here’s how to get that old, worn-out stop off without damaging your frame:
- Inspect the stop: Look for finishing nails or screws and use your utility knife to score along the paint seam—this helps prevent chipping or splintering the trim paint.
- Loosen gently: Starting at one end, slide your pry bar or putty knife behind the stop and gently wiggle it loose. If you feel resistance, work slowly along the length to avoid pulling off chunks of frame.
- Remove fasteners: As the stop comes free, carefully pull any nails or screws remaining in the frame. If they’re stubborn, use pliers to avoid splitting the wood.
- Clean the surface: Scrape away any old caulk, adhesive, or leftover wood. The smoother the frame, the easier it’ll be to fit the new stop snugly.
If your home is older, expect some surprises—like multiple paint layers sealing the stop in place, or hidden nails. Just go slow, and don’t rush the process. You’re prepping the stage for a perfect finish.
Choosing the Right Replacement Door Stop
All door stops do the same basic job, but the material, size, and shape can make a big difference. Not sure what to pick? Here’s what you need to know before heading to the hardware store:
- Material matters: Most homes use wood stops, which are easy to cut and paint. Vinyl and metal versions resist weather better, but might not match older, wooden frames as well.
- Pre-primed or bare: If you’re painting, buy pre-primed wood to save time. Otherwise, you’ll need to sand and prime before painting.
- Profile and fit: Take a small piece of the damaged stop with you to match the width, thickness, and shape—door stops aren’t always standard size, especially on custom or older doors.
- Energy efficiency upgrades: Some stops come with built-in weatherstripping for added insulation. These can help cut down on drafts and keep your home quieter.
Here’s the thing: If you can’t find an exact match, go slightly larger and trim down as needed. It’s much easier to shave off a bit of wood than fill a gap. And if you want to get fancy, you can even upgrade to a stop with integrated rubber weather seals for a pro-level finish.
How to Install a New Exterior Door Stop
Now for the fun part—putting everything back together so your door works like new. Here’s how to install that shiny new door stop:
- Measure twice, cut once: Use your tape measure to get the exact length for each side of the door frame. Mark it out on your new stop and cut cleanly with a handsaw or miter saw.
- Test the fit: Place the cut piece in position without nails just to double-check the fit. The stop should hug the door gently without pushing it out or leaving a gap.
- Attach in place: Start at the top, nailing every 10–12 inches. If you’re using glue, add a thin bead along the back. Tap the stop in place with a hammer, being careful not to dent the wood.
- Sealing and finishing: Fill nail holes with putty, smooth rough spots with sandpaper, and caulk any seams. Paint or finish to match the rest of your frame. Let it dry, and you’re done!
You might be tempted to eyeball it, but don’t skip the test fit—especially if your door frame isn’t perfectly square. Taking an extra minute here means the door will close smoothly and seal tight.
Tips for Maintaining Your Exterior Door Stop
Here’s a truth most people (even experienced DIYers) forget: once you’ve replaced a damaged exterior door stop, keeping it in good shape is a lot easier than fixing it all over again every year. A few small habits will add years to your new install.
- Paint touch-ups: Weather and sun can wear out paint fast. Check for chips and touch up as needed to keep moisture out.
- Inspect after storms: Heavy rain or wind can loosen nails or cause warping. Give your door stop a quick look when the weather passes.
- Clean debris regularly: Leaves and dirt collecting in the door jamb can trap moisture and cause rot. Sweep it out whenever you clean the porch.
- Check for pests: Termites and carpenter ants love damp, unprotected wood. If you see signs of chewing or sawdust, treat it early.
Honestly, just including the door stop in your seasonal home inspection will help you catch problems before they become headline news for your to-do list.
Comparing Universal Door Stops vs. Custom Replacements
Not all doors—or door stops—are created equal. If you’re standing in the hardware aisle, you’ll see options labeled as “universal” or “fit most doors.” Should you grab one, or is it better to match the original exactly?
- Universal door stops: These are convenient and often cheaper, designed to fit standard door frames. Perfect for newer homes or quick fixes, especially if appearance isn’t a top concern.
- Custom replacements: Best for older homes, historic properties, or when you want a seamless look. These might require extra measuring or a bit of trimming, but you’ll get a tighter fit and preserve the home’s original style.
Let me explain: There’s no harm in using a universal stop if it fits well and matches your door’s vibe. But if you’re dealing with a unique frame or want that “always been there” look, custom is the way to go—even if it means asking someone at the store to cut it to size or doing it yourself at home.
Final Thoughts: Keep Your Door Stops Working Like New
Fixing a damaged exterior door stop might seem like a tiny project, but it packs a big punch when it comes to comfort, security, and even your energy bill. Once you know what to look for, it’s hard to ignore those little signs your door isn’t sealing right. The good news is, with a handful of simple tools, a steady hand, and a little patience, anyone can identify and replace a worn stop—and make their door work like new again.
The next time you hear a rattle in the wind or feel that cold draft, remember that your exterior door stop is probably trying to get your attention. Give it a little care and it’ll keep doing its quiet job for years—no fancy skills, big budgets, or contractors necessary.