Here’s the thing: Fixing a sagging door can seem intimidating if you’ve never touched a hinge in your life. But adjusting most exterior doors (including popular brands like Masonite, Jeld-Wen, or Andersen) doesn’t require fancy tools or a full afternoon. With a little patience and a few simple steps, you can get your door swinging right and sealing tight. Let me walk you through exactly how to adjust an exterior door that’s sagging, focusing on hinge adjustment—the most common solution for this headache.
What Causes an Exterior Door to Sag?
Honestly, doors take a lot more abuse than we realize. Think about it: Every time you swing your front door open or slam it shut, you’re putting stress on the hinges and the frame. Add in changes in humidity, shifting foundations, or even kids hanging off the doorknob (yep, it happens), and it’s no wonder doors sometimes start to sag.
Sagging usually means the door is no longer sitting square in its frame. Maybe you see a gap at the top corner, or the latch doesn’t line up right anymore. Sometimes, the bottom corner rubs against the threshold or floor. Each of these is a symptom of the same basic problem—gravity is slowly pulling the door downward, or the hinges have loosened up over time.
One thing to keep in mind: It’s not always just the *hinge adjustment* at fault. Sometimes, screws loosen or pull out, wood swells and shrinks, or even the house settles slightly. But for most people, tweaking the door hinges almost always solves the problem. If you know what to look for, it’s usually a quick fix—no need to call in a pro unless your entire frame is warped or rotten.
How to Spot Signs of a Sagging Door
Before you break out your screwdriver, take a closer look at your exterior door. You can almost always spot a sagging door by a few telltale signs. First, open and close it slowly. Listen for scraping along the bottom or sides, or pay attention if the door sticks halfway through its swing.
Next, look at the gap between the door and the frame (called the reveal). Is it wider at the top corner, but tiny or rubbing at the bottom? That’s a classic sign of door sag. You might also notice the latch or deadbolt doesn’t line up with the strike plate, making it tough to lock up securely. Sometimes, you can even see daylight peeking through—never great for your energy bill or security.
Another quick trick: Stand outside and lift up gently on the doorknob. If you feel the door move up and down, or see the hinges shifting in the jamb, you’re looking at loose hinges. These little clues help you diagnose what’s going on and confirm if hinge adjustment is the right path forward.
What Tools and Materials Do You Need?
Let me explain what you’ll actually need for this project. Most exterior door hinge adjustments require only basic hand tools, which you might already have in the garage or kitchen drawer. Here’s a simple list:
- Phillips or flathead screwdriver (depending on hinge screw type)
- Drill/driver (optional, for stubborn screws)
- Wooden toothpicks or matchsticks
- Wood glue
- Hammer (helpful for tapping hinge pins)
- Shims or playing cards (for temporary support)
- Extra 3-inch wood screws
You might be wondering about fancy specialty tools. Don’t sweat it—most branded exterior doors like Masonite or Andersen use standard hinges and screws, so you won’t need anything weird. Just double-check your screws and hinges before starting, so you know the right screwdriver head.
If your hinges are painted over or rusted, you might also want a utility knife or penetrating oil. This makes it easier to unscrew and adjust things without damaging the surrounding wood or finish.
Step-by-Step: How to Adjust Exterior Door Hinges
Here’s where the real magic happens—time to get hands-on. Adjusting a sagging exterior door is often about tightening, resetting, or shimming the hinges. Take your time and follow these steps slowly, especially if this is your first door tune-up.
Step 1: Tighten the Hinge Screws
Start with the top hinge. Using your screwdriver, check every screw on the door and frame side of the hinge. If any feel loose, tighten them firmly. Sometimes, just tightening solves the sag completely.
Step 2: Replace Stripped Screws
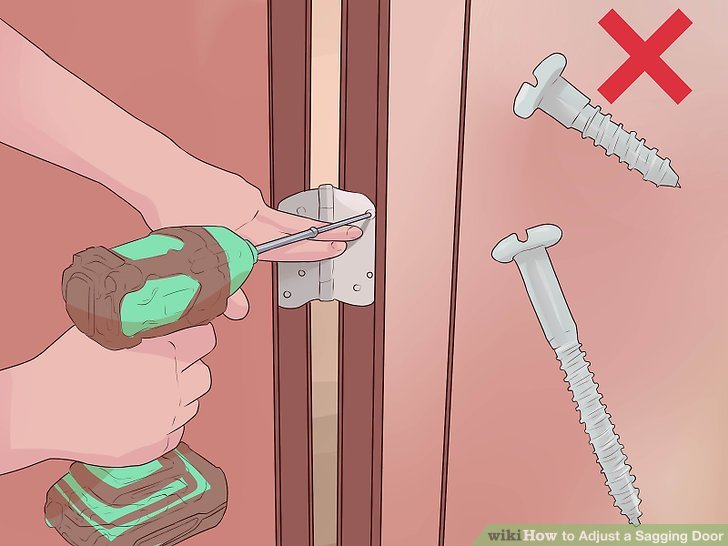
If a screw spins but won’t grab, remove it. Dip a wooden toothpick or two in wood glue, stuff them into the stripped hole, and then break off the excess. Let the glue set for a few minutes, then drive a new screw in. For extra support on exterior doors, use a 3-inch wood screw into the frame—this can reinforce the hinge and help lift the door.
Step 3: Check Hinge Placement
Make sure the hinge leaves (the flat metal plates) are flush with the door edge and jamb. If a hinge is deeply sunken, you might need to add a shim behind it—try a thin slice of cardboard or a playing card—until the hinge sits just right.
Step 4: Adjust the Door Position
Open the door half way. Lift gently on the knob to see how much play you have. If the gap at the top narrows as you lift, your adjustments are working. If not, repeat the steps above or try swapping a long screw into the top hinge. This pulls the door tighter toward the frame and reduces sag.
Pro tip: If your hinge pins are squeaky or tough to remove, tap them out with a hammer and a small nail, then lubricate with a bit of oil before reinstalling.
What to Do If Hinge Adjustment Isn’t Enough
You’ve tightened every screw and shimmed the hinge but the door still drags—what now? Sometimes, the problem goes beyond a simple adjustment. In older homes, the door frame itself can shift, or the threshold may have warped with age or moisture. That’s when you need to get a little more creative.
One option is to add or replace the weatherstripping. If your door still leaks or feels out of alignment, new weatherstripping can cover small gaps and improve the seal. Another fix: plane or sand the bottom of the door, but only as a last resort and only if you’re comfortable with woodworking.
If you spot major rot or damage in the door frame, or if you can see the entire jamb pulling away from the wall, it might be time to call in a pro. Major frame repairs or door rehanging can be tricky, and honestly, sometimes it’s worth it for your peace of mind and home’s security.
Comparing Quick Fixes vs. Full Hinge Reset
Let’s say you’re in a hurry and just want your door to close tonight—what’s the fastest option? Tightening screws and swapping in a long 3-inch screw for the top hinge almost always gives you a quick boost, pulling the door back into place without much fuss.
But here’s the tradeoff: If you only patch the loose screws, you might be adjusting the door again in six months. A full hinge reset—removing stripped screws, stuffing the holes, reinstalling the hinge, and adding shims if needed—takes a little longer but will give you a much more permanent fix.
Some people try using a universal door hinge repair kit. These sometimes work in a pinch, especially on older doors or unusual brands, but in my experience, nothing beats the reliability of good wood screws and careful hinge placement. If you invest a little extra time now, you’ll be glad you did every time your door glides open with zero drama.
How Proper Hinge Adjustment Helps with Security and Efficiency
It’s easy to think of adjusting a sagging door as purely cosmetic, but there’s more at stake than just looks. A misaligned or loose entry door actually puts your home at risk in a couple big ways.
First, an exterior door that doesn’t close properly makes it easier for intruders to force their way in—or in some cases, even just walk in if the latch won’t set! Second, any gaps or misalignment will let cold air, rain, and even bugs slip through, driving up your heating and cooling costs and making your home less comfortable.
Here’s the good news: A well-adjusted door with tight hinges creates a proper seal, keeps your locks working smoothly, and adds a layer of protection to your home. That’s why it’s always worth taking the time to get hinge adjustment right, especially before cold weather hits or you’re expecting guests.
Maintenance Tips to Keep Your Door Hanging Straight
Now that your exterior door swings like new, it’s smart to keep it that way with a few simple habits. Every few months, check the hinge screws with a quick twist of the screwdriver. If you feel the door starting to drag or notice new drafty spots, address them right away—it’s much easier to fix a minor sag before it becomes a bigger problem.
Keep the hinges clean and lubricated, especially if you live somewhere humid or near salt air. A light oil or even a little petroleum jelly on the hinge pins can keep things moving smoothly and prevent that classic creak (think haunted house, not cozy home).
Finally, don’t ignore changes in the way your door moves. If things suddenly get much worse, it could point to a bigger issue with your door frame or house settling. Regular maintenance isn’t glamorous, but it saves money and hassle in the long run.
Wrapping Up: Your Door Is Back in Business
Living with a sagging exterior door can be frustrating, but fixing it is well within reach for most homeowners. Once you understand how hinge adjustment works, the process is straightforward and doesn’t require fancy tools or pro-level skills. By taking the time to tighten, reset, or shim your door’s hinges, you’ll get smoother operation, better security, and a tighter, more energy-efficient seal.
Whether you’re tackling a Masonite, Andersen, or any other brand of exterior door, these steps will help you get things back on track. Stay patient, keep your tools handy, and remember—most home fixes are just a series of small, logical steps. Now your door should close like a dream, no annoying drag or draft in sight.
