Here’s the thing: discoloration on a clear coated kick plate isn’t just ugly—it can hint at bigger problems, like damage to the underlying metal. Dealing with it might sound intimidating, especially if you’re new to DIY. The good news? With a bit of patience and a few supplies, you can bring that kick plate back to its original glory. Let’s roll up our sleeves and dig in.
Why Do Clear Coated Kick Plates Get Discolored?
Kick plates are the first line of defense for doors, catching scrapes from shoes, bags, and even pets. But their clear coat—the thin, protective layer that gives a glossy shine—can react badly over time. Sunlight is a big culprit; UV rays can break down the chemicals in the coating, causing yellowing or cloudiness. Moisture and cleaning products aren’t innocent either. Spraying harsh cleaners or letting water pool at the base of your door can stain or dull the finish.
Think about that high-traffic front door. If it gets hit with rain and direct sun daily, the clear coat takes a beating. Even with brands like Schlage or Baldwin, which use quality materials, no kick plate is immune to wear. Some lower-end plates skimp on coating quality, making them even more likely to discolor after a couple of rough seasons.
Honestly, it’s not just about looks. When the clear coating fails, the metal underneath (usually brass, stainless steel, or aluminum) can start to corrode or pit. That’s why it matters to address discoloration early—not just for curb appeal, but to avoid bigger problems down the road.
Spotting Discoloration: What To Look For
You might be wondering, “Is what I’m seeing really discoloration, or just dirt?” It’s a fair question. Discoloration on a clear coated kick plate often shows up as:
- Yellow or brown patches—Usually from sun or oxidation.
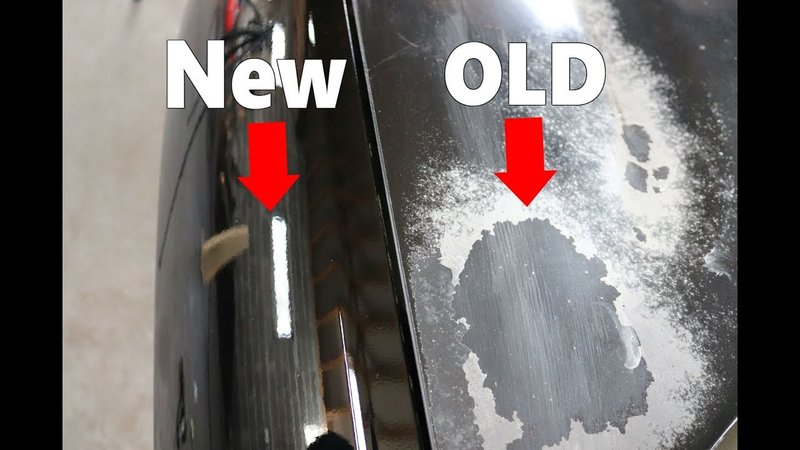
- Milky cloudiness—A hazy look, almost like someone smeared lotion across the surface.
- Peeling or bubbling—The clear coat starts to lift, showing raw metal or exposing spots to the elements.
To check if it’s really in the coating—not just on it—try gently rubbing the spot with a little soap and water. If the stain sticks around, you’re probably dealing with a damaged clear coat. Sometimes these damaged areas also feel rougher to the touch, while healthy clear coat feels smooth and slick.
I once had a friend with a Baldwin kick plate swear her “stain” was a weird kind of mud, until we realized it hadn’t budged after a full scrub. That’s your sign it’s time for real repair, not just a quick clean.
Gathering Your Supplies For Repair
Tackling a discolored kick plate isn’t much different from other small DIY fixes, but it does need the right tools. Before you start, gather these supplies:
- Microfiber cloths—To avoid scratching the surface.
- Mild soap or dish detergent—For pre-cleaning.
- Fine sandpaper (800–1500 grit)—For smoothing rough, damaged clear coat.
- Rubbing alcohol or acetone—To remove oils and prep for recoating.
- Painter’s tape—To protect surrounding door areas.
- New clear coat spray or brush-on (suitable for metal)—Look for brands made for outdoor hardware.
- Rubber gloves and a mask—So you don’t breathe fumes or get chemicals on your skin.
If your kick plate is removable (many are just screwed in), take it off the door first. It’s way easier to work on a flat surface and you’ll avoid drips or mess on your door itself. But if it’s fixed or you’re not comfortable removing it, just take extra care taping the edges.
Step-By-Step: Repairing Discoloration On A Clear Coated Kick Plate
Fixing discoloration isn’t rocket science, but you’ll get the best results by taking it slow and steady. Here’s how you can patch things up:
1. Clean The Surface Thoroughly
Start by washing the kick plate with mild soap and water. Dry it well with a clean cloth—don’t leave moisture behind. This step matters, because any leftover dirt or oil will mess with the next stages.
2. Sand The Affected Area
Once dry, gently sand the discolored or damaged spots using fine sandpaper (800–1500 grit). Your goal isn’t to strip everything down to bare metal—just to smooth out the cloudy or peeling sections. Take your time: quick, light circles usually work best. Wipe away dust with a damp cloth.
3. Remove Residue With Alcohol Or Acetone
Dab a clean cloth with rubbing alcohol or acetone, then wipe the sanded area. This will get rid of tiny oils and make sure your new coating sticks. Let it dry fully.
4. Tape Off The Surrounding Area
If the plate’s still on the door, use painter’s tape to cover the door edges and hinges. Good prep here saves a lot of headaches later.
5. Apply New Clear Coat
Spray or brush on a thin, even layer of clear coat, following the product’s instructions. Don’t rush—use slow, overlapping strokes if spraying, or light, straight brush strokes if painting. Most products need a few coats. Wait for each layer to dry before adding the next (10–30 minutes is standard, but check your can).
6. Let Everything Cure
Once you’re happy with coverage, let the clear coat cure for a few hours, or overnight if possible. Don’t touch or bump it during this time. Peel away tape carefully.
Tip: For a universal approach, always check if the clear coat you use is compatible with your kick plate’s metal—some coatings work better on brass, others on stainless steel.
When To Replace Instead Of Repair
Sometimes, honestly, no amount of sanding and recoating will save a kick plate that’s too far gone. If the metal underneath is badly corroded, pitted, or warped, a new clear coat won’t fix structural problems. Signs you should just replace the plate include:
- Large sections of missing or bubbling clear coat that won’t smooth out
- Deep scratches, gouges, or dents in the metal itself
- Multiple failed repair attempts
Replacement isn’t as intimidating (or expensive) as it sounds. Most kick plates are sold in standard sizes. If you’re swapping brands—say, from Schlage to Baldwin or vice versa—just double-check screw hole placement to avoid surprises during installation. Universal kick plates can be trimmed or drilled to fit most doors if you run into an odd size.
Preventing Future Discoloration
Now that you’ve brought your kick plate back to life—or installed a shiny new one—you’ll want to keep it that way. The best defense is regular, gentle cleaning. Skip harsh chemicals. Stick to mild soap and water, and always dry the surface to prevent water spots.
A quick polish with a soft microfiber cloth every couple of weeks helps the clear coat stay glossy and resist minor scuffs. If your door gets full sun all day, you might want to add a door awning or at least close curtains during the hottest hours. Even with top brands like Baldwin or Schlage, prolonged UV and moisture will chip away at that fresh finish.
If you’re handy, a light re-coat once a year can work wonders to seal out moisture and UV rays. Think of it like waxing a car—it extends the life of the finish and saves you bigger headaches later.
Comparing DIY Repair To Professional Restoration
You might be sizing up your kick plate and thinking, “Can I really tackle this?” For light discoloration or clear coat issues, a DIY approach is absolutely doable. The steps above don’t require special skills—just patience and a few hours on a sunny afternoon.
That said, for historic homes or custom decorative kick plates (especially those with intricate etching or two-tone finishes), it’s worth weighing the pros and cons of a professional restorer. They can remove deep corrosion, match specialty coatings, and even re-engrave details. But for the average homeowner and most door hardware from brands like Schlage or Baldwin, DIY is more than enough.
Remember: Sometimes the most valuable thing you can bring to a repair is just a little willingness to try. Mistakes can be sanded out, and a new clear coat is always just a spray away.
Wrapping It All Up
Bringing a clear coated kick plate back from the brink of discoloration is a satisfying, manageable project—no matter your experience level. Tackling it yourself means you’ll save money, learn a few new skills, and get to enjoy that “I fixed it!” moment every time you walk through your door. With a little attention, these everyday fixtures can keep your entryway looking sharp for years to come. Just remember: regular care beats major repairs every time. So, keep that clear coat fresh, and your kick plate will keep doing its job—quietly, reliably, and without stealing the spotlight from the rest of your home.