This method might sound a bit technical, but it’s easier than it seems. Think of it like using a special tool to reshape the hole, so your screws have something to hold onto again. It’s like giving the hinge a fresh start, even if it’s just for the time being. Whether you’ve got a standard door hinge or something a bit more fancy, this guide will walk you through the steps, so you’ll feel like a pro in no time.
Understanding Stripped Hinge Holes
Before diving into the solution, let’s unpack what it means when we talk about stripped hinges. Stripped hinge holes occur when the screw threads inside the wood or metal become worn out. Think of it as a fabric losing its fibers; without those threads, the screw can’t grip properly. You might notice this when your door squeaks or doesn’t close right because it’s hanging at an odd angle.
Why does this happen? Over time, repeated opening and closing can wear down the screw holes, especially if the screws weren’t installed correctly in the first place. Sometimes, it’s just the age of the material that leads to this wear and tear. You might also be wondering, “Is this a common issue?” Absolutely! It’s something many people encounter over the years, so you’re not alone.
Understanding the problem helps set the stage for a solution. When you know what you’re dealing with, it makes it easier to approach repairing it. Now, you might be curious about what tools you’ll actually need for this fix.
Tools You’ll Need
To tackle this repair, you won’t need a whole toolbox, but having the right tools on hand is essential. Here’s what you’ll need:
- Screwdriver Bit: A screwdriver bit that matches the size of your screws is crucial. If you’re unsure, a
- Drill: An electric drill simplifies the process. If you don’t have one, a manual screwdriver can work, but it’ll take longer.
- Wood Glue or Toothpicks: If the hole is particularly stripped, you might want something to fill the gap temporarily. Wood glue or some toothpicks can do the trick.
- Safety Glasses: Protecting your eyes is a must; it’s always better to be safe while doing any DIY work!
Once you have these tools ready, you’re set to proceed. Honestly, you might find that doing it yourself saves both time and money, and it feels pretty satisfying too!
Preparing the Area
Now, let’s get your workspace ready. First, make sure the door is at a good height to work on. If you’re working on a lower hinge, consider propping the door up with something sturdy to ensure it won’t swing out unexpectedly.
Next, clear away any obstructions around the hinge area. This ensures you can work unobstructed, and you won’t accidentally scratch or damage the door or surrounding surfaces. If the screws are still in the hinge, carefully remove them using your screwdriver bit. Keep them in a small container so they don’t get lost; trust me, you’ll want those for later.
After removing the screws, take a close look at the hinge and the stripped holes. If you notice debris or old wood shavings, clean them out gently to prepare for your repair. Here’s the thing: the cleaner the area, the better your repair will hold.
Using the Screwdriver Bit to Ream Out the Holes
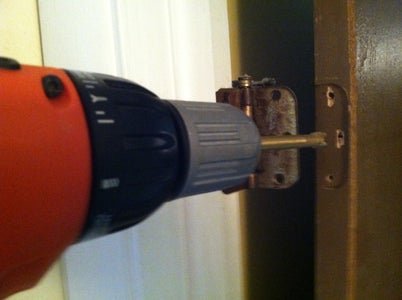
This is where the magic happens. With your drill ready and the area clean, it’s time to ream out those stripped hinge holes. Here’s a simple step-by-step on how to do this:
1. Select the Right Bit: Choose a screwdriver bit that fits the existing screws snugly. If you’re unsure, test it lightly in the hole to see if it fits.
2. Drill with Care: Insert the screwdriver bit into the drill. Start slowly; you want to create a smooth reaming effect. Gently push the bit into the hole, working it back and forth to widen it slightly. This action reshapes the hole so it can grip the screw better.
3. Check Your Progress: After a few moments, stop and check the hole. You’re looking to create a slightly wider opening without overdoing it. You might feel resistance; that’s normal, but if you feel too much, back off and take it slow.
4. Remove Any Debris: Once you’ve finished, take a moment to clean out any shavings or dust that’s fallen into the hole. You want a clear area for your next step.
Using a screwdriver bit to ream out these holes might sound a bit unconventional, but it’s a clever way to temporarily fix the issue, giving the screws a second chance to hold.
Filling Holes for Extra Grip
If you find that the holes are still too loose after reaming, it may be time to fill them for added grip. This step can provide a more long-term solution until you choose a more permanent fix later. Here’s how to do it:
– Wood Glue Method: Apply a small amount of wood glue into the hole. Then, insert a few toothpicks into the hole, breaking them off so they’re flush with the surface. This fills the hole, giving the screw something to grip onto. Allow the glue to dry according to the package instructions.
– Toothpick Method Only: If you don’t have wood glue, you can insert toothpicks directly without glue. Just pack them in firmly, and then reinsert the screw. The toothpicks will create a tighter grip.
This step is simple but effective. You might even find it’s a technique you want to keep in your back pocket for future repairs.
Reinstalling the Hinge and Screws
Now that your holes are ready, it’s time to put everything back together. This part is straightforward:
1. Align the Hinge: Position the hinge back in place, aligning it correctly with the reamed holes.
2. Insert the Screws: Take your screws and carefully insert them back into the holes, applying even pressure. Don’t rush—let the screwdriver do the work without stripping the screws again.
3. Tighten Carefully: Once the screws are in, tighten them enough to hold the hinge securely, but avoid over-tightening. You don’t want to strip the holes you just repaired!
Once you’ve secured everything, open and close the door a few times to check for smooth operation. If all goes well, you’ve successfully reamed out those stripped hinge holes and restored function.
Why This Matters
Understanding how to use a screwdriver bit to ream out stripped hinge holes can save you time and money on repairs. While this method is temporary, it’s a real lifesaver when you need a quick fix. Plus, knowing how to tackle these minor repairs empowers you as a homeowner.
Let’s be honest: nobody enjoys dealing with door issues, but having a few DIY skills makes life a lot easier. Next time your door begins to sag or squeak, you’ll feel ready to tackle it head-on. Remember, each small project builds your confidence and skills.
In conclusion, learning how to use a screwdriver bit to ream out stripped hinge holes is a practical skill that can save you hassle down the line. With just a few tools and some patience, you can restore your door’s functionality temporarily while planning a more permanent fix. Now, go ahead and tackle that door—you’ve got this!