When your door doesn’t latch properly, it can lead to all sorts of problems—from increased energy bills due to drafts to security issues. Imagine trying to watch a movie while your front door rattles every time the wind blows! It’s not just annoying; it can be a sign it needs a little TLC. For this guide, we’ll keep it simple and straightforward as we walk you through adjusting your door latch with a weatherstripped door.
Let’s get started on making your door snugger, so you can enjoy peace and comfort in your home.
Why Your Door Latch Matters
You might be wondering why adjusting your door latch is such a big deal. Well, think about it: a latch is what keeps your door securely closed. If it doesn’t align well with the strike plate (the metal piece on the door frame), you’re in for some trouble. A poorly aligned latch can cause:
- Drafts: Gaps mean drafts, and that’s money wasted on heating or cooling your home.
- Noisy Doors: A door that rattles or squeaks can be quite distracting.
- Security Risks: If your door isn’t closing properly, it’s not as secure as it should be.
In short, adjusting your door latch is essential for comfort and security. With just a little effort, you can improve your door’s performance and keep your space cozy.
Gathering Your Tools
Before diving into adjustments, you’ll want to ensure you have a few basic tools handy. Here’s what you’ll need:
- Screwdriver: A Phillips or flathead, depending on your door latch screws.
- Measuring Tape: To check alignments accurately.
- Level: Useful for making sure your door is hanging straight.
- Chisel: If you need to deepen a slot for a better fit.
Having the right tools makes a world of difference, trust me. Just like cooking without a spatula can lead to a messy kitchen, working without these basics can make the job harder and longer than it needs to be.
Check Your Door Alignment
Before you start adjusting the latch itself, it’s wise to check if the door is hung correctly. Sometimes, the problem isn’t the latch but rather how the door sits in its frame. Here’s a quick way to check:
1. Close the Door: Gently pull the door closed and observe any gaps between the door and the frame.
2. Look for Uneven Spaces: If one side is higher or lower than the other, you might need to adjust the hinges.
3. Use a Level: This can help determine if the door is straight. A door that isn’t level may affect how the latch engages with the strike plate.
Taking these steps can help you spot issues before you start adjusting the latch itself.
Adjusting the Latch Position
If your door is aligned well but still doesn’t latch properly, adjusting its position might be necessary. Here’s how to do it:
1. Remove the Latch Screws: Use your screwdriver to take out the screws holding the latch in place.
2. Move the Latch: Carefully tilt or shift the latch up, down, or sideways to see how it best fits with the strike plate.
3. Reattach the Latch: Once you’ve found the right spot, screw the latch back in securely.
Here’s the thing: this might take a little trial and error. You want to find that sweet spot where the latch easily engages without forcing the door shut.
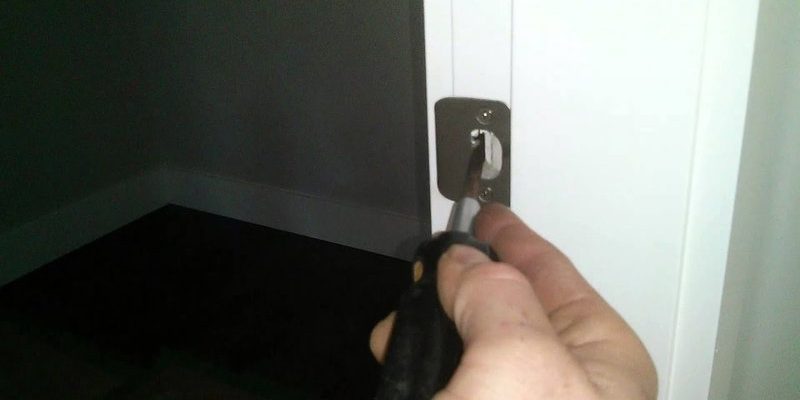
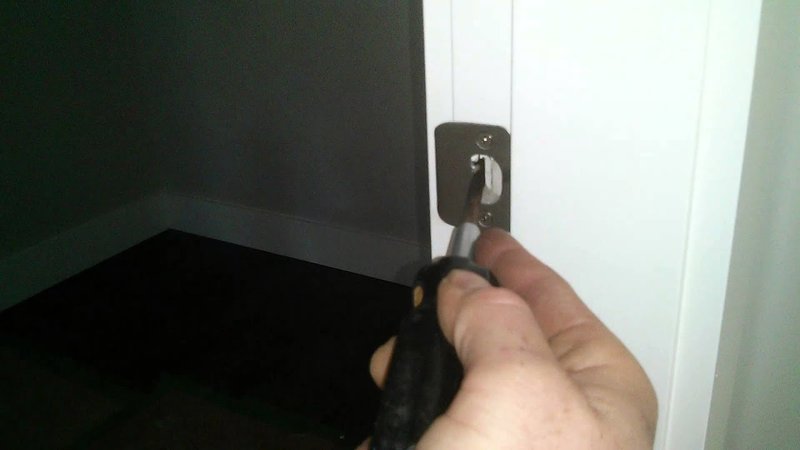
Adjusting the Strike Plate
Sometimes, the issue lies not with the door latch but with the strike plate. If it isn’t lined up properly, the latch won’t catch. To make adjustments, follow these steps:
1. Loosen the Strike Plate Screws: Use your screwdriver to gently loosen the screws without completely removing them.
2. Shift the Plate: Move the plate slightly up, down, or sideways to see if this allows for a better latch fit.
3. Secure the Plate: Once it’s in the right position, tighten the screws back down.
It might feel a bit like a puzzle, but with patience, you’ll find what works.
Test the Fit
After making adjustments, it’s important to test the fit. Here’s how to do that effectively:
1. Close the Door: Gently shut the door to see if the latch engages with the strike plate smoothly.
2. Listen for Clicks: You should hear a soft click when the latch catches. If not, you may need to adjust again.
3. Check for Gaps: Make sure there are no noticeable gaps between the door and frame.
Testing your work is just as important as the adjustments themselves. It’s that final check to ensure everything is snug and secure.
Maintaining Your Weatherstripping
While adjusting the latch is crucial, don’t overlook the weather stripping itself. Over time, it can wear out or get compressed, which may impact how snug your door closes. Here’s what to keep in mind:
- Inspect Regularly: Check for tears or gaps in the weatherstripping. If it looks worn out, consider replacing it.
- Clean the Area: Dust and debris can build up, making it harder for the door to seal properly. Keeping things clean ensures better performance.
- Choose the Right Type: There are various types of weather stripping—foam, rubber, or vinyl. Each has its own benefits, so pick what fits best for your needs.
Maintaining your weatherstripping will help protect your adjustments and keep your home cozy. A sound door latch paired with good weather stripping equals a comfy space.
Final Thoughts
Adjusting your door latch for a snug fit with a weatherstripped door might seem daunting at first, but it’s all about taking it step by step. With a little TLC and some simple tools, you can make your door feel more secure and comfortable.
Remember, a properly fitting door isn’t just about looks—it’s also about efficiency and security. By ensuring that latch and strike plate work harmoniously, you’ll cut down on drafts and keep unwanted guests out. So grab your tools and start enjoying a more snug door today!